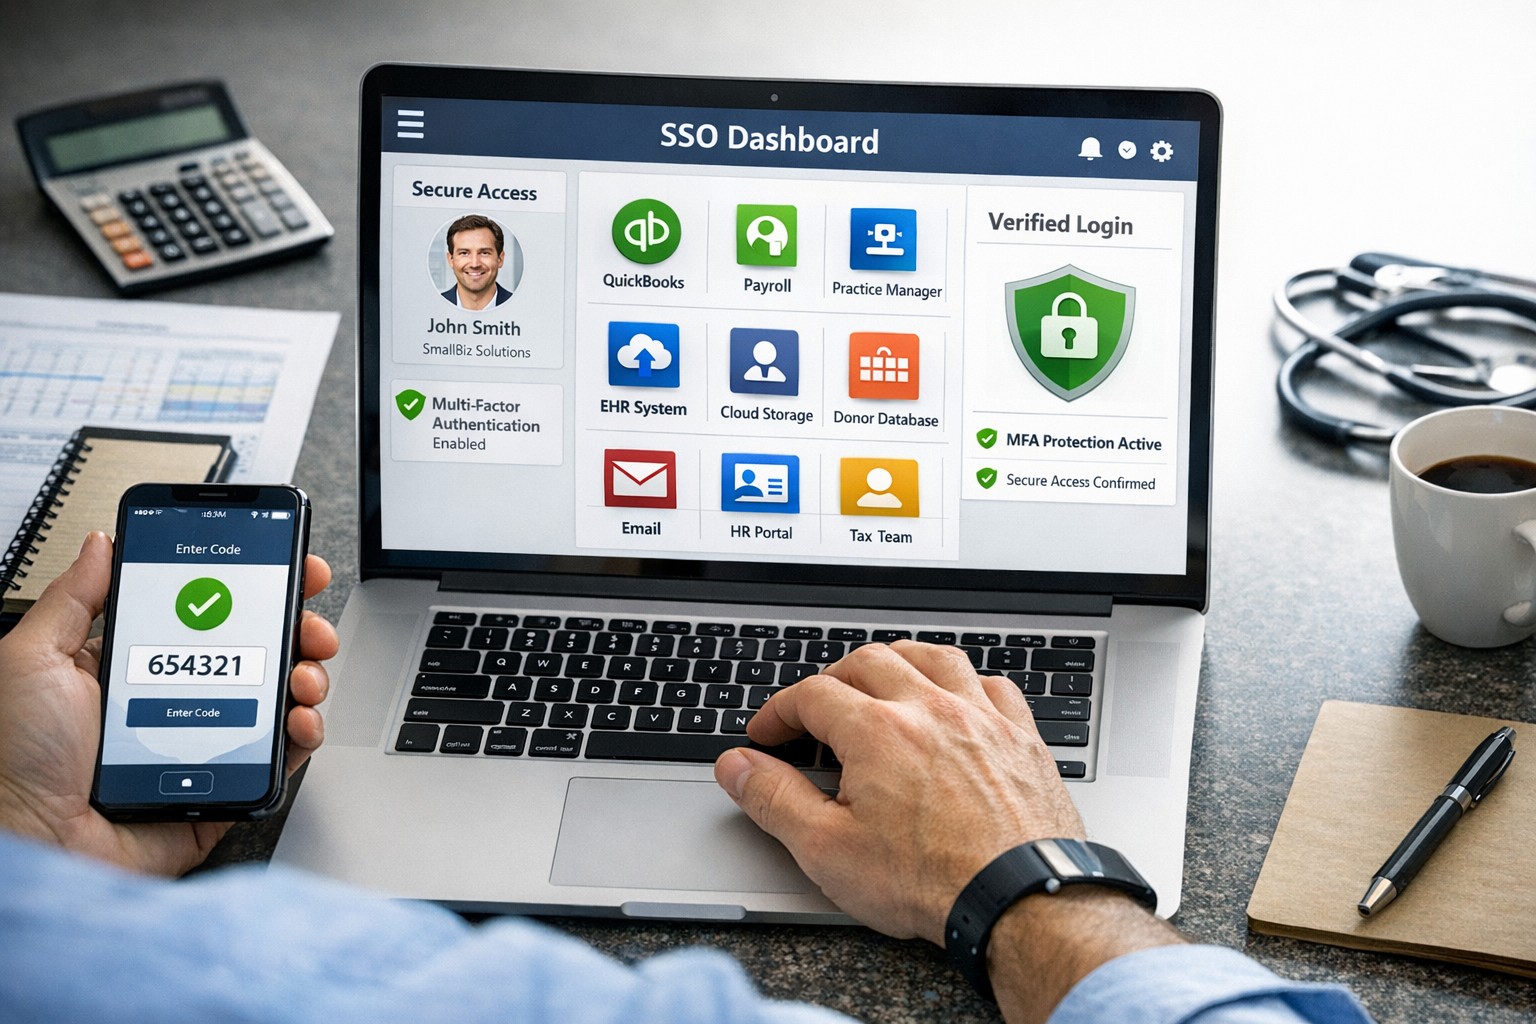
SSO for BYOD provides secure, convenient single sign-on access across apps on personal devices for small business teams.
Individuals and organizations rely heavily on various online platforms and services, the need for a secure and convenient way to access these resources is paramount. This is where SSO Single Sign-On comes into play. SSO Single Sign-On is a powerful authentication method that allows users to securely sign in to multiple applications and platforms using just one set of credentials. In this article, we will explore the benefits of SSO Single Sign-On, its implementation, and how it enhances security while streamlining the user experience.
Understanding SSO Single Sign-On
What is SSO Single Sign-On? SSO Single Sign-On is an authentication process that enables users to access multiple applications and platforms using a single set of login credentials. With SSO Single Sign-On, users only need to remember one username and password, eliminating the hassle of managing multiple credentials for different services. This not only saves time but also enhances convenience for users.
How does SSO Single Sign-On work? SSO Single Sign-On works by establishing a trust relationship between an identity provider (IdP) and the various service providers (SPs). When a user attempts to access a service, the IdP verifies the user’s identity and provides a token to the SP, which grants the user access without requiring additional authentication. This seamless process simplifies the login experience and eliminates the need for users to repeatedly enter their credentials.
Benefits of SSO Single Sign-On
Enhanced Security: One of the key advantages of SSO Single Sign-On is its ability to enhance security. By consolidating login credentials into a single set, users are less likely to resort to weak passwords or reuse passwords across multiple platforms. This reduces the risk of password-related security breaches. Additionally, SSO Single Sign-On allows for stronger authentication methods, such as two-factor authentication, further bolstering security without requiring multiple accounts.
Streamlined User Experience: With SSO Single Sign-On, users no longer have to remember and enter multiple sets of login credentials. This significantly reduces the login friction and streamlines the user experience. Users can seamlessly navigate between different applications and platforms without the need for repetitive logins. This convenience not only saves time but also improves productivity.
Centralized Access Management: SSO Single Sign-On provides organizations with centralized access management capabilities. Administrators can easily control user access to various applications and platforms from a centralized dashboard. This simplifies user provisioning and deprovisioning, ensuring that employees have timely access to the resources they need while maintaining security and compliance.
Cost and Time Savings: Implementing SSO Single Sign-On can lead to cost and time savings for organizations. By reducing the number of password-related support requests, IT teams can focus on more strategic initiatives. Additionally, the streamlined login experience reduces the time spent by employees on authentication, leading to increased productivity and efficiency.
Implementing SSO Single Sign-On
To implement SSO Single Sign-On, organizations need to follow a few key steps:
Evaluate SSO Solutions: Begin by evaluating various SSO solutions available in the market. Consider factors such as compatibility with existing systems, scalability, security features, and ease of integration.
Choose an Identity Provider: Select an identity provider that aligns with your organization’s requirements. The identity provider will be responsible for authenticating users and issuing tokens for accessing service providers. Office 365 and Google Workspace are usually the best, most prolific IdP sources to use.
Configure Service Providers: Configure the service providers that you want to integrate with SSO Single Sign-On. This involves establishing trust relationships between the identity provider and the service providers.
User Provisioning and Deprovisioning: Implement a user provisioning and deprovisioning process to ensure that users have the necessary access to the applications and platforms they require. This process should be integrated with the SSO Single Sign-On solution to maintain centralized access management.
Test and Monitor: Thoroughly test the SSO Single Sign-On implementation to ensure its functionality and security. Regularly monitor the system to identify and address any potential issues or vulnerabilities.
Best Practices for SSO Single Sign-On Implementation
When implementing SSO Single Sign-On, it is essential to follow best practices to maximize security and usability:
Strong Authentication: Implement strong authentication methods such as two-factor authentication or biometric authentication to enhance security.
Regular Auditing: Conduct regular audits of user access rights and permissions to ensure compliance and detect any unauthorized access.
User Education: Educate users about the benefits of SSO Single Sign-On and best practices for password management to promote secure behavior.
Continuous Monitoring: Implement a robust monitoring system to detect and respond to any suspicious activities or potential security threats.
Regular Updates: Keep the SSO Single Sign-On solution and all integrated applications up to date with the latest security patches and updates.
Remember, security should never be compromised, and SSO Single Sign-On provides a robust solution to protect user identities and streamline access to applications and platforms. Embrace the power of SSO Single Sign-On and enjoy the benefits of enhanced security and convenience.
Configure Synology RADIUS for secure EAP enterprise WiFi authentication
This is the eighth and final of a series that documents the Tier 3 / Co-Managed IT work we did to setup a wireless test bed for a Linux based scientific device. The testing environment included two different wireless network hardware types (Ubiquiti and Cisco). There was also a Synology device used for various purposes including hosting the Ubiquiti controller inside a Kubernetes container, providing certificate services, providing LDAP authentication, and providing RADIUS authentication. Each article has detailed a separate piece of the project. This article shows the setup of Synology RADIUS server for EAP authentication via EAP-PEAP, EAP-TLS, and EAP-TTLS.
Setup Synology Radius for EAP-PEAP
Login to Synology IP via SSH
Use admin login credentials
Go to the Radius certificate directory cd /var/packages/RadiusServer/target/etc/raddb/certs/
Radius must be configured on our certificates: sudo vi ../mods-enabled/eap
This is the seventh in a series that document the Tier 3 / Co-Managed IT work we did to setup a wireless test bed for a Linux based scientific device. The testing environment included two different wireless network hardware types (Ubiquiti and Cisco). There was also a Synology device used for various purposes including hosting the Ubiquiti controller inside a Kubernetes container, providing certificate services, providing LDAP authentication, and providing RADIUS authentication. Each article will detail a separate piece of the project. This article shows the basic setup of Ubiquiti Controller for PSK and RADIUS authentication from wireless devices.
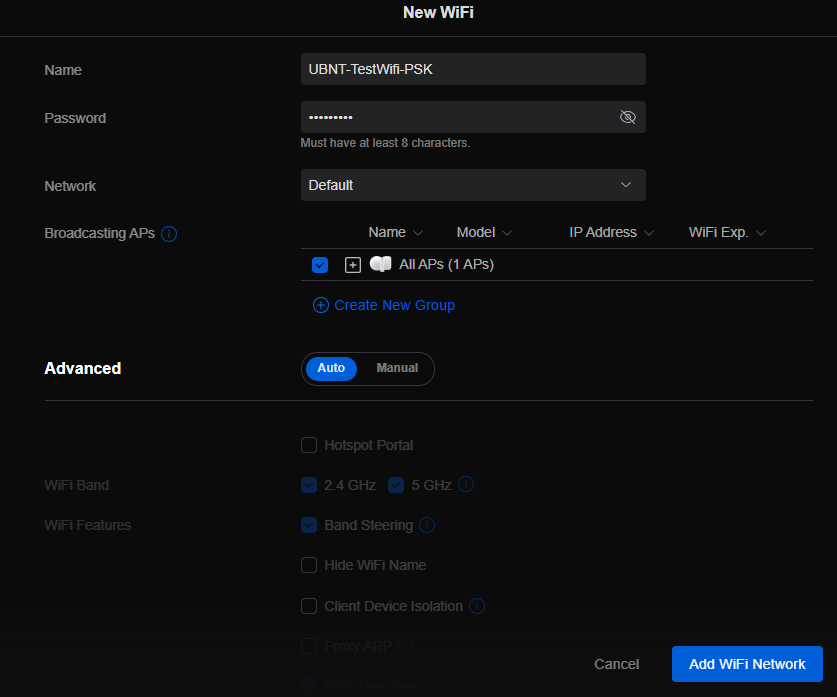
Setup Ubiquiti Wireless Network with PSK
Login to Ubiquiti controller previously created – Here
Click on Setting gear icon at bottom left
Make sure you are on Wifi tab and click Create New link
Set network BSSID
Create Password
Click Add Wifi Network button
UniFi SSID advanced security settings with RADIUS profile and PPSK configuration.
Setup Ubiquiti Wireless Network with RADIUS
Login to Ubiquiti controller previously created – Here
Click on Setting gear icon at bottom left
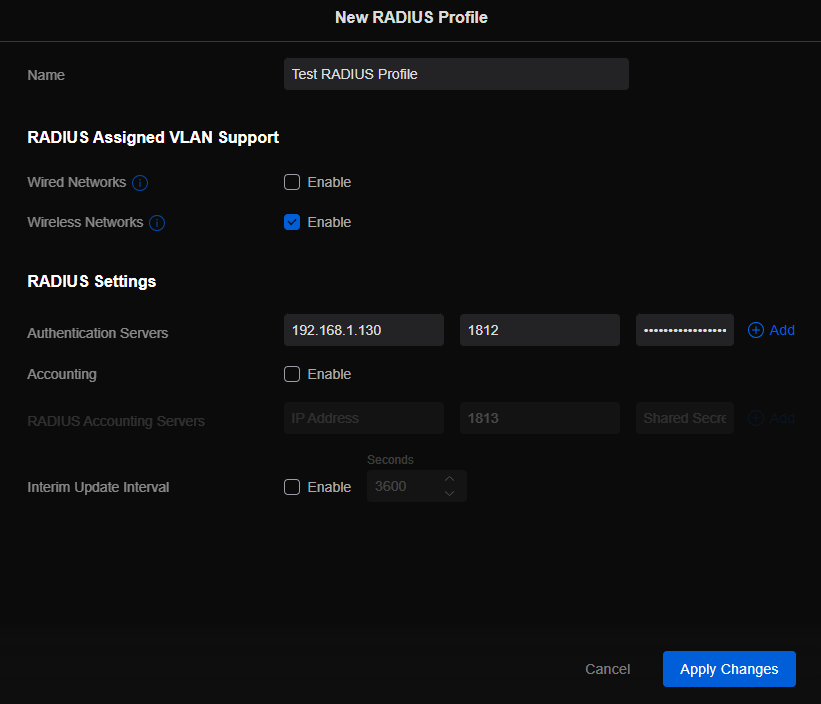
Click on Profiles
Click on Radius Tab
Click on Create New link
Give the Profile a name
Enter RADIUS server IP address as Authentication Server
Enter RADIUS shared secret
Click Add
Click Apply Changes
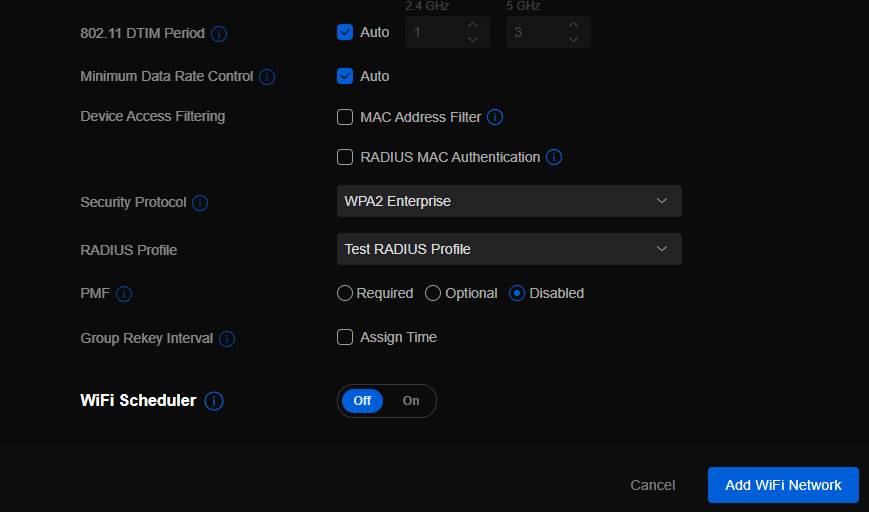
Click on Wifi Tab
Click on Create New link
Set network BSSID
Change Advanced to Manual
Set Security Protocol – WPA2 Enterprise
Select new RADIUS Profile
Click Add Wifi Network
If your company has highly customized setup requirements that you need consulting for, then contact us for assistance.
Cisco WLC WLAN configuration enabling PSK with RADIUS backend authentication.
This is the sixth in a series that document the Tier 3 / Co-Managed IT work we did to setup a wireless test bed for a Linux based scientific device. The testing environment included two different wireless network hardware types (Ubiquiti and Cisco). There was also a Synology device used for various purposes including hosting the Ubiquiti controller inside a Kubernetes container, providing certificate services, providing LDAP authentication, and providing RADIUS authentication. Each article will detail a separate piece of the project. This article shows the basic setup of Cisco Wireless Controller for PSK and RADIUS authentication from wireless devices.
Setup Cisco Wireless Network with PSK
Login to Cisco Wireless Controller
Click on WLANs tab at top
Click on GO next to Create New drop down
Create Profile Name & SSID
Click Apply
Click Enabled next to Status
Click Apply
Click on Security tab
Uncheck 802.1x
Check PSK
Enter Pre-Shared Key next to PSK format
Click Apply
Click Save Configuration at the top
Setup Cisco Wireless Network with RADIUS
Log into Cisco Wireless Controller
Click on Security tab at top
Click on Authentication under RADIUS on left hand side
Change both Acct Call Station ID Type to IP Address
Click Apply
Click on New
Add RADIUS server IP address
Add Shared Secret
Uncheck management
Click Apply
Click on WLANs tab at top
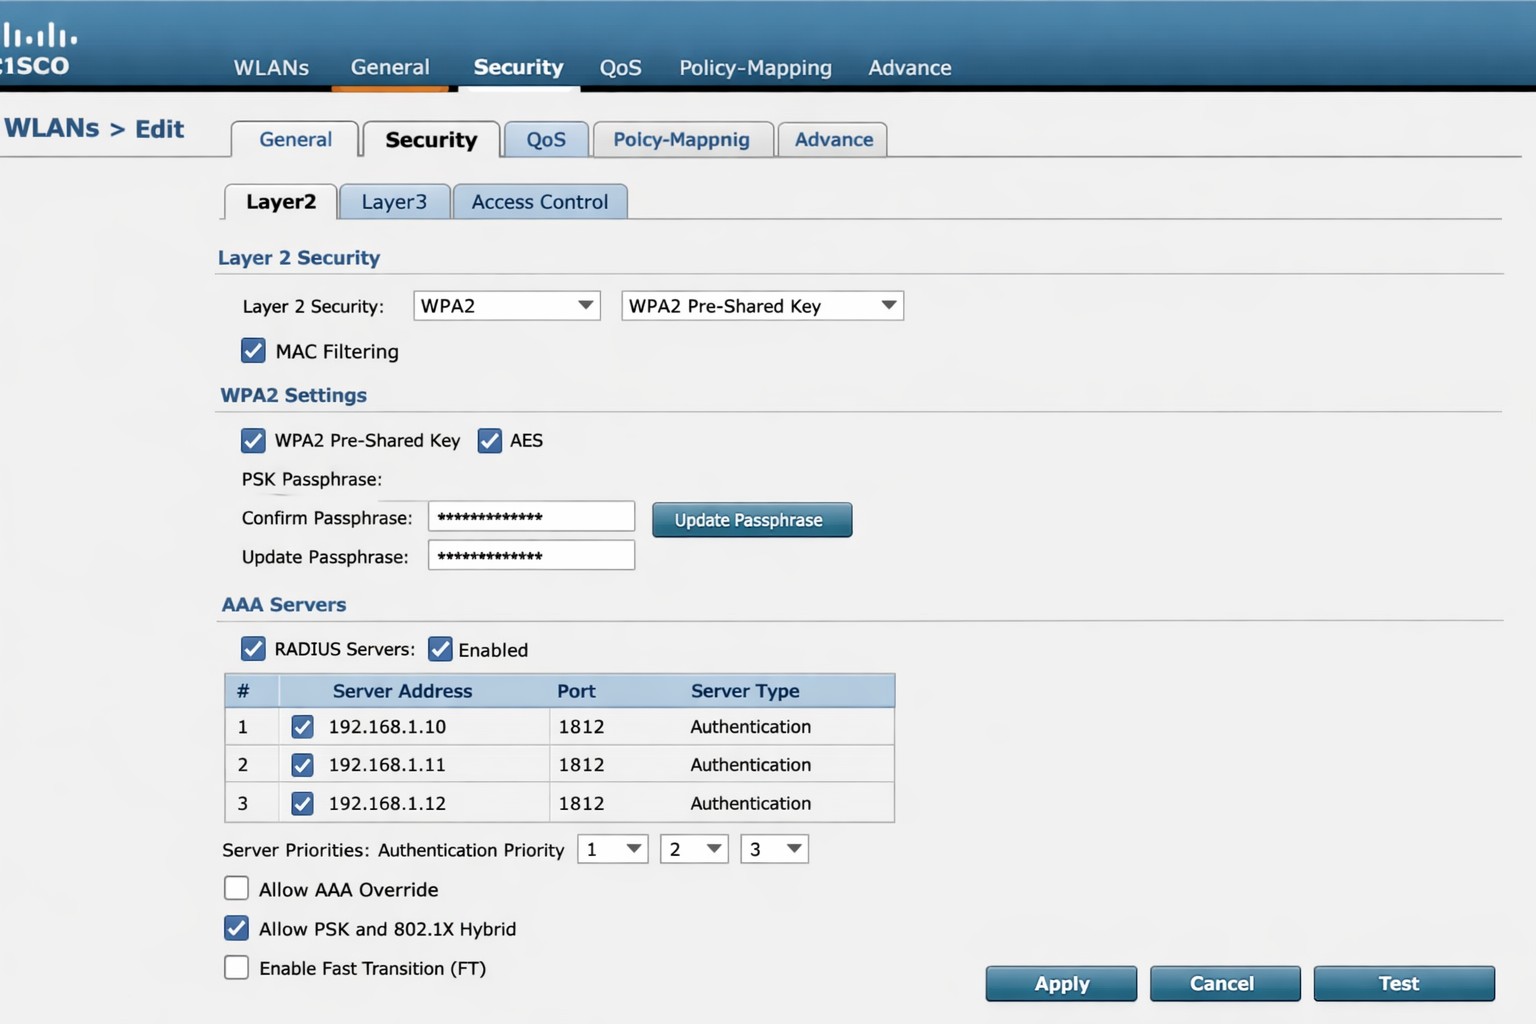
Edit WLAN 1
Click on Security tab
Click on AAA Servers tab
Change Server 1 to the one entered on RADIUS Authentication page
Click Apply
Click on Layer 2 tab
Change Authentication type to 802.11x
Click Apply
Click Save Configuration at the top
If your company has highly customized setup requirements that you need consulting for, then contact us for assistance.
This is the fifth in a series that documents the Tier 3 / Co-Managed IT work we did to setup a wireless test bed for a Linux based scientific device. The testing environment included two different wireless network hardware types (Ubiquiti and Cisco). There was also a Synology device used for various purposes including hosting the Ubiquiti controller inside a Kubernetes container, providing certificate services, providing LDAP authentication, and providing RADIUS authentication. Each article will detail a separate piece of the project. This article shows the setup Synology RADIUS server & certificates.
Setup RADIUS Server
Login to Synology
Open Package Center
Install RADIUS Server app
Open RADIUS Server package
Uncheck local users
Check LDAP users
Click Apply
Click on Clients on left hand side
Click on Add
Create Name
Create Shared Secret
Enter IP address of Cisco WLAN controller
Click on Add
Create Name
Create Shared Secret
Enter IP address of Ubiquiti Controller
Configure RADIUS Certificates
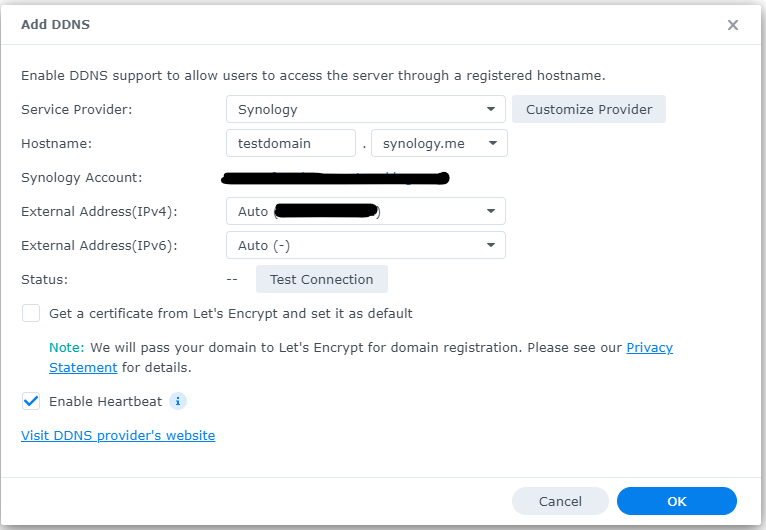
Open Control Panel
Click on External Access
Click on DDNS tab
Click Add
Choose Synology as service provider
Add hostname
Click Test Connection
Click OK
Click on Security on left hand side
Click on the Certificate tab
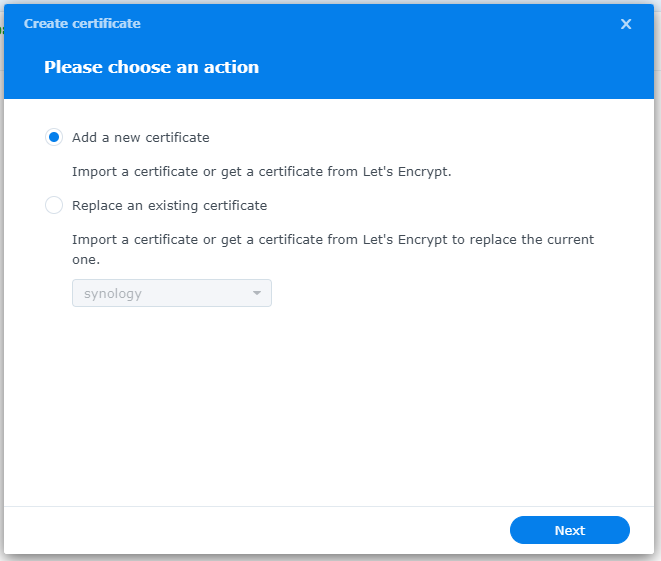
Click on Add
Add new certificate
Click Next
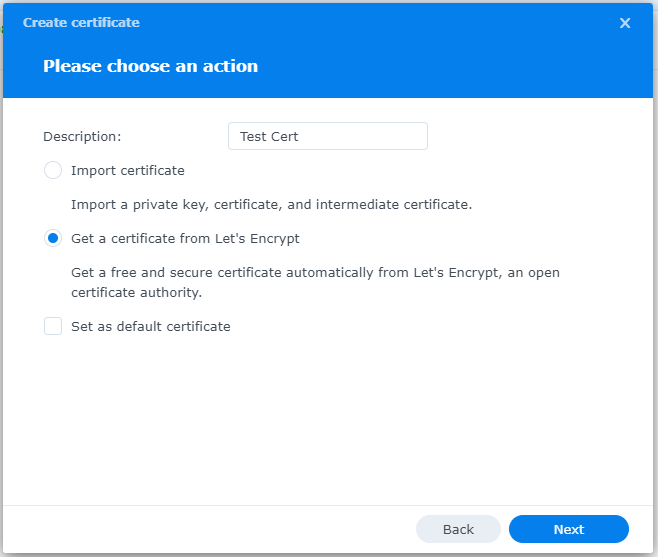
Create description
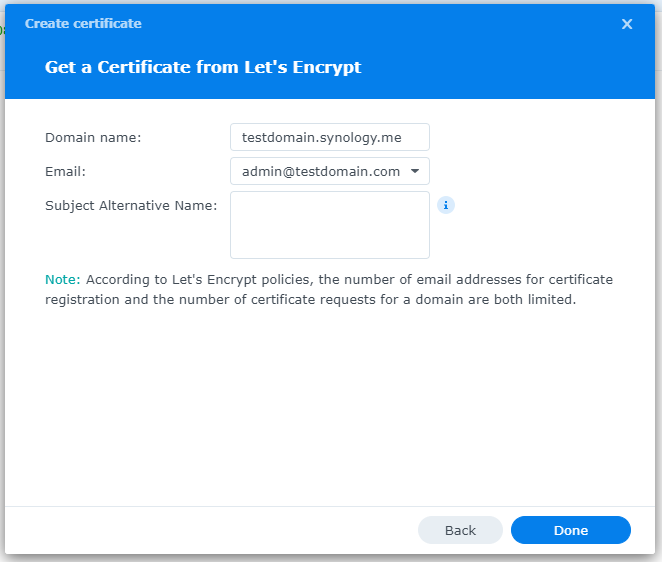
Get a certificate from Let’s Encrypt
Click Next
Add needed certificate information
Click Done
Click Settings button and choose appropriate RADIUS server certificate
If your company has highly customized setup requirements that you need consulting for, then contact us for assistance.
And God will generously provide all you need. Then you will always have everything you need and plenty left over to share with others. As the Scriptures say,
“They share freely and give generously to the poor. Their good deeds will be remembered forever.”
For God is the one who provides seed for the farmer and then bread to eat. In the same way, he will provide and increase your resources and then produce a great harvest of generosity in you. - 2 Corinthians 9:8-10
We use cookies to ensure that we give you the best experience on our website. If you continue to use this site we will assume that you are happy with it.