Key network monitoring tools every small business needs for optimal performance
As a business owner, you know reputation and customer trust are everything. But cybercriminals don’t discriminate by size—small and midsize businesses (SMBs) are increasingly the targets of ransomware and data theft. CIS Critical Security Control 13 gives you a practical way to stay ahead of attackers and protect your company’s future.
Practical Action Steps for SMBs:
Enable real-time network monitoring: Know immediately if your systems are under attack.
Centralize your logs: Aggregate data to detect issues before they escalate.
Set threshold-based alerts: Don’t wait until damage is visible to respond.
Review reports regularly: Make monitoring part of monthly executive/IT reviews.
Q&A for SMBs:
“Aren’t we too small for hackers to notice?” No—SMBs are now among the most targeted because criminals assume defenses are weak.
“Do I need an in-house IT team for this?” Not necessarily—outsourced experts can cost-effectively handle monitoring for you.
How Farmhouse Networking Helps: Farmhouse Networking provides SMBs with managed network monitoring, advanced alerts, and proactive defense strategies. We scale solutions to fit your size, budget, and growth goals.
Don’t leave your business exposed. Email Farmhouse Networking today and start building stronger defenses for lasting success.
How MSP Automation Transforms Manual Workflows for Business Owners
MSP automation eliminates manual tasks and boosts operational efficiency
Are you still relying on manual processes and inefficient workflows to run your business? If so, you’re not alone—but you may be leaving significant productivity and profitability on the table. Modern Managed Service Providers (MSPs) are helping business owners like you automate routine tasks, integrate essential applications, and streamline operations like never before. Here’s how MSP-driven automation can revolutionize your daily operations and set your business up for scalable success.
The Problem: Manual Workflows Are Costing You Time and Money
Manual data entry, repetitive administrative tasks, and disconnected systems can bog down even the most dedicated teams. These inefficiencies lead to:
Wasted time: Employees spend hours on tasks that could be automated.
Increased errors: Manual processes are prone to mistakes, leading to costly corrections.
Slower growth: When staff are overwhelmed with routine tasks, there’s little bandwidth left for innovation and strategic initiatives.
Seamless Integration of Essential Business Applications
Many businesses use a patchwork of tools for CRM, accounting, project management, and more. When these systems don’t communicate, data silos form, leading to confusion and inefficiency.
MSPs help you:
Integrate your tech stack: Connect CRM, email, project management, and other tools so data flows smoothly between them.
Eliminate manual data entry: Employees no longer need to copy information from one system to another, reducing errors and saving time.
Gain unified visibility: Centralized dashboards provide real-time insights into performance, helping you make informed decisions quickly.
Streamlined Workflows for Maximum Productivity
With automation and integration in place, MSPs help you:
Simplify complex processes: Workflows are automated and streamlined, reducing manual intervention and freeing up your team.
Reduce errors and delays: Automation minimizes human error and ensures tasks are completed on time.
Improve employee satisfaction: Staff can focus on meaningful work, leading to higher morale and better retention.
The Results: More Time, Fewer Errors, and a Stronger Bottom Line
Businesses that embrace MSP-driven automation see:
40%+ improvement in process efficiency
75% reduction in manual errors
ROI within six months
These gains translate into faster growth, happier clients, and a more resilient business.
Ready to Transform Your Business?
Don’t let manual processes hold your business back. Farmhouse Networking specializes in helping business owners automate routine tasks, integrate essential applications, and streamline workflows—so you can focus on what you do best.
Contact Farmhouse Networking today to discover how MSP automation can boost your productivity and accuracy—and set your business on the path to lasting success.
Enhanced DNS filtering protects networks from phishing, malware, and non-compliant content.
This is a quick note to all current and future customers, we have made a business decision to move from our old DNS filter / web filter software (called DNSFilter) to a new provider called DefensX.
Why Does This Even Matter?
We recently performed network inventory for all our Monthly Managed IT Services clients and found that many of them had an issue where the filtering software was in an error state and needed to be re-installed. This started our search for a more reliable partner. We found that DefensX provided all the needed functionality and gave our clients the added benefit of reports to see who is looking at what on the internet – something we think that business owners will find extremely valuable.
What Happens Now?
We are automatically removing the old software and deploying the new software to those who have already signed up for service. If you are Monthly Managed IT Services client and do not currently use our DNS filtering service, then reach out to get started at No Additional Cost!
This new service has many new categories to choose from as well, so if there are any sites being blocked or not blocked that you see in your new reports, then just let us know and we can quickly make those changes.
Don’t wait for a cyber attack to compromise your business. Take proactive steps to safeguard your network today! Contact Farmhouse Networking now to implement our advanced DNS filtering solution. Our experts will tailor a protection plan that fits your unique business needs.
As our business continues to grow our focus is on providing white labeled Tier 3 IT support services, RMM as a service, and co-managed IT services. This blog will be highlighting tips for using PowerShell to deploy Synology Active Backup for Business.
Research
Found a support page from Synology that details how to edit the MSI file and deploy it via a Group Policy Object. We are using a similar method to edit the MSI package and deploy it from a local share to all computers via the RMM. You will need to configure a Synology Active Backup for Business template for PCs and download the MSI installer. We use a software called InstEd to edit the MSI installer as follows:
Click Property in the Tables list on the left. Enter the values for the following properties3:
USERNAME: Enter the username for accessing the Synology NAS.
NO_SHORTCUT: Enter “1” if you want to hide the Active Backup for Business Agent’s icon from the main menu of the end user’s device.
ADDRESS: Enter the IP address of the Synology NAS.
PASSWORD: Enter the password for accessing the Synology NAS.
ALLOW_UNTRUST: Enter “1” if you want to connect to the Synology NAS using an IP address instead of a domain or DDNS.
PROXY_ADDR, PROXY_PORT, PROXY_USERNAME, PROXY_PASSWORD: Enter these values only when users have to access your Synology NAS via proxy.
Click File > Save
Once done, upload to the local network share and take note of the share path – i.e. \\192.168.20.10\Support
Variables
$MSIArguments = This will include full file name of the Synology Active Backup for Business MSI installer – i.e. ‘Synology Active Backup for Business Agent-2.7.0-3221-x64.msi’
Script Snippet
Push-Location -Path '\\192.168.20.10\Support' -StackName 'Backup'
Set-Location -StackName 'Backup'

$MSIArguments = "/i Synology Active Backup for Business Agent-2.7.0-3221-x64.msi"

Start-Process "msiexec.exe" -ArgumentList $MSIArguments -Wait -NoNewWindow
The script will take several seconds to minutes to run based on the speed of the computer. The computers will start populating on their own into the Synology Active Backup for Business app.
If your company is a MSP or wants to become one and automation just seems out of reach, then contact usto run your RMM for you.
Streamline client maintenance via RMM automation and AI at Farmhouse Networking
Farmhouse Networking (FHN) is constantly looking for ways to enhance the services that we offer to our clients. Automation and artificial intelligence (AI) are two technologies that have emerged to streamline this process.
FHN uses automation to manage tasks that are typically performed manually, such as system configuration, software installation, and server maintenance. By automating these tasks, FHN can prevent human error and ensure that their clients’ systems remain up to date and secure.
In addition, FHN uses AI to monitor clients’ systems for potential issues, such as hardware failure, security breaches, or performance issues. AI-powered systems can analyze data to detect patterns or anomalies that may indicate a problem, allowing FHN to act quickly based on this laser focused data to prevent downtime or data loss.
Contact us today to learn how Farmhouse Networking can future-proof your network with our innovative maintenance solutions.
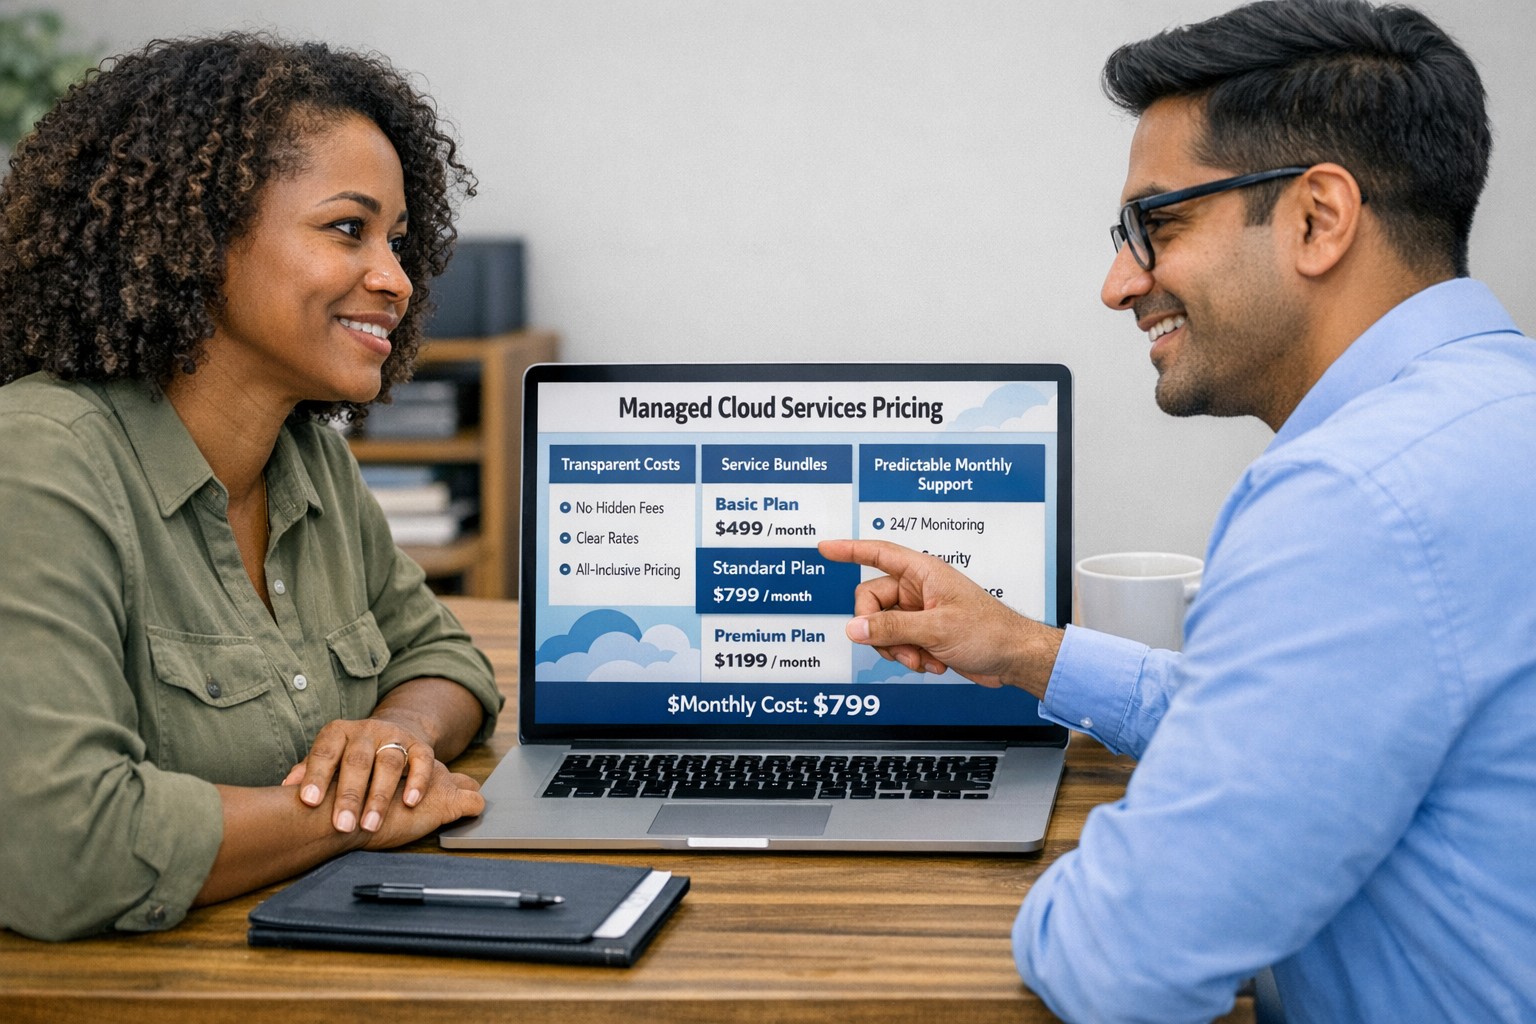
Managed cloud services pricing helps small businesses control IT costs with transparent, predictable monthly cloud support.
We have received numerous inquiries from potential customers regarding our pricing structure. Specifically, they want to know if we offer monthly contracts or if we charge an hourly rate. The answer is Yes.
Hourly Rate
For customers who require a one-time fix or need a project completed, we offer a service based on an hourly rate. Our rate for remote or on-site work that is not covered under a contract is $150 per hour. We bill in 15-minute increments and take pride in our efficiency. For clients with more than 2 service requests per month, we highly recommend signing up for a contract to save money and benefit from our expert oversight.
Monthly Contracts
There are three types of monthly contracts:
Remote Maintenance Contract
This is the package that most of our clients choose. It includes automated maintenance, cyber security protections, and unlimited remote support. Since most problems and questions can be handled remotely, this package offers real value.
Full Service Maintenance Contract
This package is for clients who want complete peace of mind. It includes all services, whether remote or at their offices. Additionally, it provides some additional benefits, such as top priority in our support queue.
Co-Managed IT Contract
This special package is designed for companies that already have a full-time IT employee or IT service companies in need of extra help. It provides them with the necessary automations and tools to make their jobs easier, allowing them to focus on what matters. This package also includes a discount on our remote and on-site services.
All contracts are based on a per-device model, taking into account the number of workstations, printers, servers, switches, etc. on the client’s network. We use this model because the other popular model, per user, is too vague and can easily hide excessive profit margins. Contracts can be month-to-month or a yearly commitment. The difference is that with a yearly commitment, you are protected from price increases for the entire year. We also offer many optional add-ons for our clients, such as Office 365, Employee Security Training, Penetration/Vulnerability Scanning, Mobile Device Management, Compliance, Secure Remote Access, and Security Operations Center.
Are you looking for reliable IT support that suits your business’s unique requirements? Look no further! Our flexible pricing options cater to businesses of all sizes. Whether you require one-time assistance or ongoing support, we have the right plan for you. Ready to take your business IT support to the next level? Contact us today to discuss your needs and find the perfect plan for your business.
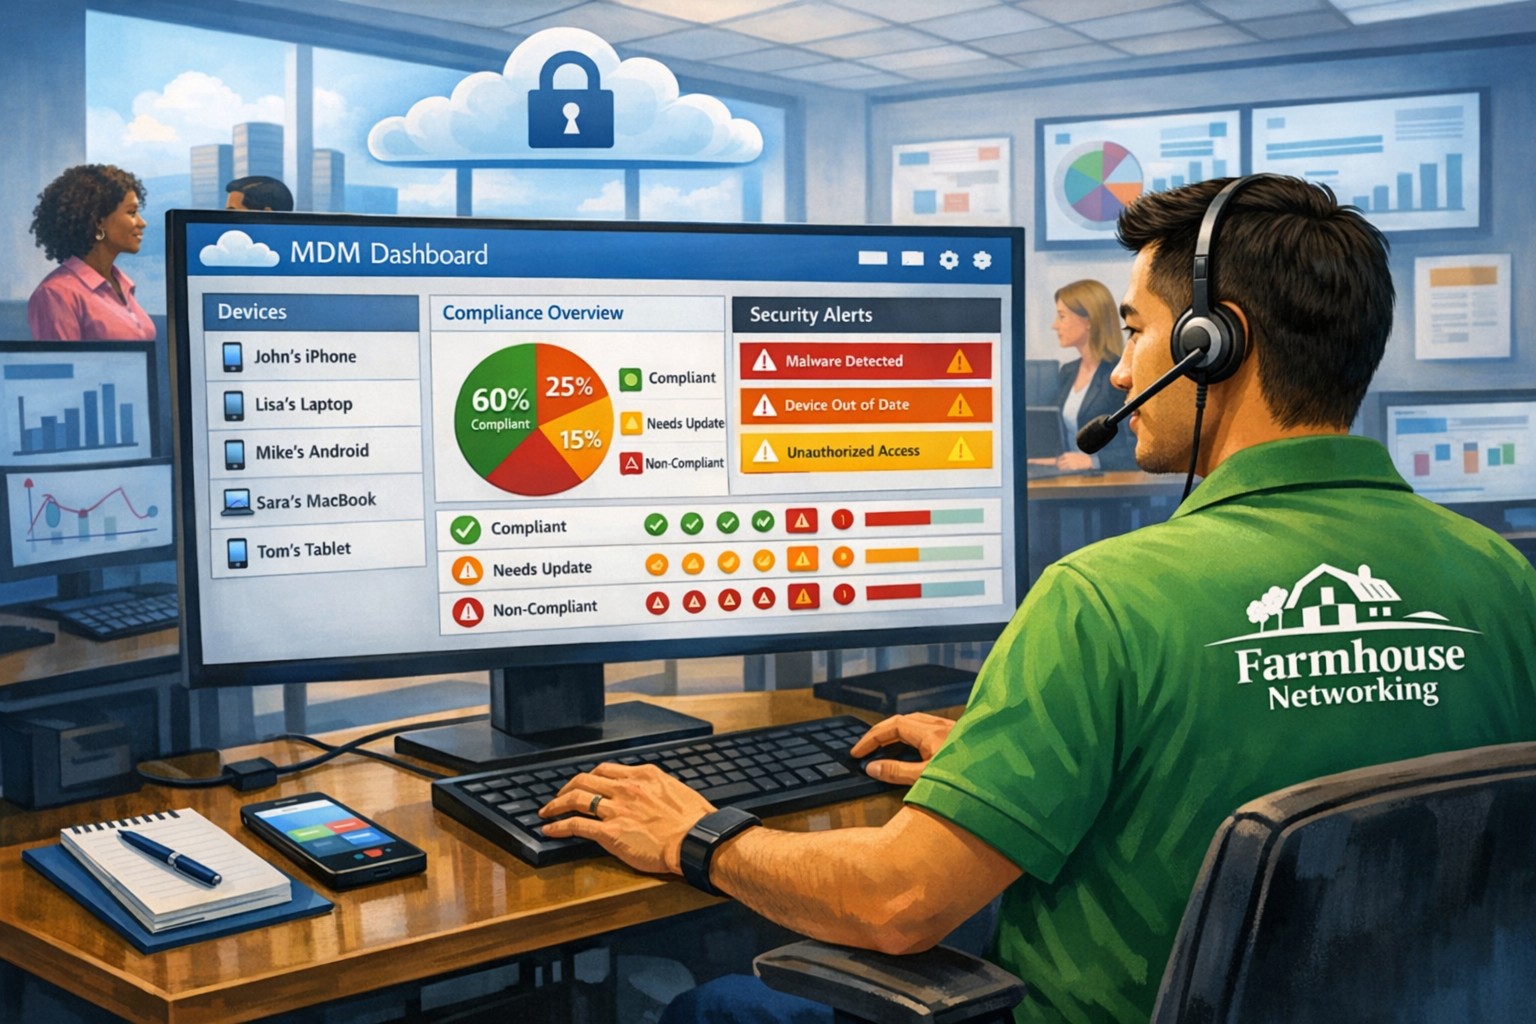
MSP console managing SMB BYOD smartphones and laptops with centralized MDM and security policies.
Small and medium-sized businesses (SMBs) face numerous challenges when it comes to managing their IT. Limited resources (both human and money), lack of expertise, and the need to focus on core business operations often make it difficult for SMBs to understand and manage technology needs. This is where Managed Service Providers (MSPs) come in. In this blog article, we will explore the reasons why SMBs should consider partnering with MSPs to enhance their IT capabilities and drive business growth.
Cost-Effective IT Solutions:
One of the primary reasons why SMBs need MSPs is the cost-effectiveness they offer. By outsourcing their IT needs to MSPs, SMBs can avoid the high costs associated with hiring and training an in-house IT team. MSPs provide a range of services, including network monitoring, data backup and recovery, cybersecurity, and software updates, all at a predictable monthly cost. This allows SMBs to allocate their resources more efficiently and focus on their core business.
Access to Expertise and Advanced Technology:
MSPs are experts in providing IT services and have a team of highly skilled professionals with expertise in variety of technology. By partnering with MSPs, SMBs gain access to the depth of knowledge and experience from IT experts who can handle complex tasks and provide strategic guidance. Additionally, MSPs stay up-to-date with the latest technology trends and can recommend and implement solutions that can help SMBs stay competitive in the market and safe from hackers.
Proactive IT Support and Maintenance:
MSPs offer proactive IT support and maintenance, which is crucial for SMBs. They monitor networks, identify potential issues, and take preventive measures to avoid downtime and disruptions. MSPs also provide regular software updates, security patches, and system maintenance, ensuring that SMBs’ IT remains secure and up-to-date. This proactive approach helps SMBs minimize the risk of costly IT failures and ensures smooth business operations.
Enhanced Data Security:
Data breaches and cyberattacks pose a significant threat to SMBs. MSPs play a vital role in safeguarding SMBs’ sensitive data and protecting them from potential security breaches. They implement robust cybersecurity measures, such as firewalls, antivirus software, and encryption, to ensure data confidentiality and integrity. MSPs can also conduct regular security audits and vulnerability assessments to identify and address any potential weaknesses in the IT infrastructure.
Scalability and Flexibility:
As SMBs grow, their IT needs evolve. MSPs offer scalable solutions that can adapt to changing business requirements. Whether it’s adding new users, expanding storage capacity, or integrating new software, MSPs can quickly and efficiently accommodate these changes. This scalability and flexibility allow SMBs to focus on their growth without worrying about the limitations of their IT infrastructure.
If your company could use the cost-effective solutions, access to expertise, proactive support, enhanced data security, and scalability that come from using a MSP, then contact us for assistance.
Farmhouse Networking cloud automation eliminates manual IT tasks for Oregon SMBs using Power Automate and PowerShell workflows.
Worked with a client lately to help them Automate a workflow, but you may be wondering what does that even mean. Let me explain. We all have tasks in our workday that are repetitive and consume little bite size pieces of our time. Depending on the steps needed to accomplish these tasks, they can be “delegated” to a computer process via scripting aka we automate them. In the case of the client we helped, they received emails from an eFax service which included attachments. These attachments had to be manually saved into a shared folder for the rest of the staff to access as needed. This process probably took about 30 to 60 seconds each, but multiply this by the 30+ faxes they received each day you have 15 to 30 minutes of wasted time each day (65-130 hours per year). This does not take into account the time taken to stop doing one thing, accomplish this task, and restart the original thing they were doing.
Automate to Freedom
What if we could automate this little task and keep them employee free to do other more important things? We did. They customer uses Office 365 which includes a service called Power Automate. We scripted this tool to look at incoming messages, find ones from the eFax vendor, strip out the attachment, and save it to a SharePoint folder. This can then be shared with other employees and even synced via OneDrive to their Desktops for viewing, etc. That is just the tip of the iceberg as there is so much more that can be done with this technology.
If your company wasting little bite size pieces of time in repetitive taks, then contact us for assistance.
As our business continues to grow our focus is on providing white labeled Tier 3 IT support services, RMM as a service, and co-managed IT services. This blog will be highlighting tips for using Powershell to get an Export List of AD Users Last Login was more than 90 Days Ago.
Research
You need to find out what the Organizational Unit (OU) path that you are trying to get the count from. The following command will list all OUs in the domain.
Get-ADOrganizationalUnit -Filter 'Name -like "*"' | Format-Table Name, DistinguishedName -A
If you want the entire organization then you will need the top level information which looks like DC=[DomainName],DC=local
Variables
$SearchOU = This is the full DistinguishedName from the above output.
The script will take several seconds to run based on the number of users in the OU being searched. The output is saved to the local c:\support directory and you can modify this script to include the FTP upload based on our previous article – https://www.farmhousenetworking.com/rmm/automation/rmm-automation-export-log-files-to-ftp/ The script can also be easily modified to change the number of days since last login.
If your company is a MSP or wants to become one and automation just seems out of reach, then contact usto run your RMM for you.
As our business continues to grow our focus is on providing white labeled Tier 3 IT support services, RMM as a service, and co-managed IT services. This blog will be highlighting tips for using Powershell to get an Active Directory User Count.
Research
You need to find out what the Organizational Unit (OU) path that you are trying to get the count from. The following command will list all OUs in the domain.
Get-ADOrganizationalUnit -Filter 'Name -like "*"' | Format-Table Name, DistinguishedName -A
If you want the entire organization then you will need the top level information which looks like DC=[DomainName],DC=local
Variables
$SearchOU = This is the full DistinguishedName from the above output.
The script will take several seconds to run based on the number of users in the OU being searched. The output is an integer number. You can do the same sort of thing for an Active Directory Group Count or Active Directory Computer Count:
And God will generously provide all you need. Then you will always have everything you need and plenty left over to share with others. As the Scriptures say,
“They share freely and give generously to the poor. Their good deeds will be remembered forever.”
For God is the one who provides seed for the farmer and then bread to eat. In the same way, he will provide and increase your resources and then produce a great harvest of generosity in you. - 2 Corinthians 9:8-10
We use cookies to ensure that we give you the best experience on our website. If you continue to use this site we will assume that you are happy with it.