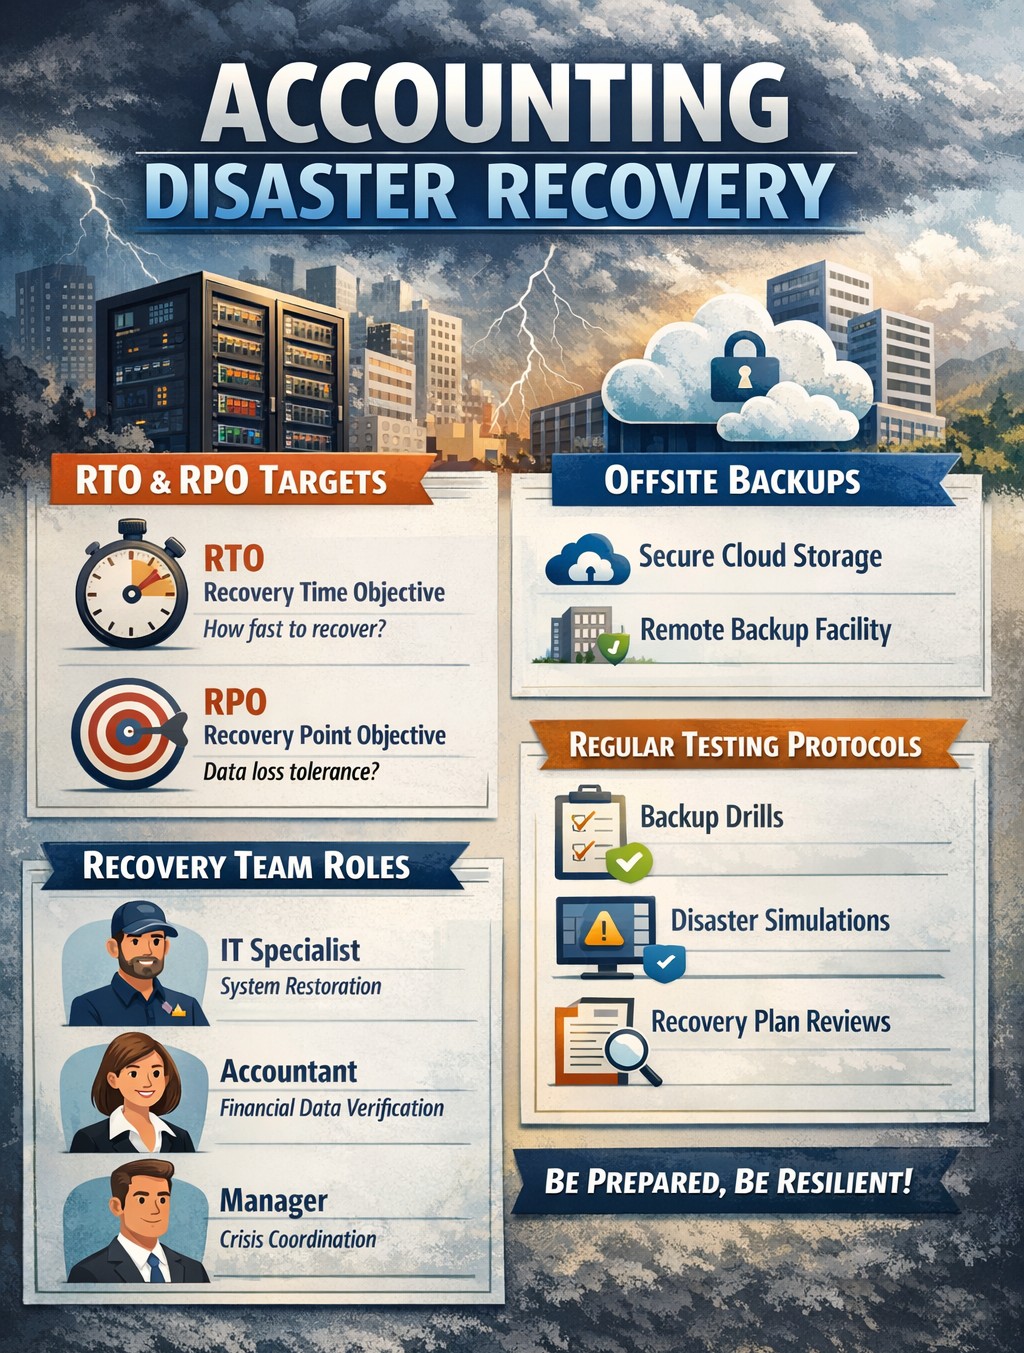
A strong data recovery plan protects businesses from data loss, downtime, and cyberattacks.
Every small and medium-sized business faces the risk of data loss—from ransomware, accidental deletions, or system failures. According to CIS Critical Security Control 11, a strong data recovery plan is essential for staying operational and protecting your reputation.
Key Action Steps for SMBs
Implement regular automated backups: Set daily schedules with both onsite and cloud solutions.
Review and test recovery plans: Don’t wait for a crisis—run annual recovery drills.
Update recovery policies as the business grows: Ensure new systems are included.
Common Client Questions
Aren’t backups enough? Not quite. You need tested recovery processes to guarantee downtime is minimal.
What if we don’t have IT staff? Partnering with an expert provider like Farmhouse Networking keeps your systems protected without you needing in-house IT.
How Farmhouse Networking Helps
We deliver reliable and cost-effective recovery strategies, handling everything from setup to ongoing monitoring, so you can focus on growth while we protect your data.
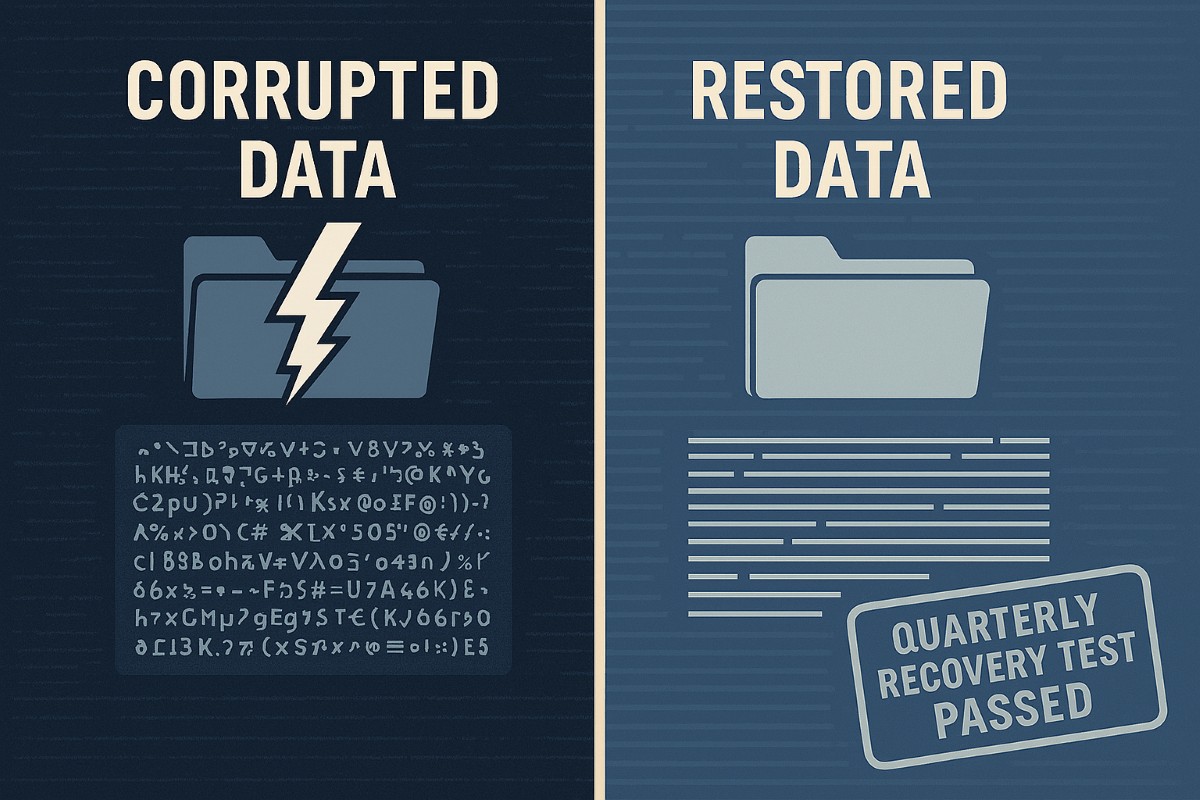
Layered backup solutions preventing data loss disasters for accounting practices
As the owner of an accounting practice, your clients trust you with their most sensitive financial data. But with great responsibility comes significant risk – data loss can devastate your operations, damage your reputation, and even threaten your firm’s survival. Understanding the causes of data loss and how to mitigate those risks is key to keeping your business secure and resilient.
The Leading Causes of Data Loss in Accounting Firms
Accounting practices face unique data risks due to the volume and sensitivity of the information they handle. The most common causes include:
Human Error: Mistakes like accidental file deletion, overwriting data, or sending sensitive information to the wrong recipient are the top cause of data loss, accounting for up to 88% of incidents. Even well-trained staff can make errors, especially under tight deadlines or with manual data entry.
Cybersecurity Breaches: Accounting firms are prime targets for hackers due to the financial data they store. Cyberattacks can lead to data theft, ransomware lockouts, and costly breaches that expose client information and trigger compliance headaches.
Hardware or Software Failure: Servers, hard drives, and other devices can fail unexpectedly, causing sudden data loss if backups aren’t in place.
Natural Disasters: Fires, floods, or power outages can physically destroy data storage systems, leading to permanent loss unless offsite or cloud backups exist.
Poor Data Management: Outdated or poorly designed systems increase the risk of accidental loss, corruption, or unauthorized access.
The consequences of data loss extend beyond immediate disruption. Accounting firms may face regulatory fines, expensive lawsuits, and – perhaps most damaging – loss of client trust and reputation.
How to Mitigate Data Loss Risks
Partnering with a trusted MSP like Farmhouse Networking provides a multi-layered approach to data protection, tailored to the unique needs of accounting practices:
Comprehensive Backups and Recovery: Farmhouse Networking implements robust, automated backup systems – storing data both onsite and in the cloud – ensuring your data is recoverable even if disaster strikes. Backups are regularly tested and monitored for reliability, so you can restore critical information quickly and minimize downtime.
Advanced Security and Encryption: Sensitive client data is protected with industry-standard encryption, both at rest and in transit. Farmhouse Networking also deploys SPAM filtering and anti-phishing tools to block malicious emails, a common entry point for cyberattacks.
Disaster Recovery and Business Continuity Planning: Farmhouse Networking works with your firm to develop and test disaster recovery plans, ensuring your operations can continue with minimal interruption after an incident.
Employee Training and Access Controls: Since human error is a leading cause of data loss, Farmhouse Networking provides security awareness training for your staff and enforces strict access controls, so only authorized personnel can access sensitive information.
Compliance and Audit Support: MSPs like Farmhouse Networking help ensure your IT systems are compliant with industry regulations, reducing the risk of fines and supporting audit readiness.
Ongoing Monitoring and Support: With 24/7 monitoring and proactive maintenance, Farmhouse Networking detects and resolves issues before they escalate, keeping your systems secure and your team focused on serving clients.
Don’t Leave Your Data and Your Reputation at Risk
Data loss is not a matter of if, but when. The right MSP partner can mean the difference between a minor hiccup and a catastrophic event. Farmhouse Networking specializes in protecting accounting firms like yours with proven solutions for backup, security, compliance, and business continuity.
Ready to safeguard your practice?
Contact Farmhouse Networking today for a free consultation and discover how we can keep your data and your business secure, resilient, and ready for whatever comes next.
Neglected IT infrastructure quickly turns into costly downtime and data loss, but proactive managed IT services help businesses stay online and protected.
Has your business ever experienced a technology crisis that could have been easily prevented? Learn from the cautionary tale of a non-managed client who recently faced a major setback due to neglected IT infrastructure. This compelling story underscores the importance of proactive IT management and the need for robust backup solutions.
The Story: A Cautionary Tale
Neglected IT Infrastructure: After 5 years of radio silence, a panicked non-managed client reached out to us when their aging computer, hosting their crucial order processing system, malfunctioned.
DIY Mishap: Attempting to fix the issue themselves, the client inadvertently worsened the situation by installing the wrong part, leading to a cascade of problems.
Costly Consequences: The subsequent visit to a local repair shop and improper part replacement led to the corruption of critical files, including the Windows Operating System and the database containing vital client data.
Backup Oversight: The client’s failure to maintain updated database backups exacerbated the crisis, with the only available backup being approximately 5 years old.
The Solution: Managed IT Services
Proactive Maintenance: With managed IT services, critical components like the aged computer would have been promptly replaced before catastrophic failure, averting the entire crisis.
Remote Support: Swift remote intervention by a managed IT provider would have prevented the corruption of the operating system and database, substantially reducing the overall cost of the incident.
Comprehensive Backup Strategy: Every business should prioritize regular, imaged-based backups to safeguard their crucial data, ensuring seamless restoration in the event of a disaster.
Expert Guidance: Embracing managed IT services equips businesses with expert recommendations and proactive measures to avoid potentially devastating technology pitfalls.
Take the Right Step for Your Business!
Don’t let your business fall victim to preventable IT disasters. Embrace the proactive protection and expert guidance offered by a managed IT service provider to ensure uninterrupted business operations.
Enterprise managed backup console with real-time monitoring and recovery analytics.
Data is the lifeblood of any business. From customer information to financial records, losing critical data can have devastating consequences for a company. That’s why businesses must have a reliable backup system in place. Managed backup services offer a comprehensive solution for data protection, providing automated backups, off-site storage, and quick data recovery in case of emergencies. In this blog post, we will explore the importance of protecting your business with managed backup services and how they can safeguard your valuable data.
The importance of data protection for businesses
Data protection is a top priority for businesses of all sizes. The importance of safeguarding your valuable data cannot be overstated. In addition to the potential financial losses that can result from data breaches or loss, businesses also face the risk of damaging their reputation and losing customer trust. Managed backup services are an essential part of a comprehensive data protection strategy. With automated backups and off-site storage, businesses can ensure that their data is safe and accessible, even in the event of a disaster. Additionally, quick data recovery capabilities minimize downtime and keep operations running smoothly. By investing in managed backup services, businesses can have peace of mind knowing that their critical data is protected and their business is secure.
Benefits of using managed backup services for your business
Using managed backup services can bring numerous benefits to your business. Let’s explore some of the key advantages that come with implementing managed backup services:
Increased Data Security: With automated backups and off-site storage, your valuable business data is protected from human errors, accidental deletions, or potential disasters. In the event of any mishaps, your data remains safe and easily recoverable.
Enhanced Disaster Recovery: Storing your data off-site ensures that even if your primary business location is compromised, you can still access your data and continue operations seamlessly. This added layer of security is crucial for business continuity.
Time and Cost Savings: The quick data recovery capabilities of managed backup services minimize downtime and save your business from significant financial losses. By swiftly restoring your data, you can maintain productivity and keep customer trust intact.
Peace of Mind: Investing in managed backup services equips your business with reliable and comprehensive data protection, giving you the peace of mind that your critical information is secure.
Factors to consider when choosing a managed backup service provider
When it comes to choosing a managed backup service provider for your business, there are several important factors to consider. Here are six key considerations that will help you make an informed decision:
Reliability and Security: Look for a provider that offers reliable and secure backup solutions. They should have a track record of successfully protecting data and providing seamless disaster recovery.
Scalability: Your business needs may change over time, so it is crucial to choose a provider that can scale its services to meet your evolving backup requirements without hindering performance.
Data Encryption: Ensure that the provider offers strong encryption measures to protect your data during storage and transmission. This will safeguard your sensitive information from unauthorized access.
Monitoring and Support: Opt for a provider that offers proactive monitoring and support services. They should be readily available to address any issues promptly and assist you in restoring your data whenever needed.
Cost and Pricing Model: Consider your budget and choose a provider that offers transparent pricing with no hidden costs. Assess the value of the service and determine if it aligns with your business’s financial objectives.
Backup Reliability: Regular testing and monitoring of your backups is crucial to ensure their effectiveness and reliability. It is important to regularly review and test the backups to verify that they are working correctly.
Taking a proactive approach to backup will provide you with confidence in your data protection strategy. By minimizing downtime and potential risks, you can focus on growing your business and achieving your goals. Invest in managed backup services today and secure your business’s future – contact us to get started
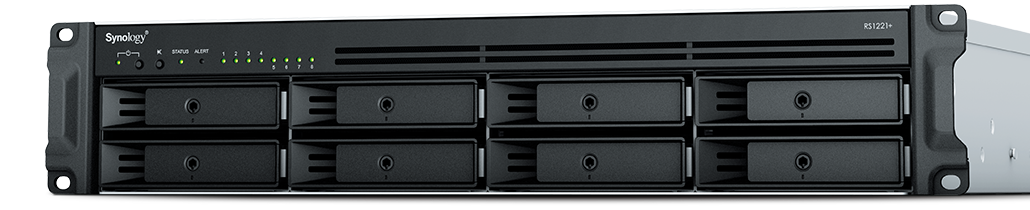
Farmhouse Networking virtualizes small office servers reducing hardware footprint while improving uptime and disaster recovery for Oregon SMBs.
Had a client recently who had a smaller office network (they have up to 6 concurrent users) with a server to process orders from their website using a software called StoneEdge. This software is SQL-based database with a Microsoft Access front-end. It was time to upgrade their server to new hardware and cost was definitely an issue based on their size and order volume. In this case we chose to use a Synology device to act as the virtual machine host and create a new virtual server on the host. Here are some details:
4x Seagate 4TB IronWolf Pro 7200 rpm SATA III 3.5″ Internal NAS HDD
Picked the Synology based on the expandability of RAM to 32 GB, the capability to use cache drives, and storage growth over time. It also has a 4-core 2.2 Ghz Ryzen processor which was plenty based on their old servers CPU usage.
Basics of Setup
Assembled parts
Installed Synology OS
Setup HDDs in Synology SHR2 RAID
Added M.2 drives as cache
Installed the Virtual Machine Manager app
Created a VM with the max CPU available and max Memory available
Uploaded the ISO for the server OS
Installed the server OS
Setup the StoneEdge application
Migrated data
This build did not increase performance dramatically, but it did allow them to spend about half the cost of a full server to accomplish the same purpose. It also reduced costs by using the Synology for backup of the server locally and into S3 storage in the cloud for redundancy.
If your company is looking to move their servers to a virtual environment or into the cloud, then contact usto start the process
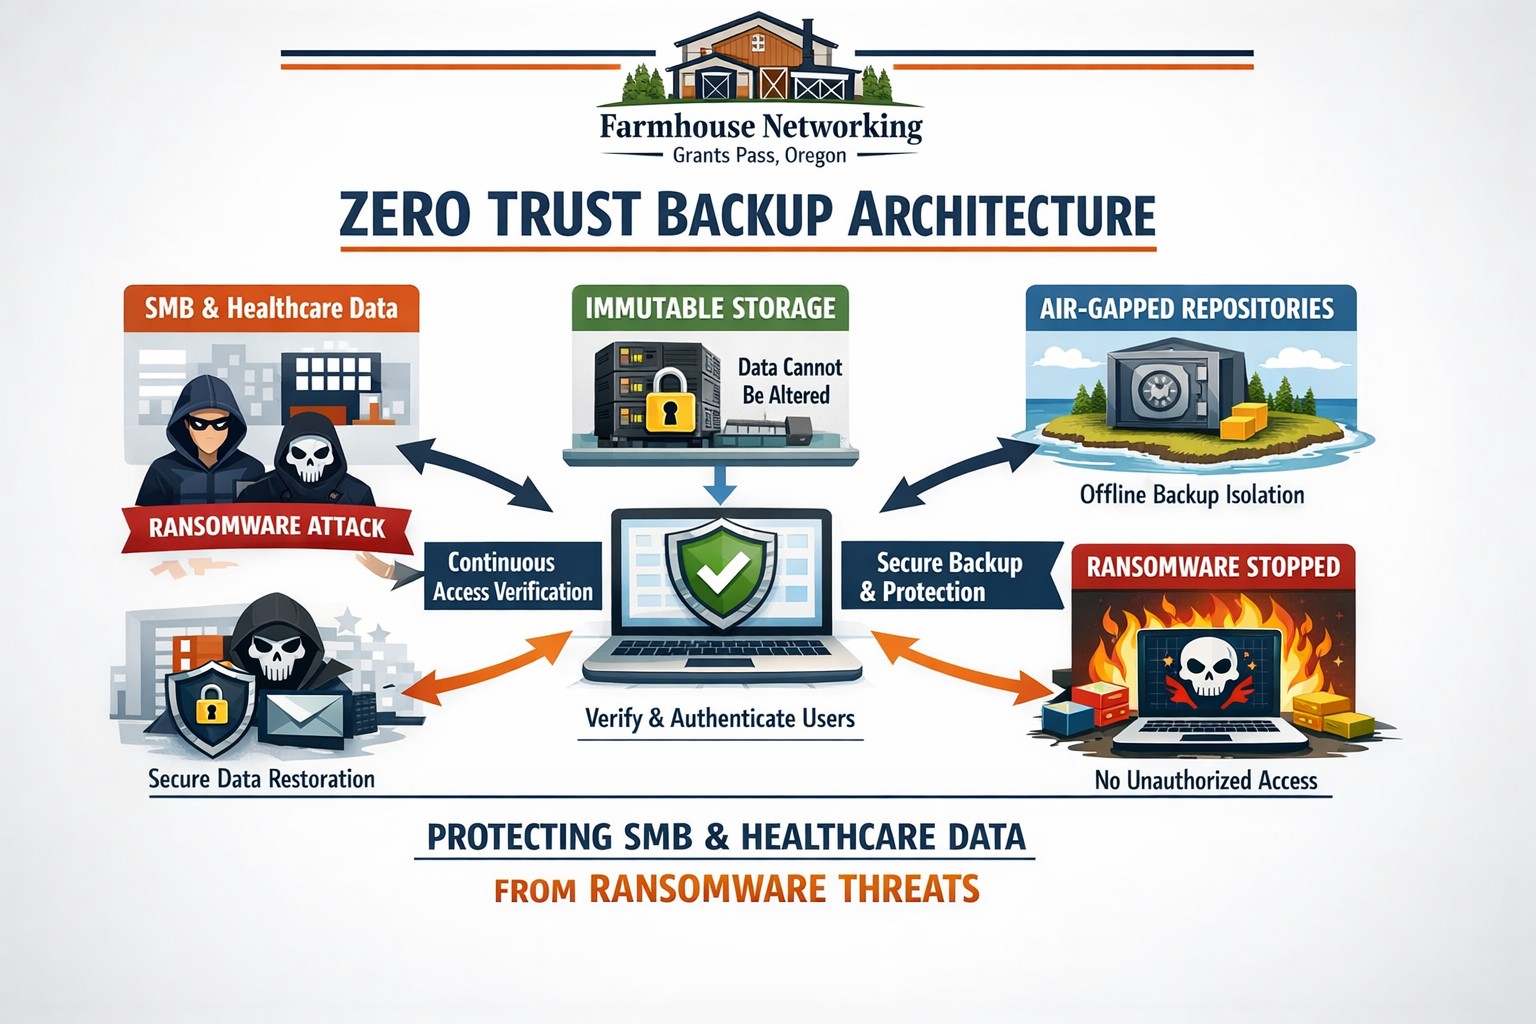
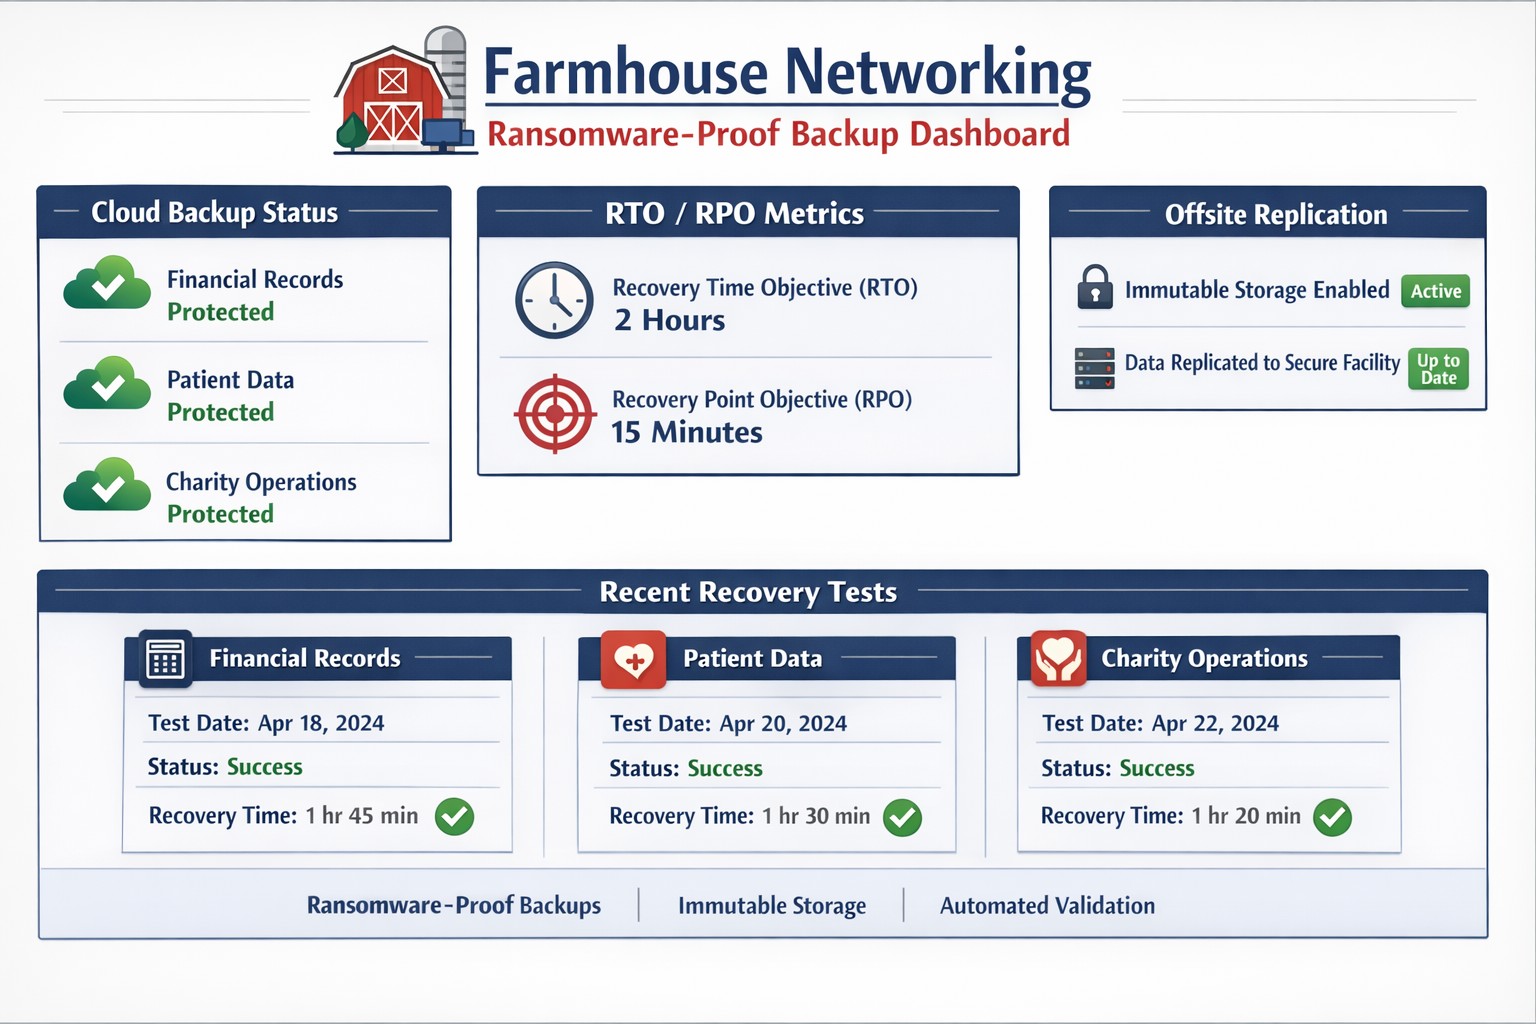
Farmhouse Networking secures Oregon business backups with zero trust immutability preventing ransomware encryption and deletion.
This is the third in a series about the concept of Zero Trust, which means in the IT sense that you trust nothing and always verify everything surrounding and connected to your network. Today’s discussion will be on the backup of important data.
Backup
Backup is a way of creating multiple copies of your important data and the systems that house them. This has become a necessity thanks to acts of God (unforeseen physical disasters), acts of employees (accidental or purposeful destruction of data), and acts of malicious hackers (ransomware or malware). Here are some questions that you should be asking yourself:
What data or systems are being backed up?
How often are these backups being performed?
Are your backups protected from natural disasters (offsite and redundant)?
How long are backups being stored?
Once expired are they securely removed?
What is the process for recovering files, emails, workstations, servers, applications, databases?
Have you tested your recovery process lately?
Do you know how long it will take to recover?
How will business continue until systems are restored?
How will you merge new information into recovered data once restored?
How often do you test your recovery process?
Is the recovery test process automated?
Take time to think about these questions and decide where changes can be made to better protect your IT investments, or contact us to do the thinking for you.
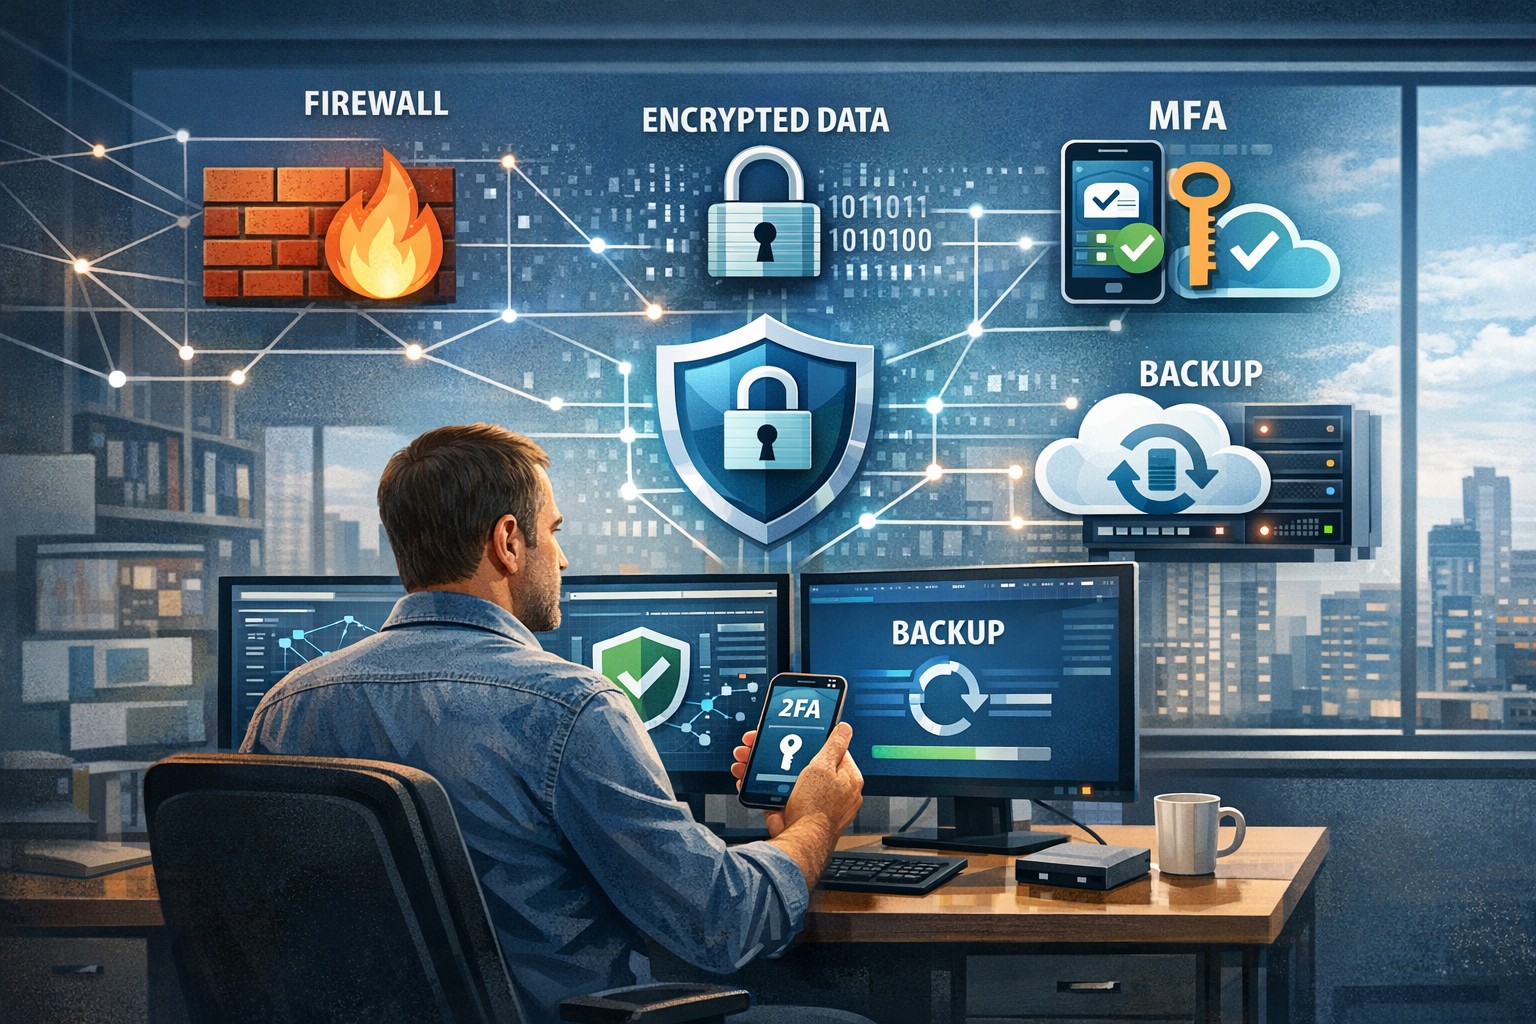
A small business owner leveraging modern cybersecurity tools—firewalls, multi‑factor authentication, and backups—to protect their company’s network and sensitive client data from cyber threats.
You may think cyberattacks are a “big‑company problem.” In 2026, that assumption is one of the most dangerous blind spots you can have. Cybercriminals increasingly target SMBs precisely because budgets are tighter, security is lighter, and breaches in small environments can be just as costly as in large enterprises. The question is no longer if a threat will hit your business, but when—and whether your people, data, and reputation are ready.
For a business‑owner audience, this post breaks down what “good cybersecurity” actually looks like in practice, gives you concrete steps your team can take, answers common client‑facing concerns, and shows how Farmhouse Networking can help you implement and maintain these protections without overhauling your operations.
Why SMBs Are Prime Targets
Cybercriminals are opportunistic: they look for the path of least resistance. SMBs often have limited IT staff, minimal security budgets, and patchy policies around email, passwords, and backups. That combination makes them ideal targets for ransomware, phishing, and data‑theft campaigns that can cripple operations and destroy customer trust in a matter of hours.
Regulatory scrutiny is also tightening. Even if you’re not a multinational, you may still face fines or contractual penalties if client or partner data is lost in a breach. Investing in cybersecurity is no longer “optional overhead”—it’s a core cost of doing business in 2026.
Practical Cybersecurity Steps for Business Owners
You don’t need a Fortune‑500‑level security team, but you do need structure. Here are the key areas every small or mid‑size business should address, along with specific actions your owner and IT team can immediately act on.
1. Lock Down Access with Strong Authentication
Require multi‑factor authentication (MFA) for all accounts that hold customer data, email, banking, or cloud services.
Prefer authenticator apps or hardware keys over SMS‑based codes to reduce phishing and SIM‑swapping risk.
Enforce strong password policies and provide a company‑approved password manager so teams don’t reuse passwords across personal and business services.
2. Patch Systems and Secure Endpoints
Turn on automatic updates for operating systems, browsers, and core business software (accounting, CRM, practice management).
Deploy next‑generation antivirus or EDR tools that monitor unusual behavior, not just known malware signatures.
Ensure every device that touches business data has disk encryption, screen‑lock timing, and basic firewall rules enabled.
3. Protect Networks and Wi‑Fi
Use business‑grade firewalls with default‑deny rules and logging, and avoid exposing unnecessary ports to the internet.
Configure Wi‑Fi networks with WPA3 encryption (or WPA2‑Enterprise), and keep guest Wi‑Fi on a separate, isolated segment.
Segment your network so that high‑value systems (financial and HR data, servers) sit on a separate, more tightly controlled segment.
4. Back Up Data and Plan for Incidents
Define what data is critical (client records, financials, contracts) and back it up regularly to an encrypted, cloud‑ or off‑site‑based solution.
Store multiple recovery points and test restorations periodically to ensure backups actually work.
Put a simple incident response plan in place: who gets notified, who talks to clients, and how you’ll isolate affected systems during a breach.
5. Train Your Team and Manage Email Risk
Conduct regular, short security training focused on phishing, password hygiene, and safe handling of sensitive data.
Deploy an email security gateway that scans attachments, rewrites malicious URLs, and quarantines suspicious messages before they reach inboxes.
Establish clear rules for sharing sensitive data via email (e.g., no client SSNs or insurance numbers in plain text) and enforce them.
Common Client Questions (and How to Answer Them)
When you talk to clients about cybersecurity, they’ll naturally ask around cost, risk, and responsibility. Framing these clearly builds trust and positions your business as a professional partner, not just a vendor.
“Won’t this slow down our operations?”
Answer: Modern security tools are designed to run quietly in the background. Properly configured firewalls, MFA, and endpoint protection add minimal friction while stopping the vast majority of automated attacks. Think of it like seat belts and airbags: you don’t feel them every day, but they’re critical when something goes wrong.
“We’re a small business; do we really need this much protection?”
Answer: Cybercriminals are increasingly using AI‑driven tools to probe and exploit small businesses precisely because defenses are weaker. A single breach can mean downtime, legal fees, and reputational damage that can take years to recover from. Basic, layered security is now table stakes for reputable SMBs.
“How do you know if our network is secure enough?”
Answer: There’s no “perfectly secure” state, but there are measurable baselines:
Are critical systems encrypted and backed up?
Is MFA enforced on all key accounts?
Are software and firmware updated regularly?
Are there clear policies and training for staff? A third‑party security audit or network assessment can map these gaps and prioritize where to invest next.
How Farmhouse Networking Can Help
Farmhouse Networking is built to help small and mid‑size businesses implement, manage, and maintain these cybersecurity measures without the overhead of a full‑time, in‑house security team. We focus on practical, cost‑effective solutions that fit your budget and workflow.
Here’s how we support your cybersecurity efforts:
Network and firewall configuration: We design and harden your network so that only necessary services are exposed, and sensitive systems are segmented and monitored.
Endpoint protection and patch management: We deploy and manage modern antivirus/EDR tools, ensure automatic updates, and enforce device‑level security policies across laptops, desktops, and mobile devices.
MFA, password policy, and access controls: We help you implement MFA everywhere it matters and set up role‑based access so employees only see the data they need.
Backup and incident readiness: We design a backup strategy tailored to your business‑critical data and help you define a simple incident response playbook so you know what to do if something goes wrong.
Ongoing monitoring and training support: We can monitor key security events and provide guidance on regular, brief security training sessions so your team stays alert without disrupting daily operations.
Take the Next Step Today
If you’re a small or mid‑size business owner, now is the time to treat cybersecurity as a core business function, not an afterthought. Simple, layered defenses—strong authentication, regular patching, secure networks, and reliable backups—can dramatically reduce your risk and keep your operations running even when threats emerge.
If you’d like to see how Farmhouse Networking can help you implement these steps with minimal disruption to your team, email us atsupport@farmhousenetworking.comfor a consultation. We’ll review your current setup, identify your top risks, and build a tailored plan that keeps your data, customers, and reputation safe in 2026 and beyond.
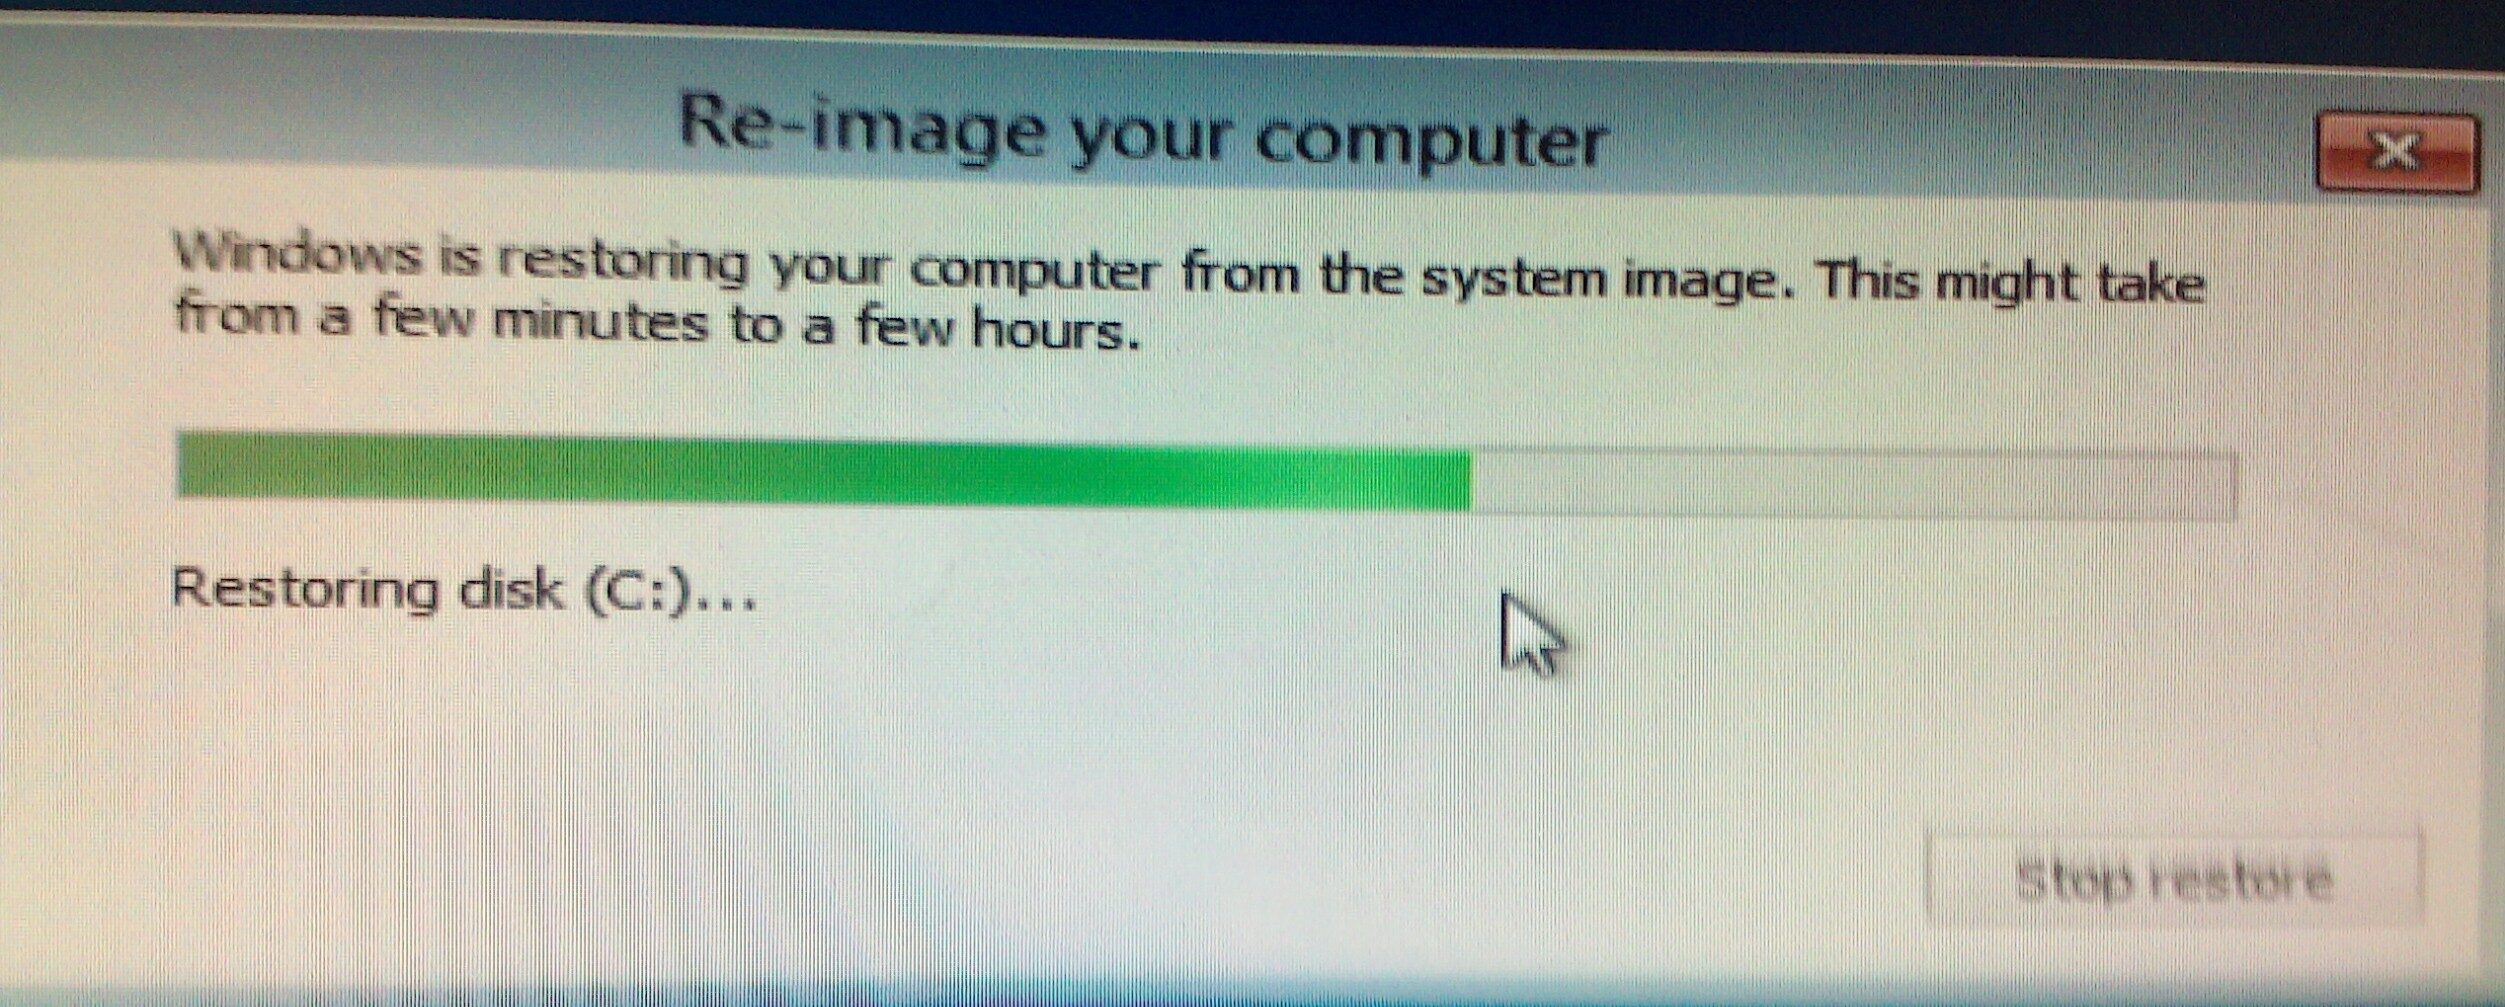
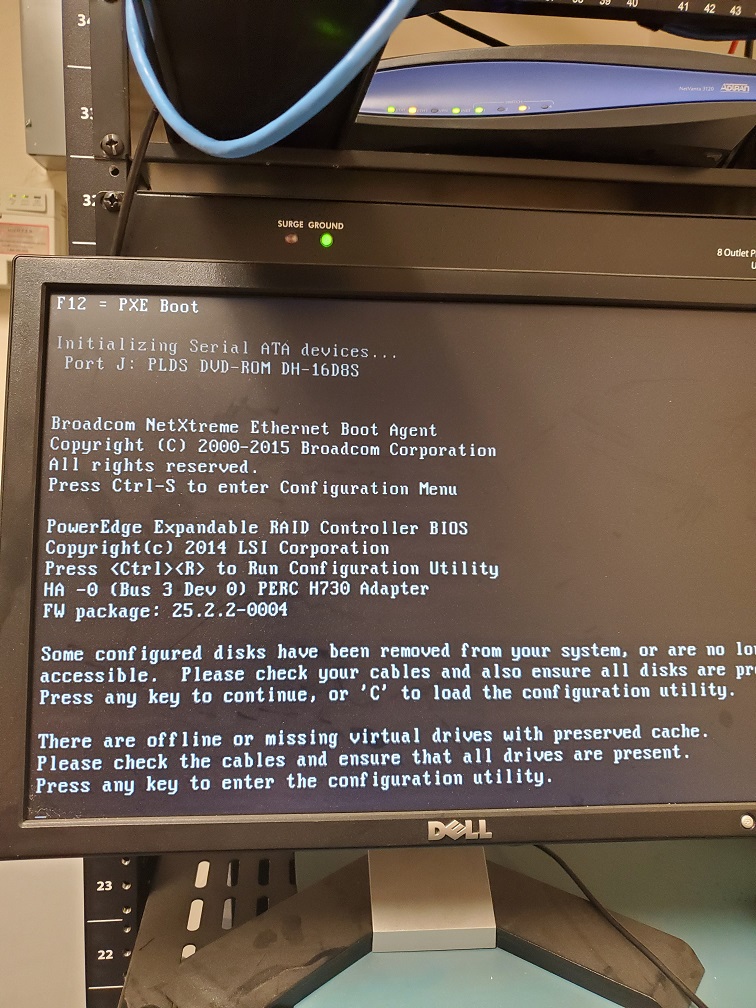
ProTips for successful Windows Server 2012 backup restoration
Here are some lessons learned from a recent recovery of a server with the following error:
Lesson #1 – Blinking Hard Drives
So when I got to the customer site the Dell server had blinking hard drive lights on two of the drives. Based on the support article about it the lights meant -“Identifying drive or preparing for removal.” and digging into the RAID controller I found the worst possible scenario for a RAID-5 array – two dead hard drives. I removed the two dead drives, cleared the configuration on the RAID controller, built a new RAID-5 array out of the remaining drives (4 out of 6), and did a fast initialize.
Lesson #2 – Drive letters on Windows Server Backup
Not sure if anyone else has noticed, but when Windows Server Backup is setup to use an external drive it likes to hide the drive by not assigning it a drive letter. This caused a few issues with the restore done from Windows Server 2012 R2 USB boot media as it couldn’t find the drive. I had to connect the external drive to my laptop then give it a drive letter. Plugged it back into the server and rebooted.
Lesson #3 – Patience is a virtue in Scanning for System Image Disks
Following the basic instructions for doing a Windows Server Backup 2012 Restore via Windows Server 2012 R2 USB boot media it came to the point where it does the scanning for System Image Disks. Turns out this can take hours depending on the speed of the drive plus the size and quantity of restores you have on the external drive. Just wait for the process to complete.
Lesson #4 – UEFI or Legacy BIOS matters
So you waited all that time for the Scanning for System Image Disks to complete and now that precious moment arrives when you realize that the Windows Server 2012 R2 USB boot media that you created was UEFI instead of legacy BIOS and the restore fails telling you so. Make sure that when you create the Windows Server 2012 R2 USB boot media that you change the settings to match the system that you are trying to restore.
Hope that these lessons help a few other Windows Server admins, who are trying to do a Windows Server Backup 2012 Restore, save some time and frustration. If you are looking for a better way to do backup and restore then contact us for details.
Automated cloud backups with tested recovery ensure business survives disasters
When it comes to security threats, it’s not “if” disaster will strike, it’s “when.” So, how will your organization respond? Do you have the proper infrastructure in place to thwart a potential data disaster and if disaster does strike, is your organization poised to recover quickly?
While 100% prevention of a data disaster is impossible, there are several ways you can position your organization to get your systems back up and running with as little disruptions to day-to-day operations as possible:
File Level Backup: A good file sync and share tool is more than just a way for your team to collaborate on the go, it’s a vital component to your organization’s security strategy. With file level backup, you can ensure that even in the event of a site wide disaster, your team can maintain anytime access to their critical files.
Backup and Disaster Recovery: Your last line of defense in a site wide disaster, backup and disaster recovery solutions allow you to recover at the systems level. An absolutely necessary piece of your organizational infrastructure, backup and disaster recovery delivers peace of mind that your systems will always be recoverable, even when disaster strikes.
Cloud-to-Cloud Backup: Cloud-to-cloud backup fills in the gaps left by some of the most commonly used SaaS applications, such as Office 365. Many of these cloud applications fall short in the way of cloud-retention and a good cloud-to-cloud backup solution can help you protect critical business data while providing enhanced features to maximize your user experience and more importantly, security.
Not sure if you have seen the same but it seems that techs who do server replacement work are using Distributed File System (DFS) to sync the file shares between two servers. This is overkill in my opinion and I recently found a simple lightweight file sync tool called Backvp2 from Switzerland. Now I setup similar shares on the new server then run this software from the new server. Configuring the target and destination are super easy and the syncing happens flawlessly. If there are issues with sync it has handy error codes that made troubleshooting file permission issues simple in a recent migration. I highly recommend it for all techs.
And God will generously provide all you need. Then you will always have everything you need and plenty left over to share with others. As the Scriptures say,
“They share freely and give generously to the poor. Their good deeds will be remembered forever.”
For God is the one who provides seed for the farmer and then bread to eat. In the same way, he will provide and increase your resources and then produce a great harvest of generosity in you. - 2 Corinthians 9:8-10
We use cookies to ensure that we give you the best experience on our website. If you continue to use this site we will assume that you are happy with it.