Duo authentication and admin activity logs flowing into a self-hosted Wazuh SIEM, ready for MFA monitoring and CMMC audit evidence.
As our business continues to grow our focus is on providing white labeled Tier 3 IT support services, RMM as a service, and co-managed IT services. This blog will be highlighting tips for using a Bash script to forward Cisco Duo MFA logs into a self-hosted Wazuh SIEM.
We recently connected Duo to the onsite Wazuh server of a client working toward CMMC Level 2. Logging every MFA event and every admin change is part of the evidence an assessor wants to see (NIST 800-171 controls 3.3.1 and 3.5.3). Duo ships an official tool for exactly this. Getting it to produce real Wazuh alerts took some work, so we turned everything we learned into one script that you can run by hand or from SuperOps RMM.
Research
Duo publishes DuoLogSync (github.com/duosecurity/duo_log_sync), a small Python service that pulls logs from the Duo Admin API and sends them as JSON over TCP. The plan was simple: run DuoLogSync on the Wazuh manager, send its output to a syslog listener that only accepts local connections, and let Wazuh’s built-in JSON decoder do the rest. No agent, no public port, no custom decoder.
In practice, five things got in the way. They aren’t obvious from the documentation:
Stock Wazuh rule 86600 (Suricata) matches any JSON event that has both “timestamp” and “event_type” fields. Duo auth logs have both, so every event was captured by a level 0 rule and silently thrown away. Our rules now hang under 86600 as child rules.
Wazuh loads every rule file, stock and custom together, in alphabetical order. Naming the file 9999_duo_rules.xml makes sure it loads after the stock rules it depends on.
“action” is a reserved Wazuh field name, so a field match on it stops the whole ruleset from loading. Use the <action> tag or a dotted field like action.name instead.
DuoLogSync 2.4 retired the “adminaction” endpoint. Admin events now come from the “activity” log, which has a completely different JSON layout.
DuoLogSync opens one TCP connection and never reconnects. Every Wazuh manager restart quietly lost the next batch of logs. The fix is a systemd unit tied to the manager with PartOf=wazuh-manager.service.
The payoff showed up right away. The 180-day history pull surfaced twelve failed Active Directory syncs, all caused by a Duo Authentication Proxy outage. If an AD sync fails, a user you just disabled in AD can still pass Duo, so that’s a finding worth knowing about.
Variables
DuoIntegrationKey = The integration key of a Duo Admin API application with only “Grant read log” permission – i.e. DIXXXXXXXXXXXXXXXXXX DuoSecretKey = The secret key for that application (mark this as a secure variable in SuperOps) DuoApiHost = The API hostname from the same application – i.e. api-xxxxxxxx.duosecurity.com DuoEndpoints = Optional. Which Duo logs to pull – default auth,telephony,activity DuoOffsetDays = Optional. How many days of history to pull on the first run, maximum 180 DuoAction = Optional. install, status, resend or uninstall
Script Snippet
The full script handles prerequisite checks, backups, validation, automatic rollback, and a final check with wazuh-logtest. These are the core pieces:
# DuoLogSync config - single quotes are required by DLS
cat > /opt/duologsync/config.yml <<EOF
version: '1.0.0'
dls_settings:
  log_format: 'JSON'
  api:
    offset: $DLS_OFFSET_DAYS
  checkpointing:
    enabled: True
    directory: '/opt/duologsync/checkpoints'
servers:
  - id: 'wazuh'
    hostname: '127.0.0.1'
    port: 5140
    protocol: 'TCP'
account:
  ikey: '$DUO_IKEY'
  skey: '$DUO_SKEY'
  hostname: '$DUO_API_HOST'
  endpoint_server_mappings:
    - endpoints: ['auth', 'telephony', 'activity']
      server: 'wazuh'
EOF

# Local-only listener added to ossec.conf
<remote>
  <connection>syslog</connection>
  <port>5140</port>
  <protocol>tcp</protocol>
  <local_ip>127.0.0.1</local_ip>
  <allowed-ips>127.0.0.1</allowed-ips>
</remote>

# Duo auth events are claimed by Suricata rule 86600 - attach under it
<rule id="120000" level="0">
  <if_sid>86600</if_sid>
  <field name="txid">\.+</field>
  <field name="factor">\.+</field>
  <description>Duo: authentication event</description>
</rule>

# systemd: restart with the manager, wait for the listener first
[Unit]
After=wazuh-manager.service
PartOf=wazuh-manager.service
[Service]
ExecStartPre=/bin/bash -c 'until ss -ltn | grep -q "127.0.0.1:5140 "; do sleep 2; done'
ExecStart=/opt/duologsync/venv/bin/duologsync /opt/duologsync/config.yml
Restart=always
The complete script, the SuperOps edition, and the full ruleset (with alerts for MFA fraud reports, MFA fatigue, admin panel brute force, Duo configuration changes and AD sync failures, all tagged for NIST 800-171) are free on our GitHub: https://github.com/FarmhouseNetworking/Duo-Wazuh-LogSync
If your company is a MSP or wants to become one and automation just seems out of reach, then contact us to run your RMM for you.
Farmhouse Networking cloud automation eliminates manual IT tasks for Oregon SMBs using Power Automate and PowerShell workflows.
Worked with a client lately to help them Automate a workflow, but you may be wondering what does that even mean. Let me explain. We all have tasks in our workday that are repetitive and consume little bite size pieces of our time. Depending on the steps needed to accomplish these tasks, they can be “delegated” to a computer process via scripting aka we automate them. In the case of the client we helped, they received emails from an eFax service which included attachments. These attachments had to be manually saved into a shared folder for the rest of the staff to access as needed. This process probably took about 30 to 60 seconds each, but multiply this by the 30+ faxes they received each day you have 15 to 30 minutes of wasted time each day (65-130 hours per year). This does not take into account the time taken to stop doing one thing, accomplish this task, and restart the original thing they were doing.
Automate to Freedom
What if we could automate this little task and keep them employee free to do other more important things? We did. They customer uses Office 365 which includes a service called Power Automate. We scripted this tool to look at incoming messages, find ones from the eFax vendor, strip out the attachment, and save it to a SharePoint folder. This can then be shared with other employees and even synced via OneDrive to their Desktops for viewing, etc. That is just the tip of the iceberg as there is so much more that can be done with this technology.
If your company wasting little bite size pieces of time in repetitive taks, then contact us for assistance.
As our business continues to grow our focus is on providing white labeled Tier 3 IT support services, RMM as a service, and co-managed IT services. This blog will be highlighting tips for using Powershell to get an Export List of AD Users Last Login was more than 90 Days Ago.
Research
You need to find out what the Organizational Unit (OU) path that you are trying to get the count from. The following command will list all OUs in the domain.
Get-ADOrganizationalUnit -Filter 'Name -like "*"' | Format-Table Name, DistinguishedName -A
If you want the entire organization then you will need the top level information which looks like DC=[DomainName],DC=local
Variables
$SearchOU = This is the full DistinguishedName from the above output.
The script will take several seconds to run based on the number of users in the OU being searched. The output is saved to the local c:\support directory and you can modify this script to include the FTP upload based on our previous article – https://www.farmhousenetworking.com/rmm/automation/rmm-automation-export-log-files-to-ftp/ The script can also be easily modified to change the number of days since last login.
If your company is a MSP or wants to become one and automation just seems out of reach, then contact usto run your RMM for you.
As our business continues to grow our focus is on providing white labeled Tier 3 IT support services, RMM as a service, and co-managed IT services. This blog will be highlighting tips for using Powershell to get an Active Directory User Count.
Research
You need to find out what the Organizational Unit (OU) path that you are trying to get the count from. The following command will list all OUs in the domain.
Get-ADOrganizationalUnit -Filter 'Name -like "*"' | Format-Table Name, DistinguishedName -A
If you want the entire organization then you will need the top level information which looks like DC=[DomainName],DC=local
Variables
$SearchOU = This is the full DistinguishedName from the above output.
The script will take several seconds to run based on the number of users in the OU being searched. The output is an integer number. You can do the same sort of thing for an Active Directory Group Count or Active Directory Computer Count:
Farmhouse Networking resolves credential manager clearing after reboot by deleting Microsoft Vault folder and restarting services for Oregon RMM automation.
As our business continues to focus on providing white labeled Tier 3 IT support services, RMM as a service, and co-managed IT services this blog will be highlighting tips for using Powershell to fix Credential Manager empty after reboot. There has been several users at a bunch of clients recently that have lost access to a network share due to saved passwords and we found Credential Manager empty after reboot. It was easy enough to re-add their password to Credential Manager, but it was not sticking around. This sounds like a job for automation, so we created a script to clear the errant Credential Manger files and create a new entry for the user to connect to file shares.
Variables
$user = username to add to Credential Manager of network share connection
$pass = password to add to same
Script Snippet
### Remove file folder associated with Credential Manager
Remove-Item -Path %localappdata%\Microsoft\Vault -Recurse

### Install Credential Manager Powershell Module
Import-Module -Name CredentialManager -Force

### Convert password to Secure String and create credential
$password = ConvertTo-SecureString -string $pass -AsPlainText -Force
$Credential = new-object -typename System.Management.Automation.PSCredential -argumentlist $user, $password

# Save the credential object directly without unwrapping it:
New-StoredCredential -Credentials $Credential -Target 'Share Credentials' -Persist Enterprise -Comment "Share Credentials for $($Credential.UserName)" > $null
This script will need to be run in the context of the user who needs the credential created. Please use caution with this script as it will empty Credential Manager completely for the user context run with. Also it is advised to run a full CHKDSK /R on the root (C:\ usually) directory to make sure that nothing else is corrupt on the drive.
If your company is a MSP or wants to become one and automation just seems out of reach, then contact usto run your RMM for you.
As our business continues to focus on providing white labeled Tier 3 IT support services, RMM as a service, and co-managed IT services this blog will be highlighting tips for using Powershell to create Office 365 User and add them to groups. We have several clients with high employee turn-over which makes it necessary to often create Office 365 user. We will detail how to find all the needed data to create the proper script for each client (yes it will take a different script for each client due to different group names for each client).
Research
You need to get two pieces of information – the license type used by the organization to create users and the names of the groups to add users to
To find out the license types used use this commands:
Connect-MsolService
Get-MsolAccountSku
To find out all the groups in the organization use this commands:
Connect-ExchangeOnline
Get-UnifiedGroup | Format-Table Alias
Variables
$displayName = Full user name – usually First name & Last Name $userPrincipleName = Email address for user $adminuser = Email address for admin of Office 365 Tenant $adminpass = Password for admin of Office 365 Tenant $licenseType = Office 365 license type found in research above
There is also the need for variables for each group you will be adding users to (found in research above). For this example I will be using:
$CompanyShared = Company Shared Contacts $CompanyTimeOff = Company Time Off Calendar $BillingPayroll = Billing & Payroll Group Email
Script Snippet
###Use this command to be allowed to use DotNet assemblies
Add-Type -AssemblyName System.web

$displayName = "UserFirst UserLast"
$userPrincipleName = “User@Company.com”
$adminuser = "admin@Company.com"
$adminpass = '@dm1nP4ssw0rd'

$CompanyShared = "yes"
$CompanyTimeOff = "yes"
$BillingPayroll = "no"

###converts admin credentials to useable format for connections to Office 365
$adminpassword = ConvertTo-SecureString -string $adminpass -AsPlainText -Force
$admincred = new-object -typename System.Management.Automation.PSCredential -argumentlist $adminuser, $adminpassword

Connect-AzureAD -Credential $admincred
Connect-MsolService -Credential $admincred

$mailNickname = $userPrincipleName.Split("@")[0]

###To find User License Types use Get-MsolAccountSku
$licenseType = "companytenantID:SPB"

###Generates a random password length
$minPassLength = 8 ## characters
$maxPassLength = 15 ## characters
$passlength = Get-Random -Minimum $minPassLength -Maximum $maxPassLength

###Generates a random number of non-alpha characters in the password
$minNonAlphaChars = 1 ## characters
$maxNonAlphaChars = 5 ## characters
$nonAlphaChars = Get-Random -Minimum $minNonAlphaChars -Maximum $maxNonAlphaChars

###Creates the password, makes it useable by Azure, sets it up to not require password change, and creates account
$password = [System.Web.Security.Membership]::GeneratePassword($passlength, $nonAlphaChars)
$PasswordProfile = New-Object -TypeName Microsoft.Open.AzureAD.Model.PasswordProfile
$PasswordProfile.Password = "$password"
$PasswordProfile.ForceChangePasswordNextLogin = $false
Write-Host "Password is set to $password for $displayName"
$user = New-AzureADUSer -DisplayName $displayName -PasswordProfile $PasswordProfile -UserPrincipalName $userPrincipleName -mailNickname $mailNickname -AccountEnabled $true

###Waits 5 minutes for the user creation process in Office 365
Start-Sleep -Seconds 300

###Sets additional parameters for account that are needed like location, license type, and sets password to never expire
Get-MsolUser -UserPrincipalName $userPrincipleName | Set-MsolUser -UsageLocation US
Get-MsolUser -UserPrincipalName $userPrincipleName | Set-MsolUserLicense -AddLicenses $licenseType
Get-MsolUser –UserPrincipalName $userPrincipleName | Set-MsolUser –PasswordNeverExpires $True

###Adds new user to groups
if ($CompanyShared -eq "yes")
{ Add-MailboxPermission -Identity companyshared@premieror.com -User $userPrincipleName -AccessRights FullAccess -InheritanceType All}

if ($CompanyTimeOff -eq "yes")
{ Add-MailboxPermission -Identity companytimeoff@premieror.com -User $userPrincipleName -AccessRights FullAccess -InheritanceType All}

if ($BillingPayroll -eq "yes")
{ Add-MailboxPermission -Identity billing_payroll@premieror.com -User $userPrincipleName -AccessRights FullAccess -InheritanceType All}
This script requires that the admin account you use to setup the user have multifactor authentication turned off (I know not secure), so use a really long complex password. The script creates a random password for the new user and write it to output. The script will take several minutes to run due to the waiting for the account to finish setup before adding additional parameters and adding them to groups.
If your company is a MSP or wants to become one and automation just seems out of reach, then contact usto run your RMM for you.
As our business continues to focus on providing white labeled Tier 3 IT support services, RMM as a service, and co-managed IT services this blog will be highlighting tips for RMM automation. Here is a script that we came up with to handle a particular client that dumps tons of PDFs into a folder unsorted and wants individual folders created for each unique file name. We have tailored this script to be used not only at that client but for any folder on any Microsoft Windows computer that needs to be sorted in this manner. This script could easily be modified to sort other types of files.
Variables
Here are the variables we are using for this script:
$SourceFolder = This is the target folder to be sorted
Script Snippet
# Defines the folder that sorted data will go into
$TargetFolder = $SourceFolder + " Sorted"

#Defines how to match files with similar names, in this case we put files with the same name then a dash or underscore and other numbers or letters to be placed in the same folder
$MatchRegEx = "[-_]"


#Grabs only the PDF files in the folder being sorted (modify for other extension types or remove filter to sort all files)
Get-ChildItem -Path $SourceFolder -Filter *.pdf |
    ForEach-Object {
        #Creates folder name for child folders in sorted data
        $FileNameFolder = $_.Name -split $MatchRegEx
        $ChildPath = Join-Path -Path $FileNameFolder[0].Replace('.pdf','') -ChildPath $_.Name

        [System.IO.FileInfo]$Destination = Join-Path -Path $TargetFolder -ChildPath $ChildPath

        #Checks if folder exists and if not creates child folder
        if( -not ( Test-Path -Path $Destination.Directory.FullName -erroraction silentlycontinue) ){
            New-Item -ItemType Directory -Path $Destination.Directory.FullName
            }

        #Copies file into child folder
        Copy-Item -Path $_.FullName -Destination $Destination.FullName
        }
This script is non-destructive meaning that the files are copied and not moved. This script gives screen output of each new child folder created.
If your company is a MSP or wants to become one and automation just seems out of reach, then contact us to run your RMM for you.
As our business continues to focus on providing white labeled Tier 3 IT support services, RMM as a service, and co-managed IT services this blog will be highlighting tips for RMM automation. Here is one of the recent scripts we added to our RMM. We often find ourselves wanting to modify the registry for all users:
Variables
It is important to not store variables in scripts especially when they are credentials for a user on the local computer, so make sure to define variables accordingly. In this script there are no variables like that, but wanted to explain some that are in the script:
$PatternSID = this is the Regular Expression pattern for the Security ID of the users to look for (found it was different for local / domain vs. Azure)
$ProfileList = List of SIDs and other information from the HKLM folders
$LoadedHives = List of logged in users from HKU
$UnloadedHives = List of not logged in users from HKU
Script Snippet
# Regex pattern for Local or Domain SIDs
$PatternSID = 'S-1-5-21-\d+-\d+\-\d+\-\d+$'

# Get Username, SID, and location of ntuser.dat for all users
$ProfileList = gp 'HKLM:\SOFTWARE\Microsoft\Windows NT\CurrentVersion\ProfileList\*' | Where-Object {$_.PSChildName -match $PatternSID} |
    Select  @{name="SID";expression={$_.PSChildName}},
            @{name="UserHive";expression={"$($_.ProfileImagePath)\ntuser.dat"}},
            @{name="Username";expression={$_.ProfileImagePath -replace '^(.*[\\\/])', ''}}

# Get all user SIDs found in HKEY_USERS (ntuder.dat files that are loaded)
$LoadedHives = gci Registry::HKEY_USERS | ? {$_.PSChildname -match $PatternSID} | Select @{name="SID";expression={$_.PSChildName}}

# Get all users that are not currently logged
$UnloadedHives = Compare-Object $ProfileList.SID $LoadedHives.SID | Select @{name="SID";expression={$_.InputObject}}, UserHive, Username

# Loop through each profile on the machine
Foreach ($item in $ProfileList) {
    # Load User ntuser.dat if it's not already loaded
    IF ($item.SID -in $UnloadedHives.SID) {
        reg load HKU\$($Item.SID) $($Item.UserHive) | Out-Null
    }

    #####################################################################
    # This is where you can read/modify a users portion of the registry

    # This example checks for a key, adds it if missing, and creates / changes a DWORD in that key
    "{0}" -f $($item.Username) | Write-Output
    If (!(Test-Path registry::HKEY_USERS\$($Item.SID)\SOFTWARE\Microsoft\Windows\CurrentVersion\UserProfileEngagement)) {
	    New-Item -Path registry::HKEY_USERS\$($Item.SID)\SOFTWARE\Microsoft\Windows\CurrentVersion\UserProfileEngagement -Force | Out-Null
	}
    Set-ItemProperty registry::HKEY_USERS\$($Item.SID)\SOFTWARE\Microsoft\Windows\CurrentVersion\UserProfileEngagement -Name “ScoobeSystemSettingEnabled” -Value “0” -Type DWord

    #####################################################################

    # Unload ntuser.dat
    IF ($item.SID -in $UnloadedHives.SID) {
        ### Garbage collection and closing of ntuser.dat ###
        [gc]::Collect()
        reg unload HKU\$($Item.SID) | Out-Null
    }
}
# Regex pattern for AzureAD SIDs
$PatternSID = 'S-1-12-1-\d+-\d+\-\d+\-\d+$'

# Get Username, SID, and location of ntuser.dat for all users
$ProfileList = gp 'HKLM:\SOFTWARE\Microsoft\Windows NT\CurrentVersion\ProfileList\*' | Where-Object {$_.PSChildName -match $PatternSID} |
    Select  @{name="SID";expression={$_.PSChildName}},
            @{name="UserHive";expression={"$($_.ProfileImagePath)\ntuser.dat"}},
            @{name="Username";expression={$_.ProfileImagePath -replace '^(.*[\\\/])', ''}}

# Get all user SIDs found in HKEY_USERS (ntuder.dat files that are loaded)
$LoadedHives = gci Registry::HKEY_USERS | ? {$_.PSChildname -match $PatternSID} | Select @{name="SID";expression={$_.PSChildName}}

# Get all users that are not currently logged
$UnloadedHives = Compare-Object $ProfileList.SID $LoadedHives.SID | Select @{name="SID";expression={$_.InputObject}}, UserHive, Username

# Loop through each profile on the machine
Foreach ($item in $ProfileList) {
    # Load User ntuser.dat if it's not already loaded
    IF ($item.SID -in $UnloadedHives.SID) {
        reg load HKU\$($Item.SID) $($Item.UserHive) | Out-Null
    }

    #####################################################################
    # This is where you can read/modify a users portion of the registry

    # This example checks for a key, adds it if missing, and creates / changes a DWORD in that key
    "{0}" -f $($item.Username) | Write-Output
    If (!(Test-Path registry::HKEY_USERS\$($Item.SID)\SOFTWARE\Microsoft\Windows\CurrentVersion\UserProfileEngagement)) {
	    New-Item -Path registry::HKEY_USERS\$($Item.SID)\SOFTWARE\Microsoft\Windows\CurrentVersion\UserProfileEngagement -Force | Out-Null
	}
    Set-ItemProperty registry::HKEY_USERS\$($Item.SID)\SOFTWARE\Microsoft\Windows\CurrentVersion\UserProfileEngagement -Name “ScoobeSystemSettingEnabled” -Value “0” -Type DWord

    #####################################################################

    # Unload ntuser.dat
    IF ($item.SID -in $UnloadedHives.SID) {
        ### Garbage collection and closing of ntuser.dat ###
        [gc]::Collect()
        reg unload HKU\$($Item.SID) | Out-Null
    }
}
Checking whether each item already exists helps the RMM to get the proper exit code and not show the script as failed when run.
If your company is a MSP or wants to become one and automation just seems out of reach, then contact us to run your RMM for you.
Automated FTP log export scales RMM diagnostics across client endpoints
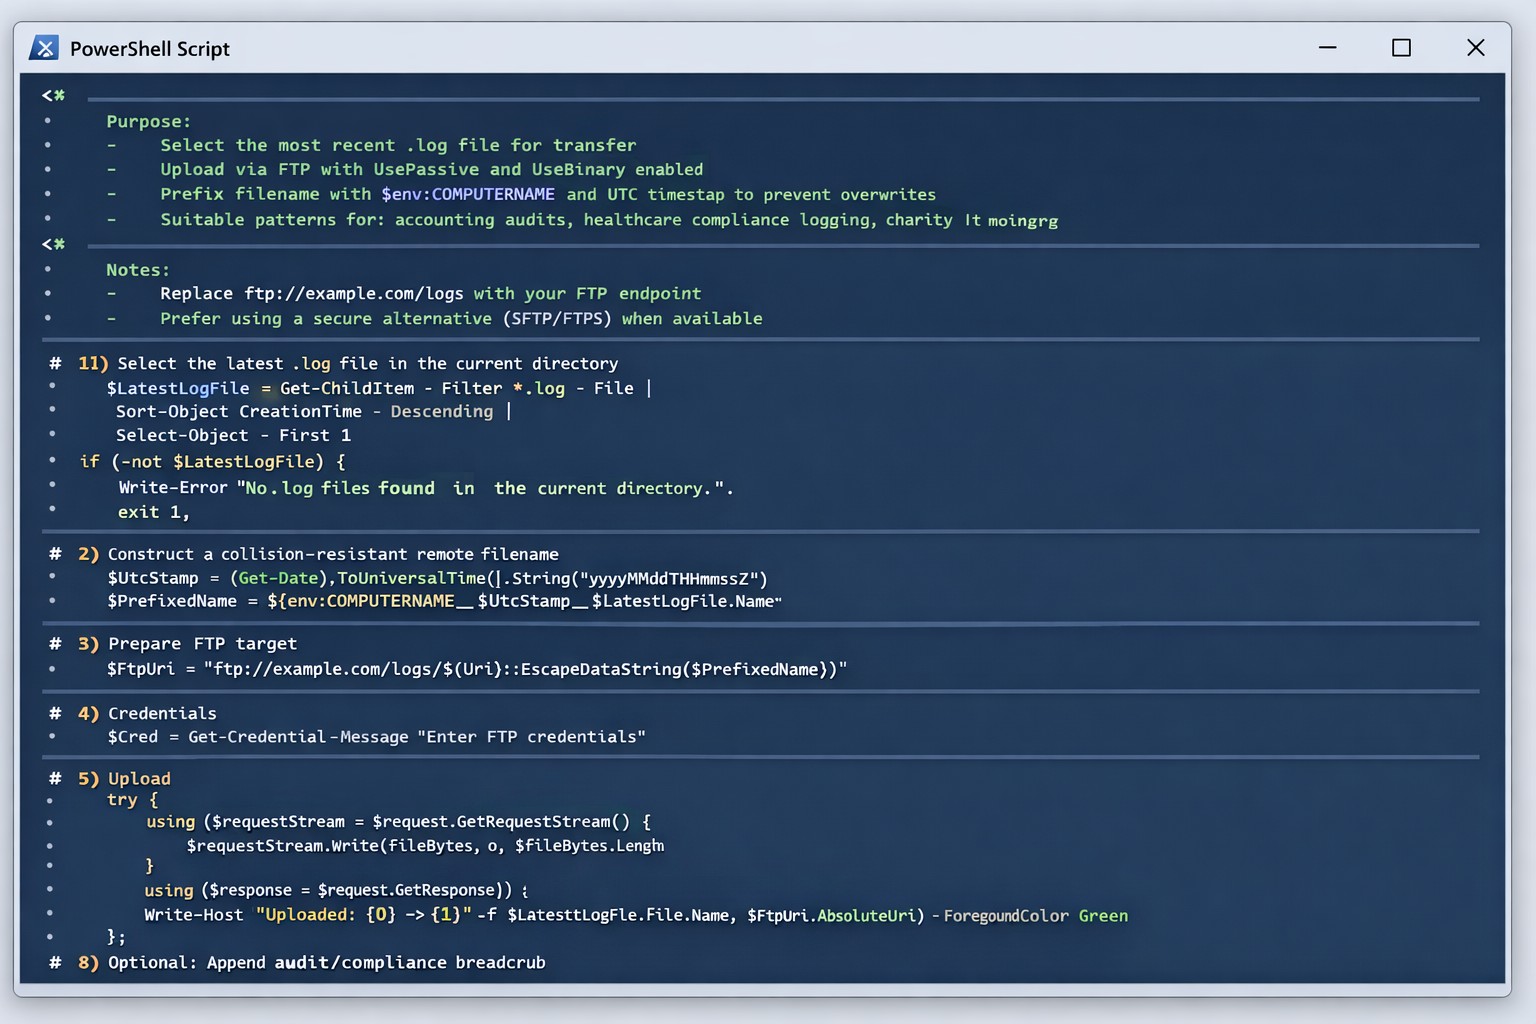
As our business continues to focus on providing white labeled Tier 3 IT support services, RMM as a service, and co-managed IT services this blog will be highlighting tips for RMM automation. Here is one of the recent updates we are making to several of our scripts. It is great to have a diagnostic script that outputs information and review those logs to help figure out issues or to write out the log file created to output for review from the RMM.
What if you have a software tool that aggregates log files to look for trends or security issues across the organization. Running the script and manually collecting log files from each computers gets tedious at scale, so I came up with the idea to automate the log collection via sending them to a FTP site. Here is what we are adding to scripts:
Variables
It is important to not store variables in scripts especially when they are credentials for the FTP server, so make sure to define variables accordingly. Here are the variables we are using for this script:
$LocalDir = the local directory where you expect to find the logs from the script
$RemoteDir = the FTP server address and file directory structure (ie ftp://myftpserver.com/LOGS)
Notice that we use the $LatestLogFile variable to find the most recent log file. Edit this as needed (ie *.txt or whatever) to get the newest log file name. Adding this to the end of the RMM automation script will allow the needed log files to be placed in the FTP server. Collecting from multiple machines means that each file collected should have a different file name, so make sure when you are scripting the diagnostic that you use to name the log file with $env:computername or some other identifier to make sure the files don’t overwrite themselves when uploaded.
If your company is a MSP or wants to become one and automation just seems out of reach, then contact us to run your RMM for you.
And God will generously provide all you need. Then you will always have everything you need and plenty left over to share with others. As the Scriptures say, “They share freely and give generously to the poor. Their good deeds will be remembered forever.” For God is the one who provides seed for the farmer and then bread to eat. In the same way, he will provide and increase your resources and then produce a great harvest of generosity in you. - 2 Corinthians 9:8-10
We use cookies to ensure that we give you the best experience on our website. If you continue to use this site we will assume that you are happy with it.