Stepping over dollars to pick up pennies with backup can cost your business more than it saves—invest in reliable online backup instead.
It’s story time again!
This time we are talking about Dave a former client of ours. He decided several years ago to change his accounting practice’s IT support to a national company that produced one of the software packages he used. Dave listened to their sales pitch about a better understanding and support of their software for less money per month. Dave still called us once and awhile to help do things in person because this national company did not have any local presence. It had been almost a year since we had heard from Dave last when we got a phone call from another local computer repair shop asking us for any information we could provide to help them – Dave’s server had crashed and was not booting after a power outage.
It turns out that Dave’s national IT support company did not have any backups of the server. They had no idea how the server was configured and this forced Dave to reach out to the local computer repair shop. We gave them credentials that we had for the backup system we had put in place previously and talked them through reconnecting a network storage device to the server to get the server back to complete functionality. This process took them about a week to complete.
During the time that we did support Dave there was a similar incident with one of his computers. We used the backup system we had recommended to get him back to fully functional in a matter of hours – in the middle of tax season no less.
The moral of the story is that Dave should have stayed with Farmhouse Networking or moved to a managed IT support company that understands both the software and the things that can go wrong in a company like Dave’s account practice so that he could be properly protected.
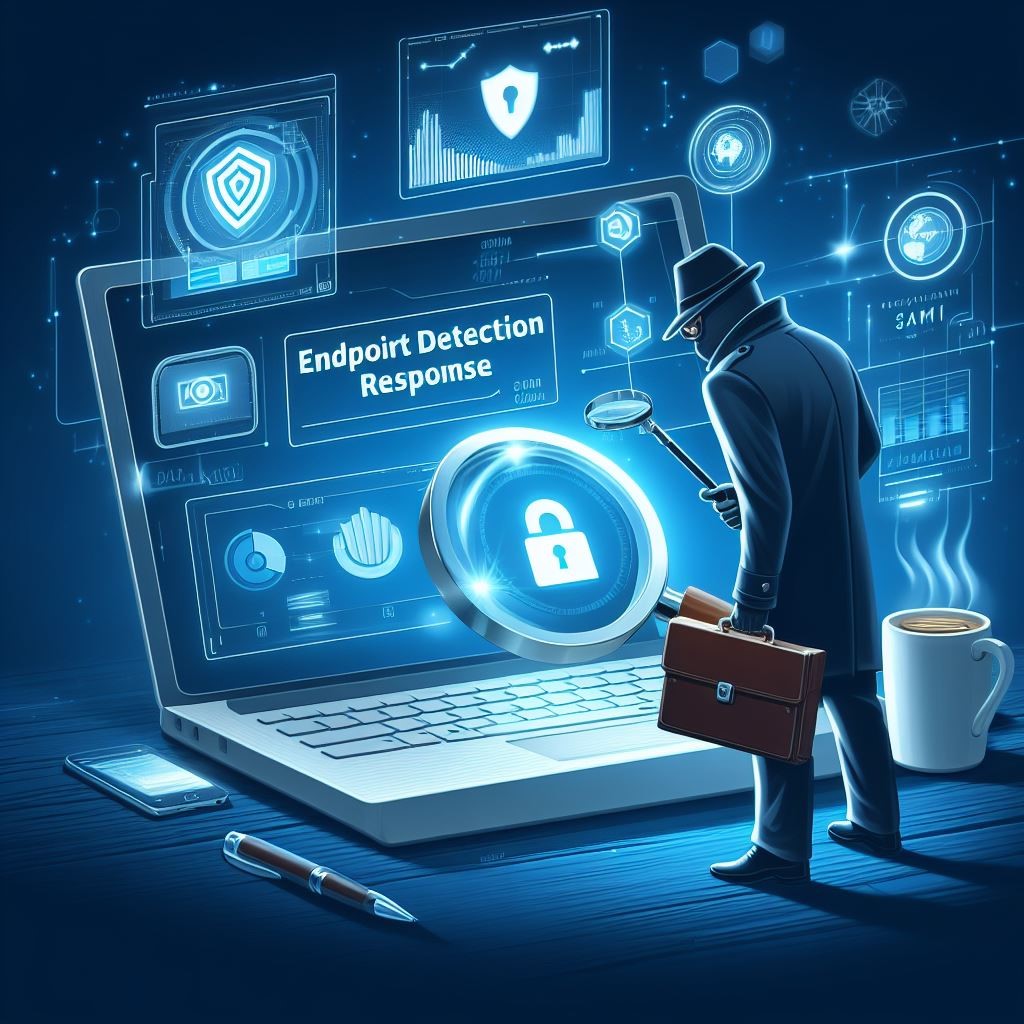
EDR provides SMBs with real-time endpoint monitoring, automatic threat quarantine, and rapid incident response to minimize breaches.
Cybersecurity is more important than ever. Cyber threats are evolving and becoming increasingly sophisticated, making it essential for small and medium-sized businesses (SMBs) to protect their sensitive information. One crucial tool in the cybersecurity arsenal is Endpoint Detection & Response (EDR). In this article, we will explore why SMBs should prioritize EDR and the benefits it brings to their cybersecurity posture.
Understanding Endpoint Detection & Response
Endpoint Detection & Response (EDR) is a proactive cybersecurity solution that focuses on detecting, investigating, and mitigating advanced threats at the endpoint level. Endpoint refers to any device connected to a network, such as laptops, desktops, servers, or even mobile devices. EDR solutions monitor endpoints in real-time, collecting and analyzing data to identify and respond to suspicious activities or potential security breaches.
The Rising Threat Landscape for SMBs
SMBs often mistakenly believe that they aren’t attractive targets for cybercriminals due to their size. However, the reality is quite different. In fact, SMBs are increasingly being targeted by cybercriminals because they often have fewer resources dedicated to cybersecurity, making them an easier target. According to recent studies, nearly half of all cyberattacks target SMBs.
Moreover, the consequences of a successful cyberattack on an SMB can be devastating. From financial loss to reputational damage, the impact can be significant, and in some cases, even cause businesses to shut down. This highlights the urgent need for SMBs to invest in robust cybersecurity measures, such as EDR.
The Benefits of Endpoint Detection & Response for SMBs
Real-time Threat Detection: EDR solutions provide continuous monitoring of endpoint activities, enabling real-time threat detection. By analyzing behavioral patterns and indicators of compromise, EDR can quickly identify potential threats, allowing businesses to respond promptly and mitigate risks before they result in data breaches or system compromises.
Improved Incident Response Capabilities: EDR not only detects threats but also provides valuable insights to aid in incident response. It records endpoint activity logs, allowing security teams to investigate incidents, identify root causes, and take appropriate action to contain and remediate the threat effectively.
Visibility and Control: SMBs often struggle with limited visibility into their IT environments. EDR solutions provide deeper visibility into endpoints across the network, allowing IT teams to identify vulnerabilities, enforce security policies, and ensure compliance with regulatory requirements.
Proactive Threat Hunting: EDR empowers SMBs to take a proactive approach to cybersecurity by actively hunting for potential threats. By leveraging advanced detection techniques and threat intelligence, EDR can identify and mitigate emerging threats even before they have a chance to impact the organization.
Simplified Security Operations: Automating threat detection and response processes frees up valuable time for IT teams, enabling them to focus on other critical tasks. EDR solutions can automatically contain and remediate threats, reducing the burden on IT staff and improving overall efficiency.
Overcoming Challenges in Implementing EDR
While EDR offers immense benefits, implementing and managing EDR solutions can pose challenges for SMBs. Common obstacles include limited budgets and resources, the complexity of deployment, and the need for ongoing monitoring and maintenance. However, by partnering with a reliable cybersecurity provider, like Farmhouse Networking, that understands the unique needs of SMBs, these challenges can be overcome and the full potential of EDR can be realized.
It is not a matter of if you will be targeted, but when. Let Farmhouse Networking take proactive steps to secure your endpoints and fortify your cybersecurity defenses with EDR.
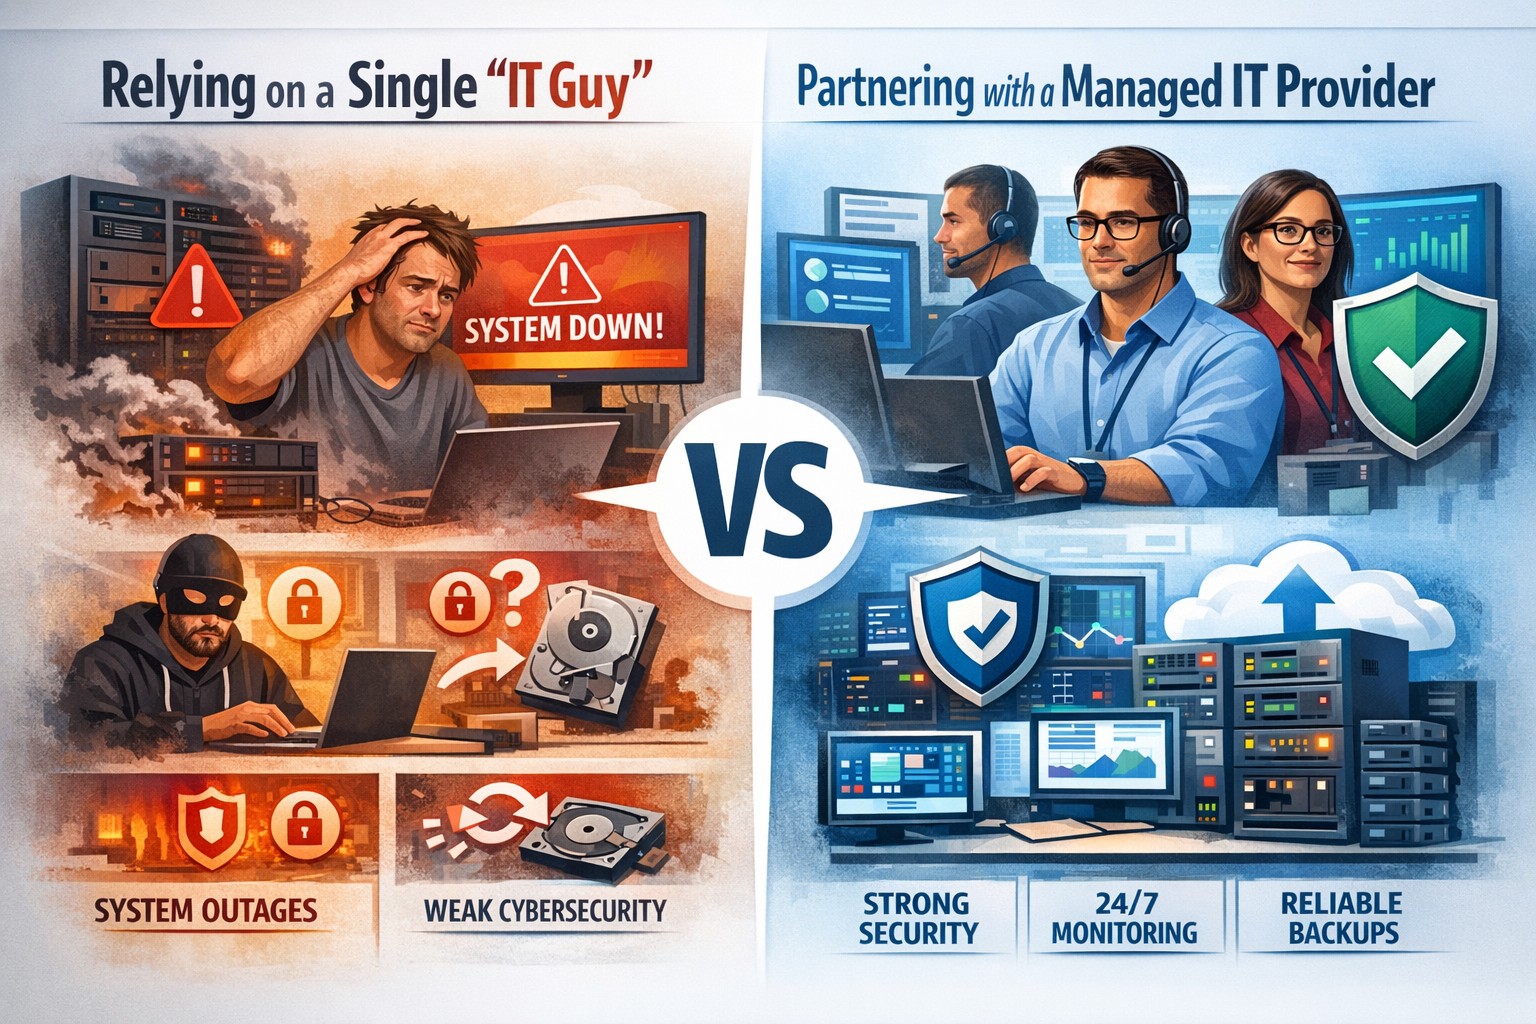
Relying on one IT guy can expose your small business to downtime, data loss, and security vulnerabilities—managed IT services offer stronger protection.
The role of Information Technology (IT) in business success cannot be overstated. IT systems and infrastructure form the backbone of modern businesses, facilitating communication, data management, and efficient workflow. From managing customer databases to ensuring network security, IT plays a crucial role in driving productivity and competitiveness. However, many businesses make the mistake of relying on a single IT guy to handle all their technological needs. In this article, I will discuss the risks associated with this approach and the importance of adopting a team-based approach to IT support.
The risks of relying on a single IT guy
Lack of expertise and knowledge
When you rely on a single IT guy, you are limited to their individual skills and expertise. While they may be knowledgeable in certain areas, they may not possess the breadth of knowledge required to handle all aspects of your business’s IT infrastructure. IT is a vast field that encompasses various domains such as network administration, cybersecurity, software development, and hardware maintenance. By relying on a single guy, you risk missing out on specialized expertise that could greatly benefit your business.
Limited availability and support
Another significant risk of relying on a single IT guy is limited availability and support. IT issues can arise at any time, and if your IT guy is unavailable or overwhelmed with other responsibilities, it can lead to significant downtime and disruptions in your business operations. With a single point of contact, you may have to wait for extended periods before your IT issues are resolved, resulting in decreased productivity and potential financial losses.
Single point of failure
Relying on a single IT guy also means that your business is vulnerable to a single point of failure. If your IT guy falls ill, takes a vacation, or leaves the company, you may be left without any IT support. Singular IT techs often don’t have the time or resources to properly document procedures and critical passwords, so when they go this information is lost. This can be particularly problematic during critical times when you need immediate assistance. Having a backup plan or a team of IT professionals ensures that your business operations can continue uninterrupted, even if one person is unavailable.
The impact of downtime on business operations
Downtime can have severe consequences on your business operations. Every minute your systems are down translates to lost revenue, missed opportunities, and frustrated customers. According to a study conducted by Gartner, the average cost of IT downtime is $5,600 per minute. Imagine the financial implications if your IT guy is unavailable for an extended period. With a team-based approach to IT support, you can minimize downtime and ensure swift resolution of any issues, thereby safeguarding your business’s success.
The importance of a team approach to IT support
Adopting a team approach to IT support offers numerous benefits for your business. Firstly, it provides a diverse set of skills and expertise that can be leveraged to address various IT challenges effectively. Each team member brings their unique knowledge and experience, allowing for comprehensive and well-rounded support. Additionally, with a team, you have the advantage of increased availability and faster response times. By distributing responsibilities among team members, you can ensure that someone is always available to address your IT needs promptly.
The benefits of outsourcing IT support
Outsourcing IT support is a viable solution for businesses looking to avoid the risks associated with relying on a single IT guy. Outsourcing allows you to tap into a pool of talented professionals with specialized expertise in different IT domains. Moreover, outsourcing IT support can often be more cost-effective than hiring a full-time IT staff, especially for small and medium-sized businesses. By partnering with an external IT support provider, like Farmhouse Networking, you can access a wide range of services, including network monitoring, cybersecurity, data backup, and software maintenance, all while enjoying the benefits of a dedicated team.
Finding the right IT support provider
Finding the right IT support provider is crucial to ensuring a successful and secure IT infrastructure. When evaluating potential providers, consider their experience, track record, and the range of services they offer. Look for certifications and qualifications that demonstrate their expertise and commitment to quality. It is also essential to assess their responsiveness and availability to ensure that they can meet your business’s IT needs promptly. Ask them about their record keeping habits, make sure they document everything and keep your information secure with industry standard protocols. By conducting thorough research and seeking recommendations, you can find an IT support provider that aligns with your business goals and requirements.
By adopting a team-based approach to IT support or outsourcing your IT needs, you can mitigate these risks and ensure a successful and secure IT infrastructure. Don’t get stuck when your IT guy no longer responds; contact us to experience the comfort of having a team look after your business IT. With the right IT support provider, you can focus on growing your business while leaving your technological needs in capable hands.
Modern accounting firm using managed IT services to keep tax software and client data online during busy season
Tax season is when every minute of billable time matters, and even a one-hour outage can cost thousands in lost work, delayed returns, and stressed staff. As a firm owner, the right IT strategy is the difference between a smooth March and a “fire drill” every week.
Why Downtime Is So Costly During Tax Season
Accounting teams regularly work 60+ hour weeks during peak busy season, so any outage hits during extended hours, not just 9–5.
Firms that move from reactive to proactive IT strategies have been able to cut downtime by 60–80%, protecting both billable hours and client trust.
Technology advances have already helped 69% of firms reduce time spent on admin tasks, which means you’re increasingly dependent on always-available systems.
In practice, that means tax software, QuickBooks, email, client portals, and e-file systems must stay fast and available—even at 9 PM on a Saturday in March.
Practical Actions You and Your IT Team Should Take
As the owner, your job is to set expectations, fund the right solutions, and make sure your IT partner or internal team executes before tax season hits.
1. Define Acceptable Downtime and Recovery Targets
Set Recovery Time Objective (RTO) for critical apps (e.g., “tax software back online within 30 minutes”).
Set Recovery Point Objective (RPO) for data (e.g., “no more than 15 minutes of work lost if something fails”).
Require your IT provider to document how their backup and disaster recovery design actually meets those targets.
2. Harden and Modernize Your Infrastructure
Move key workloads (tax apps, file shares, QuickBooks, portals) to scalable cloud or private hosting so performance doesn’t collapse under peak load.
Decommission old servers and unused software that increase failure risk and maintenance overhead.
Implement redundant systems for critical functions—at minimum, dual internet connections from different providers.
3. Automate the “Failure-Prone” Tasks
Enable automated patch management so security and stability updates happen after hours, not manually in the middle of busy season.
Automate data backup verification so someone doesn’t have to remember to check if last night’s backups actually completed.
Use automation for repetitive workflows like recurring invoice generation and batch processing of returns during off-hours.
4. Lock Down Cybersecurity Without Slowing Staff
Enforce multi-factor authentication (MFA) on all remote access, portals, and email accounts that touch client financial data.
Standardize access control (no shared logins, immediate offboarding for departed staff, clear least-privilege rules).
Maintain a written information security plan aligned with IRS Publication 4557 and FTC Safeguards expectations.
5. Demand 24/7 Support and Clear Escalation
Make 24/7 support a non-negotiable during tax season so issues at night or weekends are addressed immediately.
Require defined SLAs (response and resolution times) for any outage that touches tax apps, QuickBooks, or client-facing portals.
Ask your IT provider to test an incident response plan at least annually, including simulated ransomware or major vendor outages (like the July 2024 CrowdStrike event that disrupted 8.5 million devices).
6. Train Your Team to Avoid Preventable Incidents
Run short, focused phishing and security awareness training for staff before busy season.
Provide simple playbooks for “what to do if X happens” (ransomware popup, strange login alert, application freeze).
Make it clear that reporting a problem early is rewarded, not punished—this reduces hidden incidents that later explode into full outages.
Common Client Questions (and Strong Answers You Can Give)
You can turn solid IT preparation into a client trust advantage by proactively answering these questions.
Q1: “What happens to my data if your system goes down during tax season?” A: Our systems are backed up frequently with both onsite and cloud-based, immutable backups, and we have defined recovery objectives so we can restore access quickly even in a worst-case scenario.
Q2: “How do you protect my financial data from hackers?” A: We use multi-factor authentication, strict access controls, encryption, and continuously updated security tools aligned with IRS and FTC guidelines to safeguard your information.
Q3: “Will a cyberattack or outage delay my return filing?” A: We’ve engineered redundancy and disaster recovery around our tax applications, with clear recovery time targets and 24/7 IT monitoring, so even if something happens, we can recover quickly without missing filing deadlines.
Q4: “Can I still access my documents if your office is closed?” A: Yes, our cloud-based portals and systems are designed for secure remote access, allowing us and you to access documents from anywhere as long as there is internet connectivity.
How Farmhouse Networking Helps Accountants Minimize Downtime
Farmhouse Networking specializes in managed IT services for fast-growing accounting and finance firms, with a focus on performance, uptime, and client experience. As a business owner, you get a partner that understands both the technical and regulatory pressures of tax season.
Here’s how Farmhouse Networking can support the action steps above:
Proactive managed IT and cloud services: We design and manage scalable infrastructure and cloud solutions built specifically to handle tax-season peak loads for accounting firms.
Business continuity and disaster recovery: We implement and test backup strategies (including immutable and cloud backups), document RTO/RPO, and prepare runbooks so your team knows exactly what happens when something fails.
Security and compliance alignment: We deploy MFA, patch management, endpoint protection, and network hardening that align with IRS and FTC expectations, helping you protect client data and avoid regulatory headaches.
24/7 monitoring and support: We provide round-the-clock monitoring and responsive support, so your late-night tax work is covered and small issues don’t become revenue-killing outages.
Strategic technology roadmap: We help you decommission legacy systems, plan upgrades, and “future-proof” your practice so each year’s tax season gets easier, not harder.
Take the Next Step Before the Next Busy Season
If you wait until March to “fix IT,” you’re already too late. The easiest way to protect your firm’s revenue, reputation, and sanity is to partner with an IT team that lives and breathes accounting workflows and tax-season realities.
Email support@farmhousenetworking.com for more information about how Farmhouse Networking can help improve your business, minimize downtime next tax season, and give you and your team the confidence to focus on client work instead of fighting technology.
Neglected IT infrastructure quickly turns into costly downtime and data loss, but proactive managed IT services help businesses stay online and protected.
Has your business ever experienced a technology crisis that could have been easily prevented? Learn from the cautionary tale of a non-managed client who recently faced a major setback due to neglected IT infrastructure. This compelling story underscores the importance of proactive IT management and the need for robust backup solutions.
The Story: A Cautionary Tale
Neglected IT Infrastructure: After 5 years of radio silence, a panicked non-managed client reached out to us when their aging computer, hosting their crucial order processing system, malfunctioned.
DIY Mishap: Attempting to fix the issue themselves, the client inadvertently worsened the situation by installing the wrong part, leading to a cascade of problems.
Costly Consequences: The subsequent visit to a local repair shop and improper part replacement led to the corruption of critical files, including the Windows Operating System and the database containing vital client data.
Backup Oversight: The client’s failure to maintain updated database backups exacerbated the crisis, with the only available backup being approximately 5 years old.
The Solution: Managed IT Services
Proactive Maintenance: With managed IT services, critical components like the aged computer would have been promptly replaced before catastrophic failure, averting the entire crisis.
Remote Support: Swift remote intervention by a managed IT provider would have prevented the corruption of the operating system and database, substantially reducing the overall cost of the incident.
Comprehensive Backup Strategy: Every business should prioritize regular, imaged-based backups to safeguard their crucial data, ensuring seamless restoration in the event of a disaster.
Expert Guidance: Embracing managed IT services equips businesses with expert recommendations and proactive measures to avoid potentially devastating technology pitfalls.
Take the Right Step for Your Business!
Don’t let your business fall victim to preventable IT disasters. Embrace the proactive protection and expert guidance offered by a managed IT service provider to ensure uninterrupted business operations.
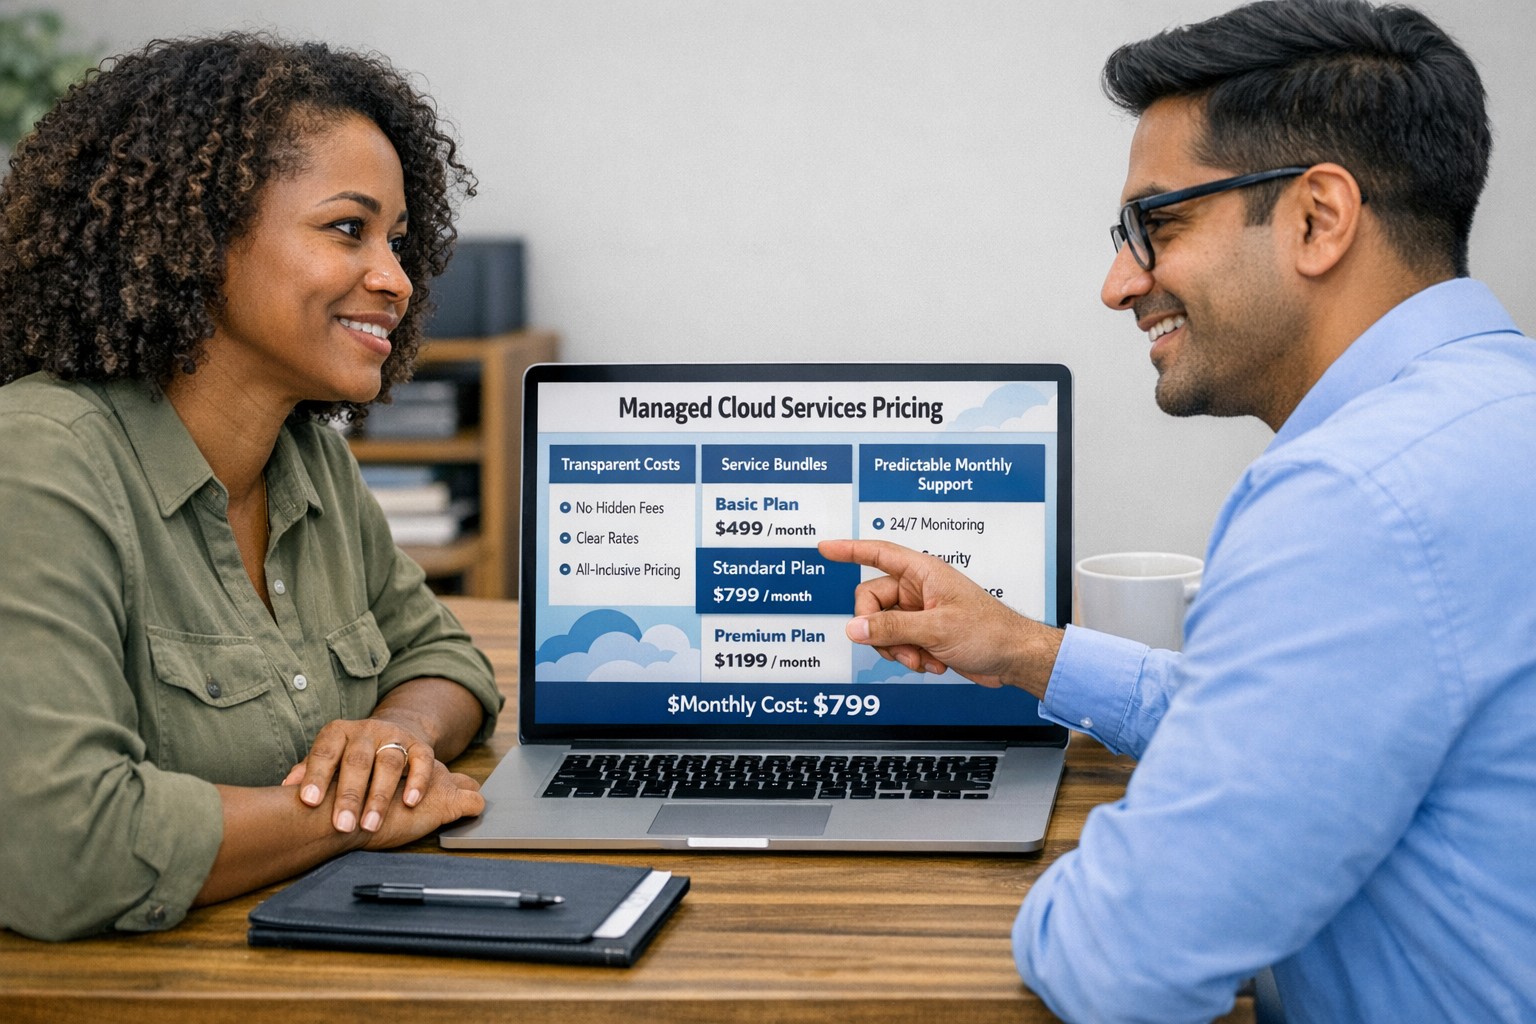
Managed cloud services pricing helps small businesses control IT costs with transparent, predictable monthly cloud support.
We have received numerous inquiries from potential customers regarding our pricing structure. Specifically, they want to know if we offer monthly contracts or if we charge an hourly rate. The answer is Yes.
Hourly Rate
For customers who require a one-time fix or need a project completed, we offer a service based on an hourly rate. Our rate for remote or on-site work that is not covered under a contract is $150 per hour. We bill in 15-minute increments and take pride in our efficiency. For clients with more than 2 service requests per month, we highly recommend signing up for a contract to save money and benefit from our expert oversight.
Monthly Contracts
There are three types of monthly contracts:
Remote Maintenance Contract
This is the package that most of our clients choose. It includes automated maintenance, cyber security protections, and unlimited remote support. Since most problems and questions can be handled remotely, this package offers real value.
Full Service Maintenance Contract
This package is for clients who want complete peace of mind. It includes all services, whether remote or at their offices. Additionally, it provides some additional benefits, such as top priority in our support queue.
Co-Managed IT Contract
This special package is designed for companies that already have a full-time IT employee or IT service companies in need of extra help. It provides them with the necessary automations and tools to make their jobs easier, allowing them to focus on what matters. This package also includes a discount on our remote and on-site services.
All contracts are based on a per-device model, taking into account the number of workstations, printers, servers, switches, etc. on the client’s network. We use this model because the other popular model, per user, is too vague and can easily hide excessive profit margins. Contracts can be month-to-month or a yearly commitment. The difference is that with a yearly commitment, you are protected from price increases for the entire year. We also offer many optional add-ons for our clients, such as Office 365, Employee Security Training, Penetration/Vulnerability Scanning, Mobile Device Management, Compliance, Secure Remote Access, and Security Operations Center.
Are you looking for reliable IT support that suits your business’s unique requirements? Look no further! Our flexible pricing options cater to businesses of all sizes. Whether you require one-time assistance or ongoing support, we have the right plan for you. Ready to take your business IT support to the next level? Contact us today to discuss your needs and find the perfect plan for your business.
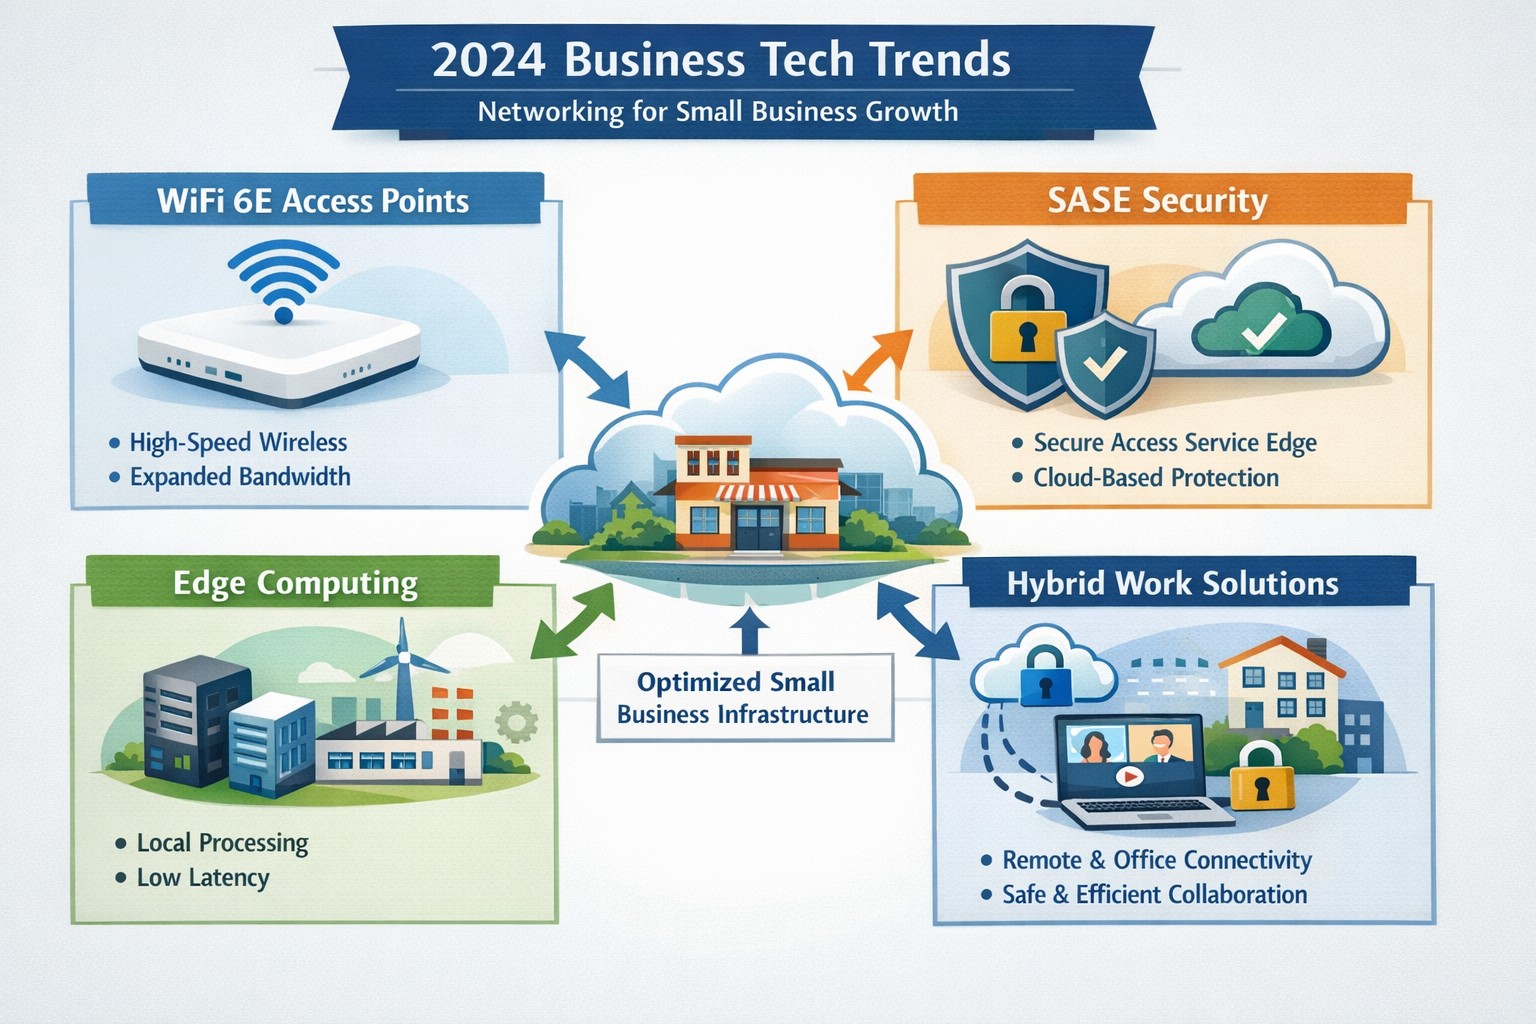
2024 networking trends like WiFi 6E and zero trust architecture prepare small businesses for hybrid work and cybersecurity demands.
As we enter 2024, the U.S. Chamber of Commerce reports that 64% of business owners believe their businesses are in good health, showing confidence in navigating the future. Technology has emerged as a key driver of success, enabling businesses to thrive in uncertain times. Farmhouse Networking has identified four essential technology trends that will empower businesses in 2024, propelling them towards growth and success.
1. Harnessing the Power of Artificial Intelligence
Artificial intelligence (AI) has moved beyond the realm of technology discussions and is now at the forefront of business success. Businesses utilizing AI credit it for increased success, as it offers game changing assistance in various areas of operations. AI tools can automate tasks, saving time and resources for businesses.
AI for Operational Efficiency
Businesses can leverage AI to automate expense management, correlate data from multiple sources to create meaningful reports, create sales presentations that address customer needs, and tackle tasks that were previously time-consuming. By harnessing AI, manufactures can optimize inventory, align staffing with peak hours, and identify opportunities for targeted promotions. Although implementing AI may require an initial investment, the positive impact it can have on businesses in 2024 is promising.
AI for Enhanced Customer Experiences
Customer experience plays a pivotal role in business success, with 34% of business leaders recognizing the pivotal role of technology in delivering exceptional experiences. Upgrading systems to ditch outdated tech and manual methods is a priority for many businesses in 2024. Chatbots, for instance, are invaluable for front-line customer service agents, providing round-the-clock support. Automated assistants and Unified Communications tools enhance customer interactions and employee productivity. These digital processes not only enhance retention and satisfaction but also create opportunities for cross-selling and upselling efforts.
2. Delivering Exceptional Digital Customer Experiences
Businesses understand the importance of delivering exceptional digital customer experiences in 2024. Upgrading systems and embracing efficient digital processes will be key to achieving this goal.
Upgrading Systems for Efficiency
Outdated technology and manual methods hinder efficiency. Businesses are expected to upgrade their systems by adopting AI, automating repetitive tasks, and migrating to the cloud. These solutions make information easily accessible, guide customers interactions, and improve employee productivity.
Embracing Cloud-based Solutions
A robust technology infrastructure is crucial for businesses to keep up with competition and exceed customer expectations. Automation software can save time and cut down on expenses by managing data and completing routine tasks. Mobile technology ensures network connectivity anywhere, anytime, allowing for collaboration on the go. Cloud based systems enables efficient management of IT costs plus offer flexibility and scalability, especially for businesses, as the workforce continues to move away from traditional office setups.
3. The Backbone of Business Operations: Fast and Reliable Connectivity
Fast and reliable connectivity is the backbone of efficient operations, seamless communication, and scalable expansion. Businesses across different sectors can benefit from investing in connectivity solutions.
Optimizing Inventory and Collaboration
Manufactures can leverage fast and reliable a to optimize inventory management. By having real-time visibility into inventory levels, manufactures can prevent stockouts and ensure they have the right products available when customers need them. Accountants can collaborate effectively without being limited by physical office spaces. Cloud connectivity allows them to access customer files, share updates, and communicate with team members regardless of their location.
Enhancing Healthcare Services
Connectivity plays a vital role in enhancing healthcare services. From telemedicine to remote patient monitoring, healthcare providers can offer more accessible and efficient care. Fast and reliable connectivity enables seamless communication between healthcare professionals and patients, facilitates the sharing of medical records, and supports the use of emerging technologies like artificial intelligence and Internet of Things (IoT) devices.
Safeguarding Customer and Company Devices
Investments in network connectivity not only benefit customers but also help safeguard customer and company devices. By adopting a complete network connectivity solution that includes reliable internet, network security measures, and disaster recovery solutions, businesses can protect sensitive data and ensure the smooth operation of their technology infrastructure.
4. Embracing the Future: Expanding Technology Spending
In 2024, CEOs are planning to expand their technology spending to stay competitive and meet evolving customer expectations. However, to fully leverage the benefits of technological investments, businesses need to partner with reputable companies that can provide robust network infrastructure.
Strengthening Technological Investments with Robust Networks
Businesses should partner with companies like Farmhouse Networking to reinforce their critical technological investments. Robust networks ensure reliable network connectivity, data security, and seamless integration of technology solutions. By partnering with trusted providers, businesses can enhance their technology infrastructure and drive growth.
Weathering Uncertainties with Tech Transformation
By staying ahead of technology trends, business owners can not only weather uncertainties but also emerge stronger and more resilient. Embracing the power of artificial intelligence, delivering exceptional digital customer experiences, building a strong technology infrastructure, and investing in fast and reliable network connectivity will position businesses for success in 2024 and beyond.
Embracing these tech trends and partnering with trusted providers will enable businesses to thrive in an ever-evolving business landscape.
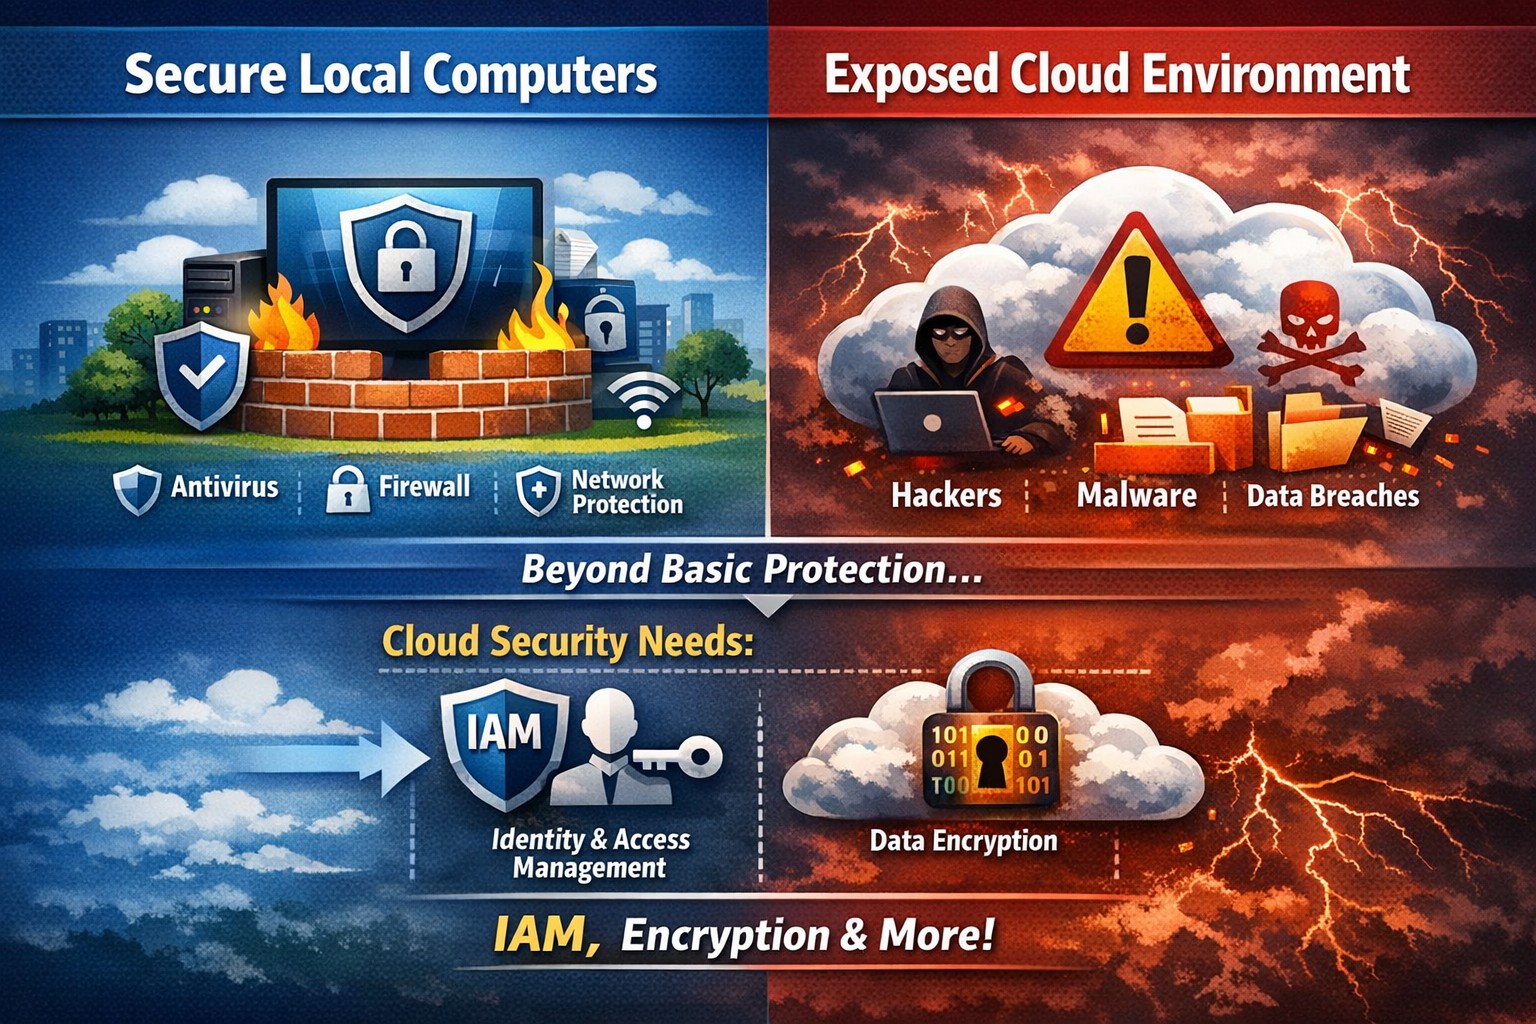
Secure endpoints don’t guarantee cloud safety—address cloud-specific risks now
The ability to store and access data remotely in the cloud has revolutionized the way organizations operate, providing flexibility, scalability, and cost-efficiency. However, with this convenience comes the need for robust security measures to protect sensitive information from cyber threats. This article explores the importance of cloud security and provides strategies to safeguard your company’s data in the cloud.
Understanding Cloud Security
Cloud security encompasses a set of controls, processes, technologies, and policies designed to protect cloud-based systems, infrastructure, and data. It is one part of computer security and information security, aiming to safeguard businesses from financial, legal, and reputational repercussions of data breaches and loss.
Cloud security involves various strategies and best practices to ensure the confidentiality, integrity, and availability of cloud resources. It includes measures such as real-time monitoring, multi-factor authentication (MFA), identity and access management (IAM), cloud-to-cloud backup solutions, systematic off-boarding processes, and anti-phishing training.
Real-time Monitoring
Real-time monitoring is a crucial strategy to detect and respond to suspicious threats promptly. By implementing real-time monitoring tools, businesses can gain visibility into their employee activity and cloud systems to proactively identify any potential cyber attacks. This allows for immediate action to mitigate risks and minimize the impact of data breaches. According to IBM, the global average total cost of a data breach in 2023 was $4.45 million, highlighting the financial implications of inadequate security measures.
Multi-Factor Authentication (MFA)
Traditional username and password combinations are no longer sufficient to protect user accounts from hackers. MFA adds an extra layer of security by requiring users to provide multiple pieces of evidence to verify their identities. This could include a combination of something they know (password), something they have (a mobile device or security key), or something they are (biometric data like a fingerprint or facial recognition). By implementing MFA, businesses can significantly reduce the risk of account compromise attacks and prevent unauthorized access to cloud applications.
Identity and Access Management (IAM)
Identity and access management (IAM) is a critical component of cloud security. It involves assigning proper levels of authorization and access controls to ensure that employees only have access to the information and resources necessary for their roles. IAM not only prevents accidental data breaches but also protects businesses from external threats by limiting the potential attack surface. By implementing IAM solutions, organizations can enforce strict access controls, reduce the risk of unauthorized data access, and maintain data privacy.
Cloud-to-Cloud Backup Solutions
While cloud providers typically have robust data protection measures in place, businesses should not solely rely on them for data backup. Cloud-to-cloud backup solutions provide an additional layer of protection by replicating data from one cloud service to another. This helps mitigate the risk of data loss due to cloud provider mistakes or system failures. Organizations using software-as-a-service (SaaS) applications can benefit from cloud-to-cloud backup solutions, ensuring advanced data protection beyond the basic safeguards provided by the applications themselves.
Systematic Off-boarding Process
When employees leave a company, it is crucial to have a systematic off-boarding process in place to revoke their access rights immediately. According to a survey conducted by Cyberark, “88% of IT workers would take sensitive data with them or abscond with company passwords if they were fired.” Additionally, 50% of ex-employees can still access corporate apps. To prevent unauthorized access and protect sensitive data, organizations should ensure that departing employees’ access rights are promptly revoked. This includes revoking access to systems, data, cloud storage, intellectual property, and consumer information.
Offering Anti-Phishing Training
Phishing remains a prevalent threat in the cybersecurity landscape. Hackers often gain access to secure information by stealing employees’ login credentials or utilizing social engineering techniques. Offering anti-phishing training to employees can help raise awareness about these scams and prevent them from falling victim to phishing attacks. By educating employees on how to identify and report phishing attempts, organizations can safeguard their sensitive data without compromising productivity.
Strengthening Cloud Security Measures
While the above strategies are crucial for securing cloud operations, it is essential to adopt a comprehensive approach to cloud security. Here are additional best practices to strengthen your cloud security measures:
Enforce reliable passwords: Implement password policies that require complex, unique passwords and regular password updates. Encourage the use of password managers to reduce the risk of weak passwords.
Use encryption: Encrypting sensitive data helps protect it from unauthorized access. Implement encryption measures for data at rest and in transit.
Test security continuously: Regularly conduct vulnerability assessments and penetration testing to identify and address security weaknesses in your cloud infrastructure. This proactive approach ensures that potential vulnerabilities are discovered and remediated before they can be exploited.
Ensure local backup: In addition to cloud-to-cloud backup solutions, consider implementing local backups of critical data. This provides an extra layer of protection in case of cloud provider outages or data loss incidents.
Implement additional security measures: Explore additional security solutions such as intrusion detection systems (IDS), firewalls, and data loss prevention (DLP) tools to enhance your overall cloud security posture.
Avoid storage of sensitive data: Minimize the storage of sensitive data in the cloud. Identify and classify data based on its sensitivity and apply appropriate security controls accordingly. This reduces the risk of data breaches and ensures compliance with data protection regulations.
Why Is Cloud Security Important?
Cloud security is crucial for organizations migrating their sensitive data and applications to the cloud. By adopting secure cloud practices, businesses can protect highly sensitive data from hackers and ensure compliance with regulatory requirements. Here are a few reasons why cloud security is important:
Control Access
Cloud security enables organizations to monitor and regulate access to their data. By formulating policies and implementing access controls, businesses can prevent unauthorized users from accessing sensitive information. Cloud management tools provide visibility into user behavior and help maintain strong access controls.
Encrypting Sensitive Data
Encryption plays a vital role in securing data in the cloud. By encrypting data at rest and in transit, organizations can protect it from unauthorized access. Implementing encryption with strong access and control policies minimizes the impact of compromised keys and ensures data confidentiality.
Using Automation
Automation helps minimize human errors and misconfigurations in cloud environments. By automating routine tasks and configurations, organizations can ensure that their infrastructure is deployed and maintained correctly. Cloud automation tools streamline everyday configuration items and provisioning, reducing the risk of security vulnerabilities.
Extend Vulnerability Management Tools
Vulnerability management tools scan networks to identify potential threats or weaknesses that attackers can exploit. These tools help manage and mitigate attacks on the network by suggesting remedies and actions to reduce the prospect of network breaches. Regular scanning and remediation of vulnerabilities are essential to maintain a secure cloud environment.
Implementing Enhancements
Continuous improvement is crucial for maintaining cloud security. Organizations should continuously enhance their security measures throughout the entire lifecycle of their operations. As new threats emerge, businesses must adapt and implement necessary enhancements to safeguard against potential risks.
Deploying Multi-Factor Authentication (MFA)
Deploying MFA increases security and authentication for enterprise applications. Weak or reused passwords are a significant cause of data breaches. By implementing MFA, businesses can protect their cloud applications from unauthorized access attempts. Authorized personnel are granted access, minimizing the risk of data breaches.
Local businesses rely on Farmhouse Networking to simplify their cloud security management and enhance overall security posture. Click here to get started.
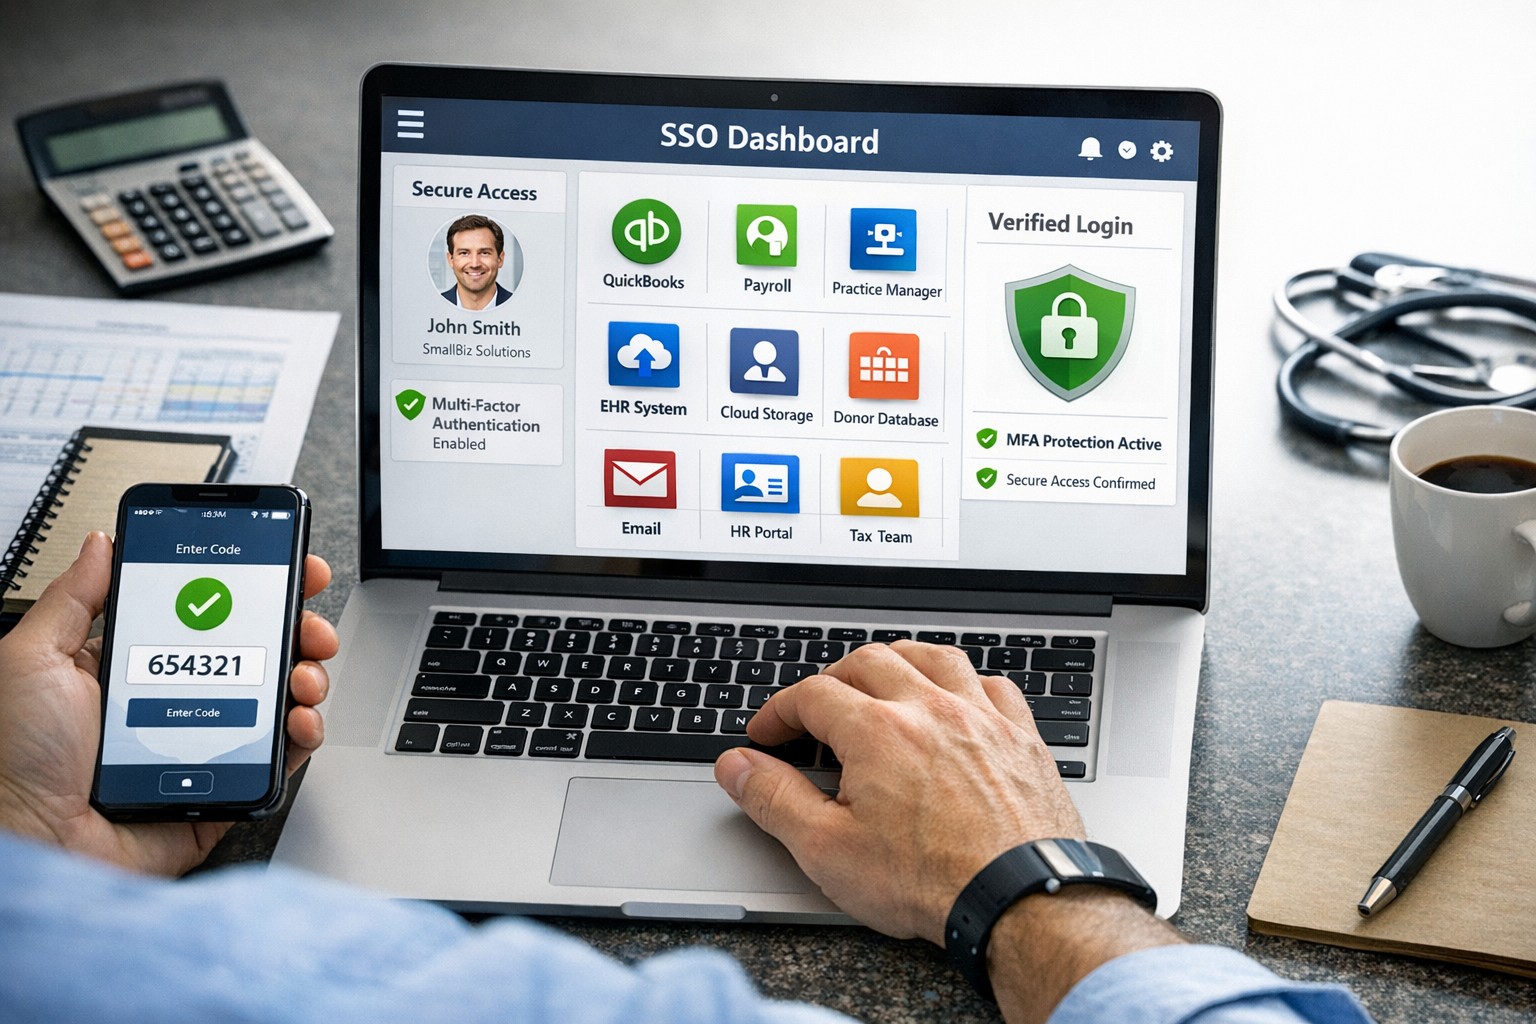
SSO for BYOD provides secure, convenient single sign-on access across apps on personal devices for small business teams.
Individuals and organizations rely heavily on various online platforms and services, the need for a secure and convenient way to access these resources is paramount. This is where SSO Single Sign-On comes into play. SSO Single Sign-On is a powerful authentication method that allows users to securely sign in to multiple applications and platforms using just one set of credentials. In this article, we will explore the benefits of SSO Single Sign-On, its implementation, and how it enhances security while streamlining the user experience.
Understanding SSO Single Sign-On
What is SSO Single Sign-On? SSO Single Sign-On is an authentication process that enables users to access multiple applications and platforms using a single set of login credentials. With SSO Single Sign-On, users only need to remember one username and password, eliminating the hassle of managing multiple credentials for different services. This not only saves time but also enhances convenience for users.
How does SSO Single Sign-On work? SSO Single Sign-On works by establishing a trust relationship between an identity provider (IdP) and the various service providers (SPs). When a user attempts to access a service, the IdP verifies the user’s identity and provides a token to the SP, which grants the user access without requiring additional authentication. This seamless process simplifies the login experience and eliminates the need for users to repeatedly enter their credentials.
Benefits of SSO Single Sign-On
Enhanced Security: One of the key advantages of SSO Single Sign-On is its ability to enhance security. By consolidating login credentials into a single set, users are less likely to resort to weak passwords or reuse passwords across multiple platforms. This reduces the risk of password-related security breaches. Additionally, SSO Single Sign-On allows for stronger authentication methods, such as two-factor authentication, further bolstering security without requiring multiple accounts.
Streamlined User Experience: With SSO Single Sign-On, users no longer have to remember and enter multiple sets of login credentials. This significantly reduces the login friction and streamlines the user experience. Users can seamlessly navigate between different applications and platforms without the need for repetitive logins. This convenience not only saves time but also improves productivity.
Centralized Access Management: SSO Single Sign-On provides organizations with centralized access management capabilities. Administrators can easily control user access to various applications and platforms from a centralized dashboard. This simplifies user provisioning and deprovisioning, ensuring that employees have timely access to the resources they need while maintaining security and compliance.
Cost and Time Savings: Implementing SSO Single Sign-On can lead to cost and time savings for organizations. By reducing the number of password-related support requests, IT teams can focus on more strategic initiatives. Additionally, the streamlined login experience reduces the time spent by employees on authentication, leading to increased productivity and efficiency.
Implementing SSO Single Sign-On
To implement SSO Single Sign-On, organizations need to follow a few key steps:
Evaluate SSO Solutions: Begin by evaluating various SSO solutions available in the market. Consider factors such as compatibility with existing systems, scalability, security features, and ease of integration.
Choose an Identity Provider: Select an identity provider that aligns with your organization’s requirements. The identity provider will be responsible for authenticating users and issuing tokens for accessing service providers. Office 365 and Google Workspace are usually the best, most prolific IdP sources to use.
Configure Service Providers: Configure the service providers that you want to integrate with SSO Single Sign-On. This involves establishing trust relationships between the identity provider and the service providers.
User Provisioning and Deprovisioning: Implement a user provisioning and deprovisioning process to ensure that users have the necessary access to the applications and platforms they require. This process should be integrated with the SSO Single Sign-On solution to maintain centralized access management.
Test and Monitor: Thoroughly test the SSO Single Sign-On implementation to ensure its functionality and security. Regularly monitor the system to identify and address any potential issues or vulnerabilities.
Best Practices for SSO Single Sign-On Implementation
When implementing SSO Single Sign-On, it is essential to follow best practices to maximize security and usability:
Strong Authentication: Implement strong authentication methods such as two-factor authentication or biometric authentication to enhance security.
Regular Auditing: Conduct regular audits of user access rights and permissions to ensure compliance and detect any unauthorized access.
User Education: Educate users about the benefits of SSO Single Sign-On and best practices for password management to promote secure behavior.
Continuous Monitoring: Implement a robust monitoring system to detect and respond to any suspicious activities or potential security threats.
Regular Updates: Keep the SSO Single Sign-On solution and all integrated applications up to date with the latest security patches and updates.
Remember, security should never be compromised, and SSO Single Sign-On provides a robust solution to protect user identities and streamline access to applications and platforms. Embrace the power of SSO Single Sign-On and enjoy the benefits of enhanced security and convenience.
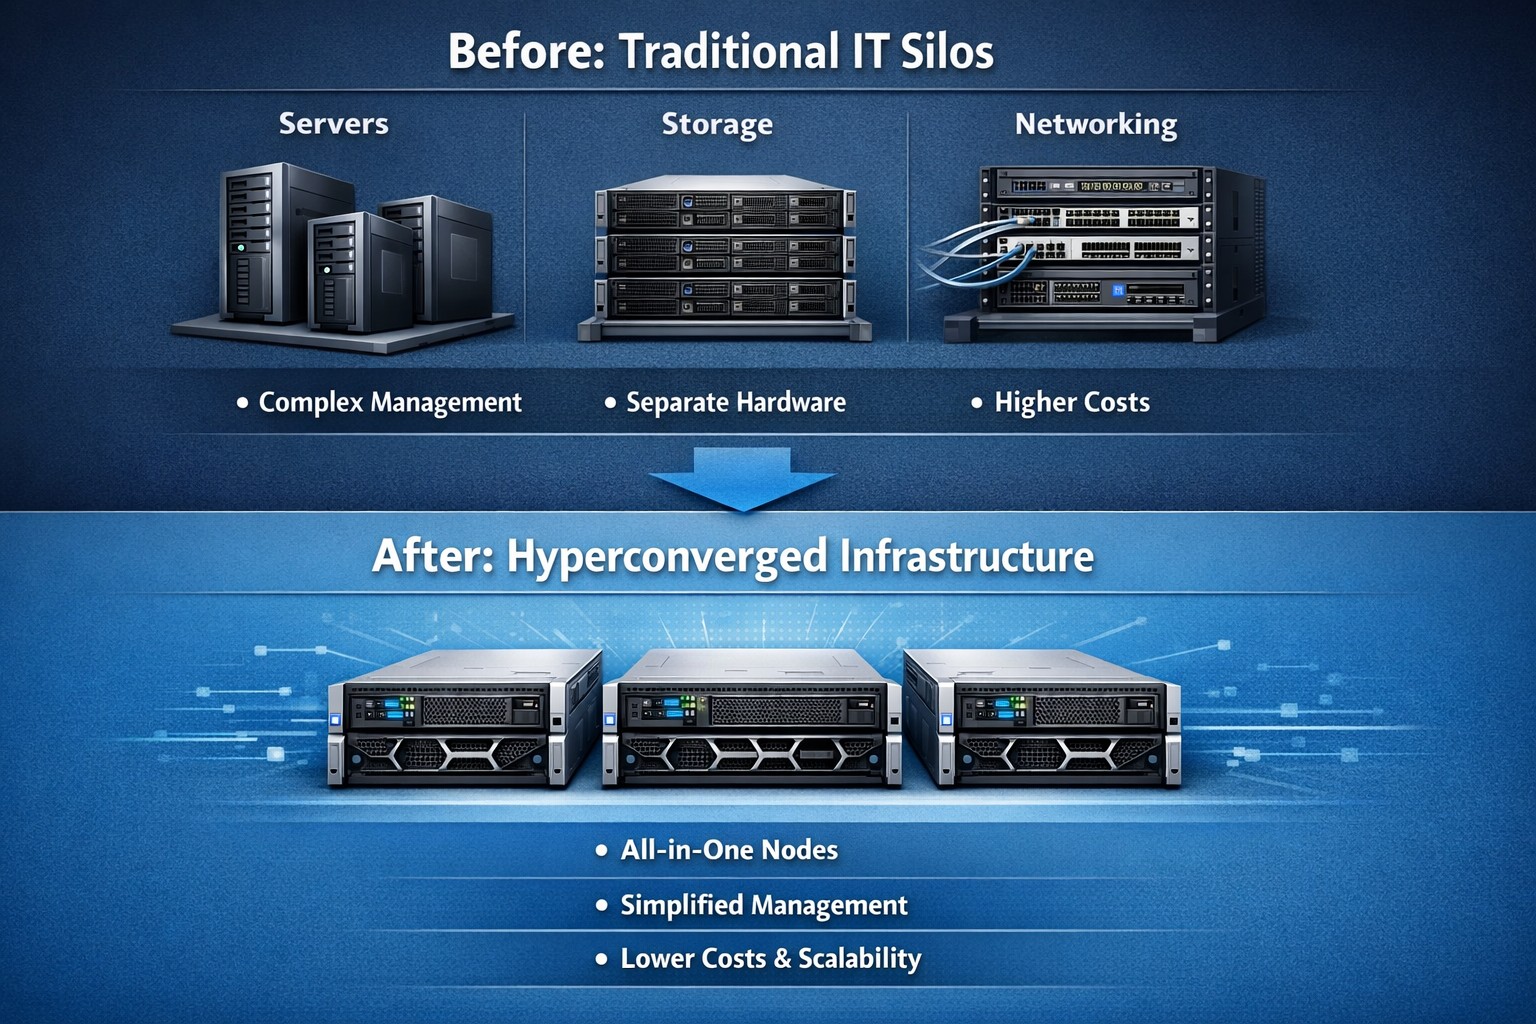
Streamlining Your Company’s Technology Infrastructure
Hyperconvergence consolidates servers, storage, and networking into scalable HCI infrastructure, streamlining small business IT operations.
Modern businesses rely heavily on their IT infrastructure to operate efficiently and effectively. As companies grow, they often accumulate a hodgepodge of hardware and software systems that were never designed to work together. This lack of integration can lead to inefficiencies, increased costs, and a lack of agility in responding to changing business needs. To address these challenges, many businesses are turning to IT consolidation as a solution.
Understanding IT Consolidation
IT consolidation refers to the process of streamlining and centralizing a company’s technology infrastructure by combining multiple hardware and software systems into a cohesive and integrated environment. This consolidation can be done in various ways, such as merging separate hardware systems into a single platform or migrating to a hyperconverged infrastructure.
What is Hyperconvergence? Hyperconvergence is an emerging technology trend that combines storage, computing, and networking resources into a single, integrated system. It eliminates the need for separate hardware components and simplifies management. This approach offers several advantages, including increased efficiency, cost savings, improved business agility, and enhanced ability to support it.
The Benefits of IT Consolidation
Consolidating your technology infrastructure offers numerous benefits to businesses of all sizes. Let’s explore some of the key advantages:
Increased Efficiency: When businesses have multiple vendors for various technology services, resolving issues becomes a time-consuming and disjointed process. With consolidation, businesses can rely on a single managed service provider (MSP) who understands their entire system and can provide comprehensive support. This streamlines troubleshooting and reduces downtime, ultimately improving overall operational efficiency.
Cost Savings: Consolidating your technology with a single provider can also lead to significant cost savings. With a holistic view of your technology infrastructure, an MSP can identify redundancies, eliminate unnecessary services, and recommend more cost-effective solutions. Additionally, by bundling services under a single monthly fee, businesses can simplify their billing process and gain better visibility into their technology expenses.
Improved Business Agility: IT consolidation enables businesses to respond quickly to changing market conditions by simplifying processes and reducing the complexity of their technology environment. With a consolidated infrastructure, businesses can easily scale their operations, adopt new technologies, and implement changes without disruption.
Enhanced Support and Expertise: Working with an MSP for IT consolidation provides businesses with a supportive partner who understands their unique needs and goals. Unlike individual vendors who focus on selling their specific services, an MSP takes a holistic approach to ensure that all technology components work together seamlessly. They offer expert guidance, make better purchasing decisions, and provide ongoing support to optimize performance and security.
Implementing IT Consolidation
Implementing an IT consolidation strategy requires careful planning and execution. Here is a three-step process to guide you:
Step 1: Assess Your Technology Landscape: Before embarking on IT consolidation, it’s essential to assess your current technology landscape. Conduct a thorough audit of your hardware and software systems, identifying any gaps or redundancies. Consider your business needs and goals, as well as feedback from your employees and clients. This assessment will serve as a foundation for identifying areas where consolidation can bring the most significant benefits.
Step 2: Explore Hyperconvergence Solutions: As mentioned earlier, hyperconvergence is an increasingly popular approach to IT consolidation. Research and explore hyperconverged infrastructure solutions that align with your business requirements. Look for platforms that offer seamless integration of storage, computing, and networking resources while providing scalability, performance, and ease of management.
Step 3: Execute a Phased Consolidation Plan: To minimize disruption and ensure a smooth transition, it’s recommended to execute the consolidation plan in phases. Start by implementing the selected hyperconverged infrastructure platform alongside your existing systems. This allows for gradual adoption, training, and adjustment to the new technology. Once the new platform is fully integrated and employees are familiar with its features, you can begin eliminating redundant systems and optimizing your technology environment.
Let Farmhouse Networking evaluate your technology landscape, explore appropriate solutions, and execute a phased consolidation plan to streamline your company’s technology infrastructure and propel your business forward.
And God will generously provide all you need. Then you will always have everything you need and plenty left over to share with others. As the Scriptures say,
“They share freely and give generously to the poor. Their good deeds will be remembered forever.”
For God is the one who provides seed for the farmer and then bread to eat. In the same way, he will provide and increase your resources and then produce a great harvest of generosity in you. - 2 Corinthians 9:8-10
We use cookies to ensure that we give you the best experience on our website. If you continue to use this site we will assume that you are happy with it.