This is the seventh in a series that document the Tier 3 / Co-Managed IT work we did to setup a wireless test bed for a Linux based scientific device. The testing environment included two different wireless network hardware types (Ubiquiti and Cisco). There was also a Synology device used for various purposes including hosting the Ubiquiti controller inside a Kubernetes container, providing certificate services, providing LDAP authentication, and providing RADIUS authentication. Each article will detail a separate piece of the project. This article shows the basic setup of Ubiquiti Controller for PSK and RADIUS authentication from wireless devices.
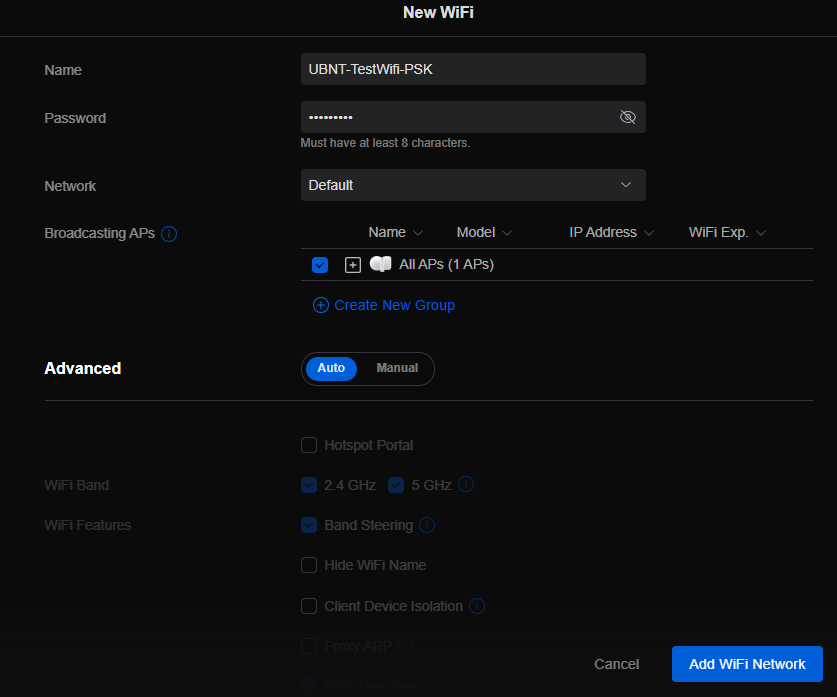
Setup Ubiquiti Wireless Network with PSK
Login to Ubiquiti controller previously created – Here
Click on Setting gear icon at bottom left
Make sure you are on Wifi tab and click Create New link
Set network BSSID
Create Password
Click Add Wifi Network button
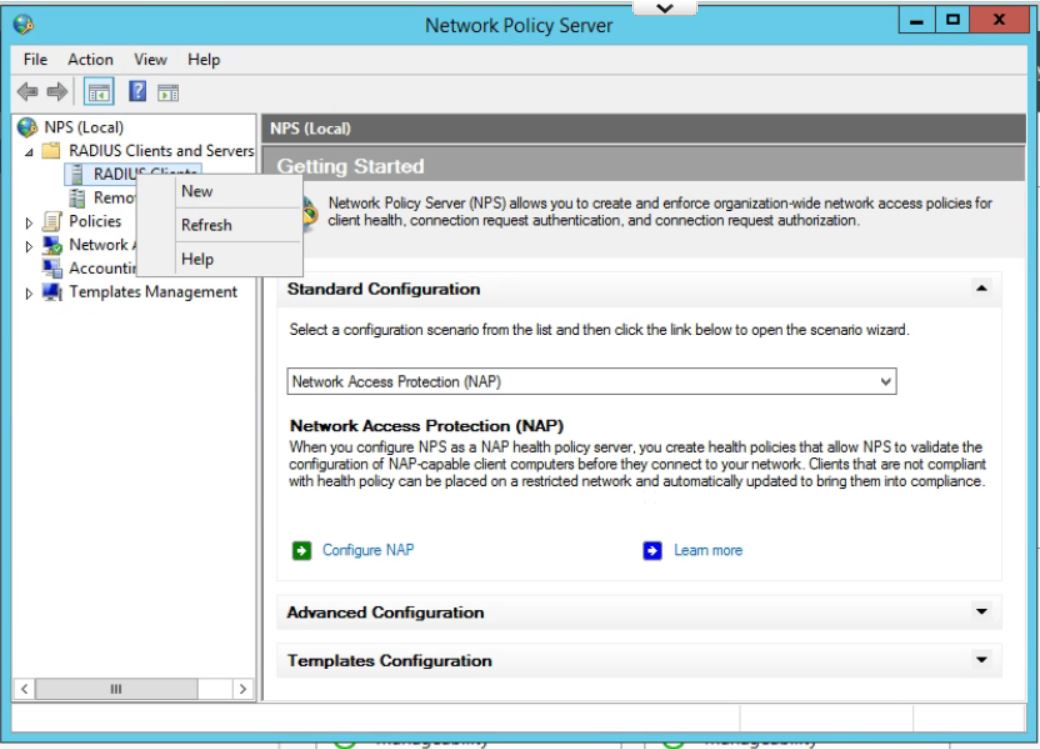
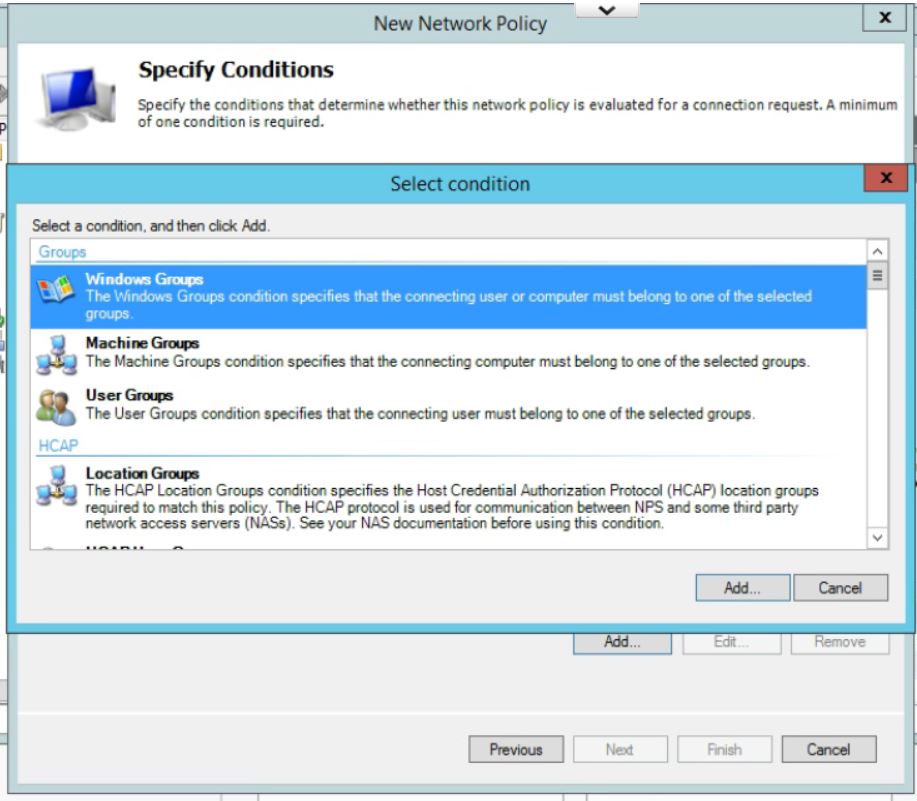
UniFi SSID advanced security settings with RADIUS profile and PPSK configuration.
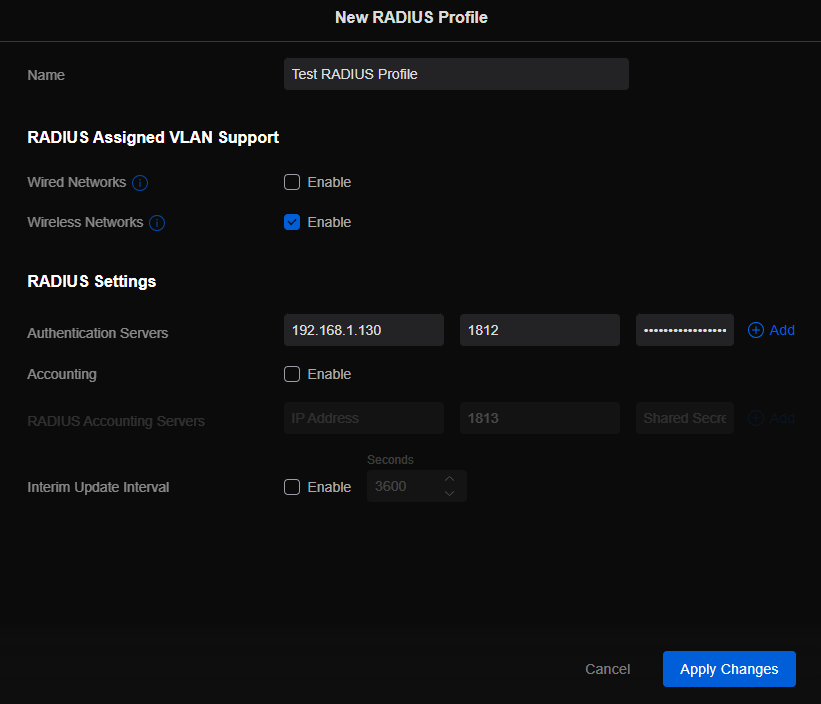
Setup Ubiquiti Wireless Network with RADIUS
Login to Ubiquiti controller previously created – Here
Click on Setting gear icon at bottom left
Click on Profiles
Click on Radius Tab
Click on Create New link
Give the Profile a name
Enter RADIUS server IP address as Authentication Server
Enter RADIUS shared secret
Click Add
Click Apply Changes
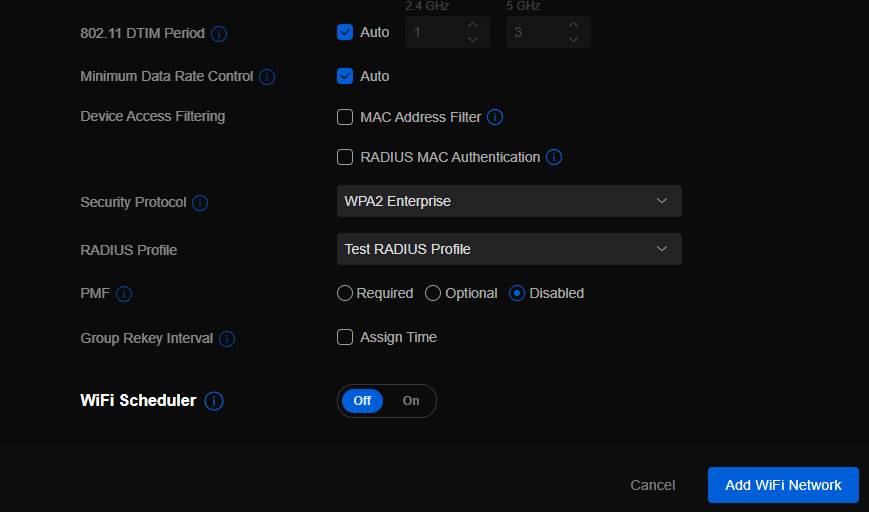
Click on Wifi Tab
Click on Create New link
Set network BSSID
Change Advanced to Manual
Set Security Protocol – WPA2 Enterprise
Select new RADIUS Profile
Click Add Wifi Network
If your company has highly customized setup requirements that you need consulting for, then contact us for assistance.
This is the fifth in a series that documents the Tier 3 / Co-Managed IT work we did to setup a wireless test bed for a Linux based scientific device. The testing environment included two different wireless network hardware types (Ubiquiti and Cisco). There was also a Synology device used for various purposes including hosting the Ubiquiti controller inside a Kubernetes container, providing certificate services, providing LDAP authentication, and providing RADIUS authentication. Each article will detail a separate piece of the project. This article shows the setup Synology RADIUS server & certificates.
Setup RADIUS Server
Login to Synology
Open Package Center
Install RADIUS Server app
Open RADIUS Server package
Uncheck local users
Check LDAP users
Click Apply
Click on Clients on left hand side
Click on Add
Create Name
Create Shared Secret
Enter IP address of Cisco WLAN controller
Click on Add
Create Name
Create Shared Secret
Enter IP address of Ubiquiti Controller
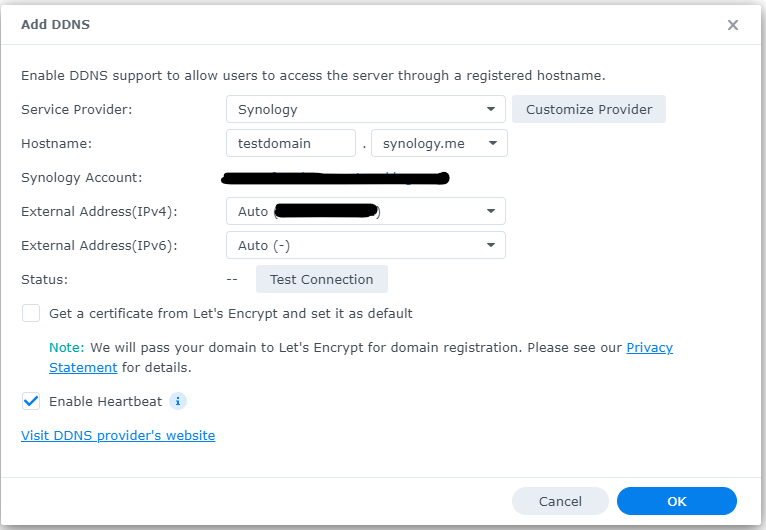
Configure RADIUS Certificates
Open Control Panel
Click on External Access
Click on DDNS tab
Click Add
Choose Synology as service provider
Add hostname
Click Test Connection
Click OK
Click on Security on left hand side
Click on the Certificate tab
Click on Add
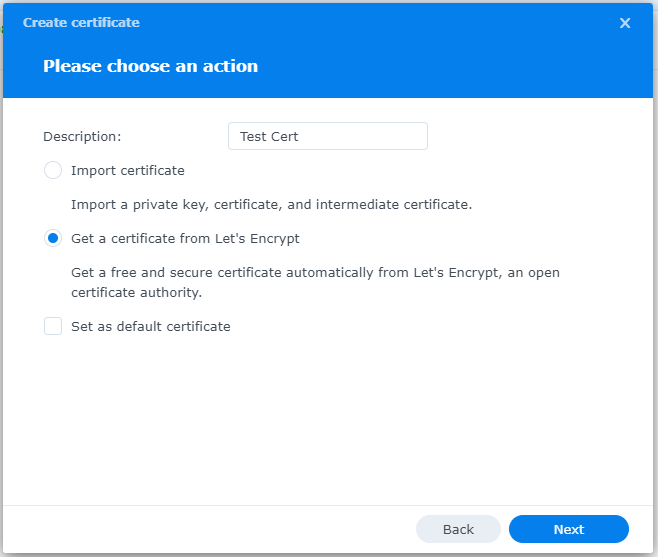
Add new certificate
Click Next
Create description
Get a certificate from Let’s Encrypt
Click Next
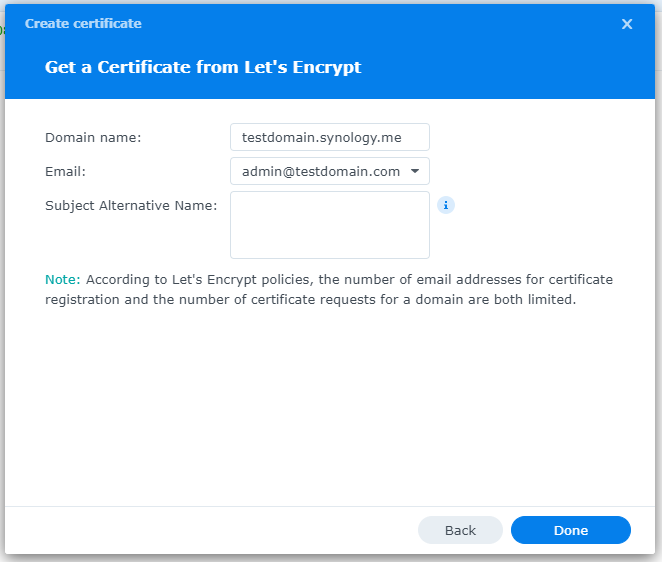
Add needed certificate information
Click Done
Click Settings button and choose appropriate RADIUS server certificate
If your company has highly customized setup requirements that you need consulting for, then contact us for assistance.
Reliable retail routers powering WFH for B2B professionals
This blog post is more about the use of retail routers at the office than at home, just to make that clear from the beginning. We would also recommend non-retail routers at home, but that is not feasible for everyone.
What is a retail router?
This is a phrase I am coining to describe any router that is generally available from your local retailers like Staples, Walmart, etc or delivered as part of the internet service from your local provider. They include brand names like ASUS, D-Link, Linksys, and Netgear. They range in price from $30 for the extreme low end to $450 for a gaming router. These routers are built for home and small office networks that have very few users or devices connected at any given time. They may include some features that sound “business-like” such as Virtual Private Network (VPN), Stateful Packet Inspection (SPI), VLAN, and Quality of Service (QoS) – remember though that these are also only able to support a minimum number of users and devices connected at any given time. If you try to use a retail router to run your business network then you will find that performance will be severely degraded and these features will not work as advertised.
There is also the issue of security. These routers are rarely if ever updated even when new vulnerabilities are found. This makes them ineligible for PCI or HIPAA compliance situations.
Is there a non-retail router?
So what to do about this situation? Time to call your trusted IT services provider who will be able to get you a non-retail router, but that begs the question – what is a non-retail router?
These routers are built by network professionals who design the hardware to perform under the pressures of the office environment and to handle the work from home remote workload. These routers include brands like Cisco, Juniper, Ubiquiti, and Araknis. They range in price from $150 for an office of up to 5 people to $10,000 for a high traffic company with hundreds of users. These routers handle VPN, SPI, VLAN, QoS, and many other services all at once with ease. Security is baked into these routers with the best ones having the ability to be managed from the cloud. They provide consistent access to all connected users and devices at all times. Your trusted IT services provider will work with you to “right size” the router to your business needs.
If your company is going to have full time work from home employees and is concerned about their ability to perform, then contact us for assistance.
The following steps will setup Windows Server 2012 R2 RADIUS authentication via Network Policy Server (NPS) with your Ubiquiti UniFi Security Gateway (USG) for a USG Remote User VPN. This will allow users to use their current Active Directory Domain Services (AD DS) credentials to authenticate to the Virtual Private Network (VPN).
I am using the UniFi controller version 5.4.14 hosted in Microsoft Azure on a Linux Server with PostFix for alerting.
Step 1: Configure Windows NPS Server
From the Server Manager Dashboard, install the Network Policy and Access Server role using Add Roles and Features accepting all defaults.
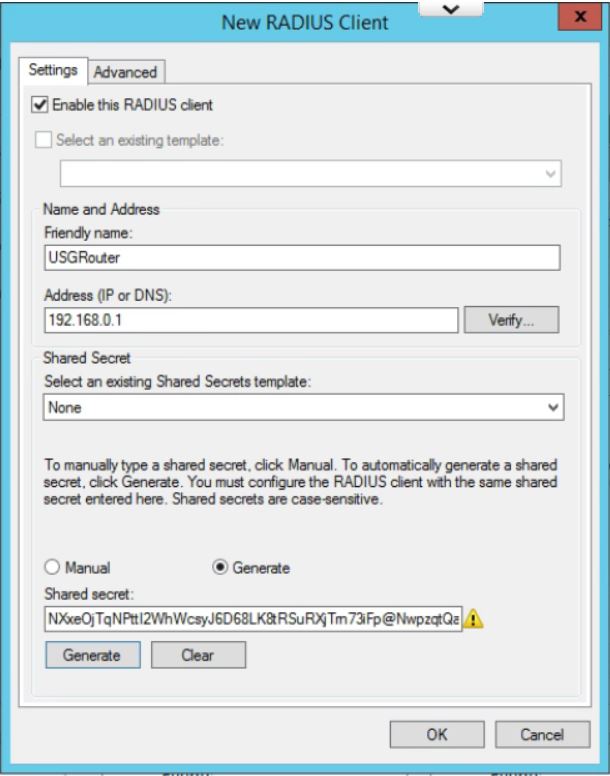
Once installed, open the Network Policy Server Administrator Tool. Expand the RADIUS Clients and Servers, then right Click on RADIUS Clients and click New.
Give the USG router a Friendly Name. Type in the IP Address of the inside interface of the USG on the same network as the Windows Server. (This is the IP that the RADIUS requests will come from.) Click the Generate radio button, then click the generate button. Copy this Shared Secret to be pasted later. Click OK.
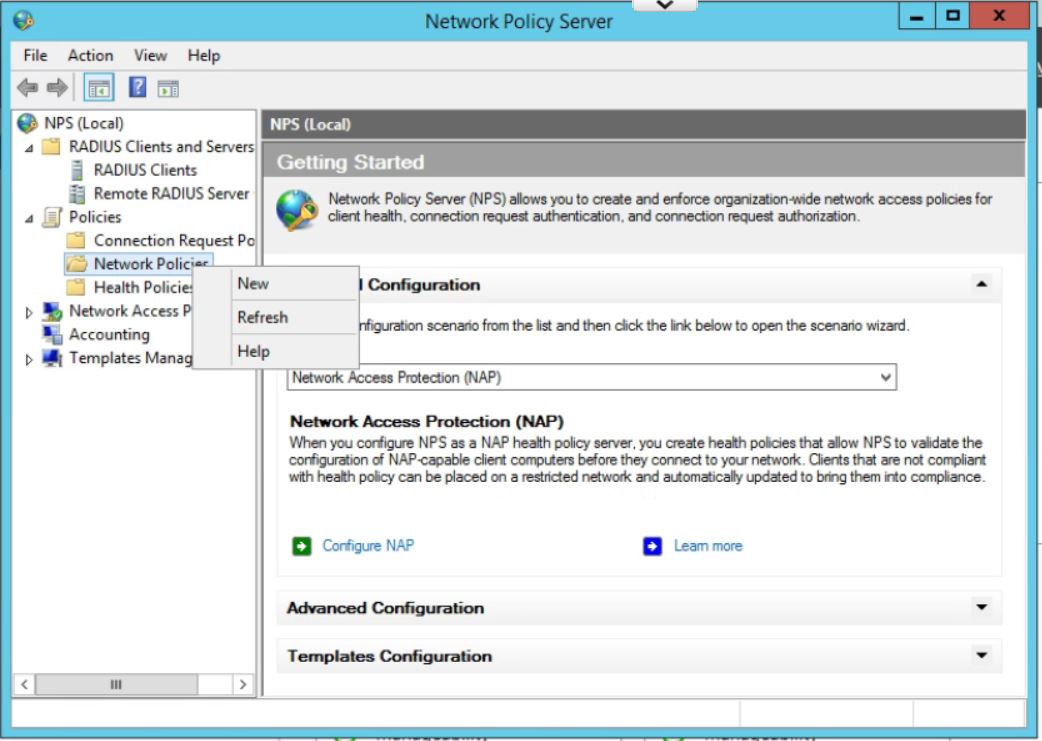
In the Network Policy Server window, expand Policies, right click on Network Policies, and then click New.
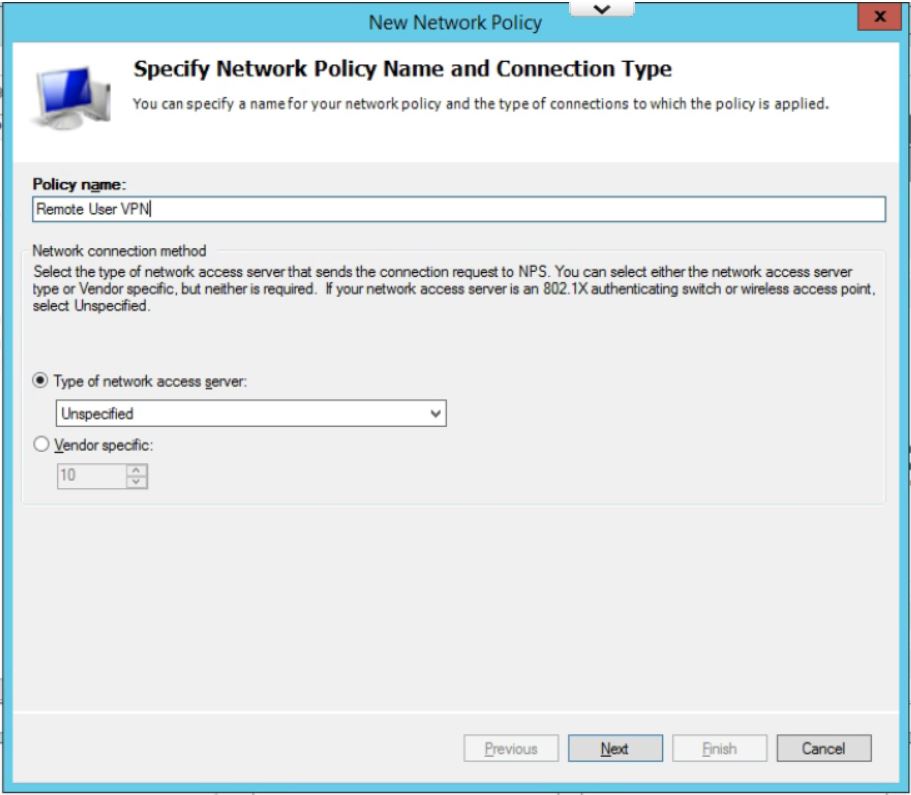
Enter a policy name and leave Type of Network Access Server as Unspecified. Click on Next.
In Specify Conditions click Add.. and then select Windows Group, and pick the AD Group you want to use to allow VPN access. (If you have not already then you will need to add all users who will be accessing the VPN into a seperate group.) Click Add… then Add Groups… which brings up the typical AD search box. Type in the name of the VPN Windows Group and click on OK. Click OK again. Click on Next
Leave the Specify Access Permissions at the defaults (Access Granted, Dial-in box unchecked). Click Next.
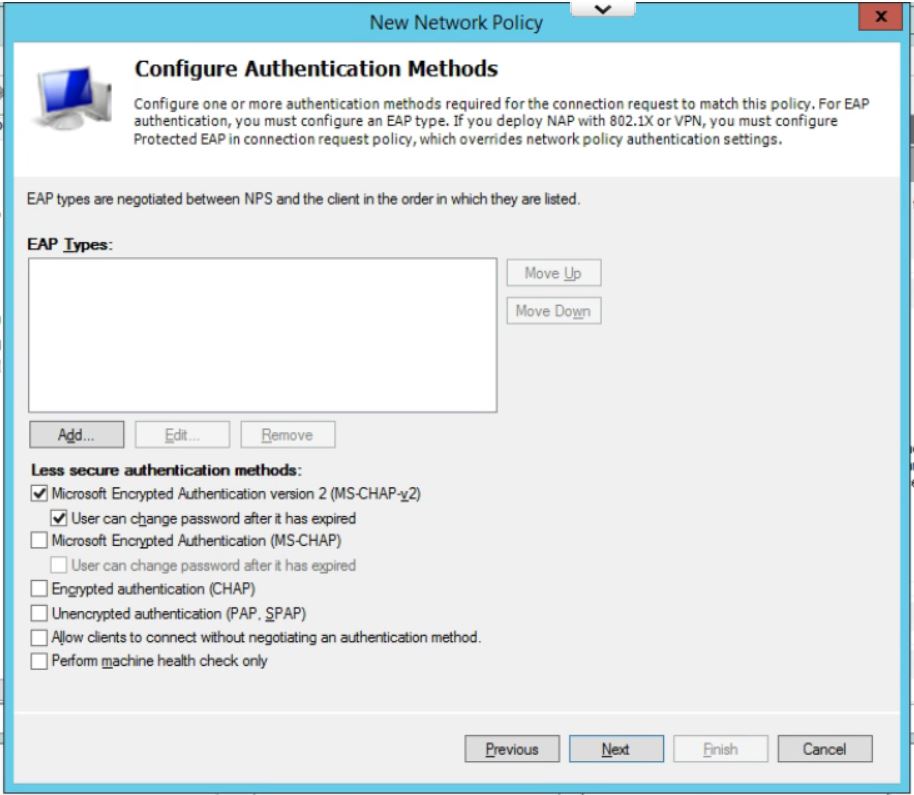
Uncheck all authentication methods other than MS-CHAPv2. Click on Next.
Accept the defaults under Configure Constraints. Click Next.
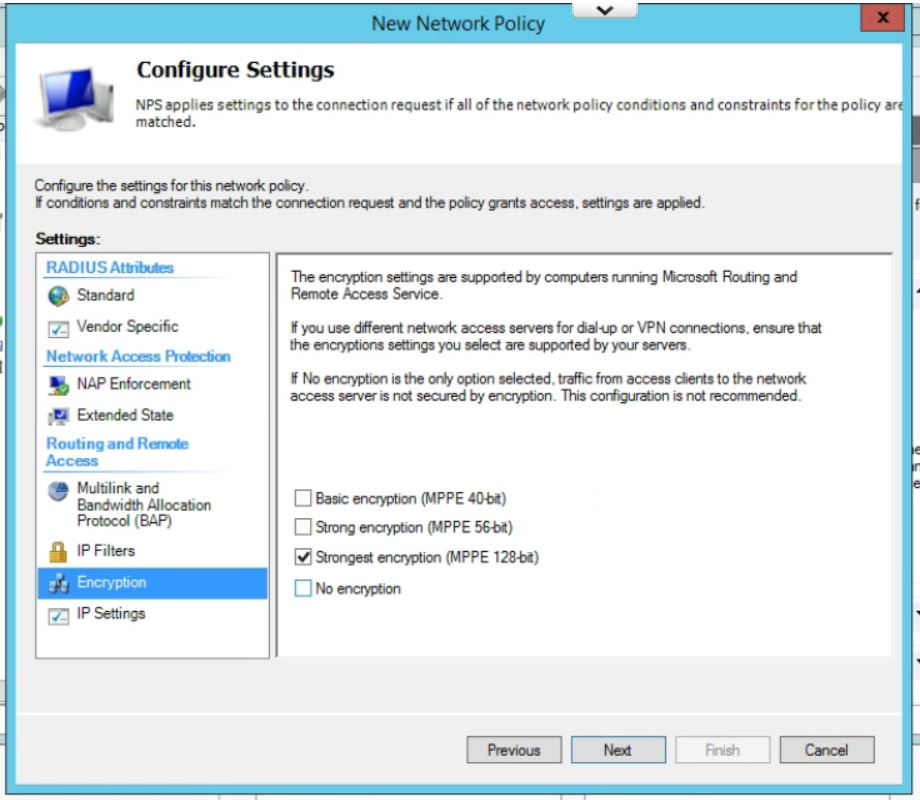
Leave all setting at the default on this page except for under Encryption. Uncheck everything except for MPPE 128-bit. Click Next.
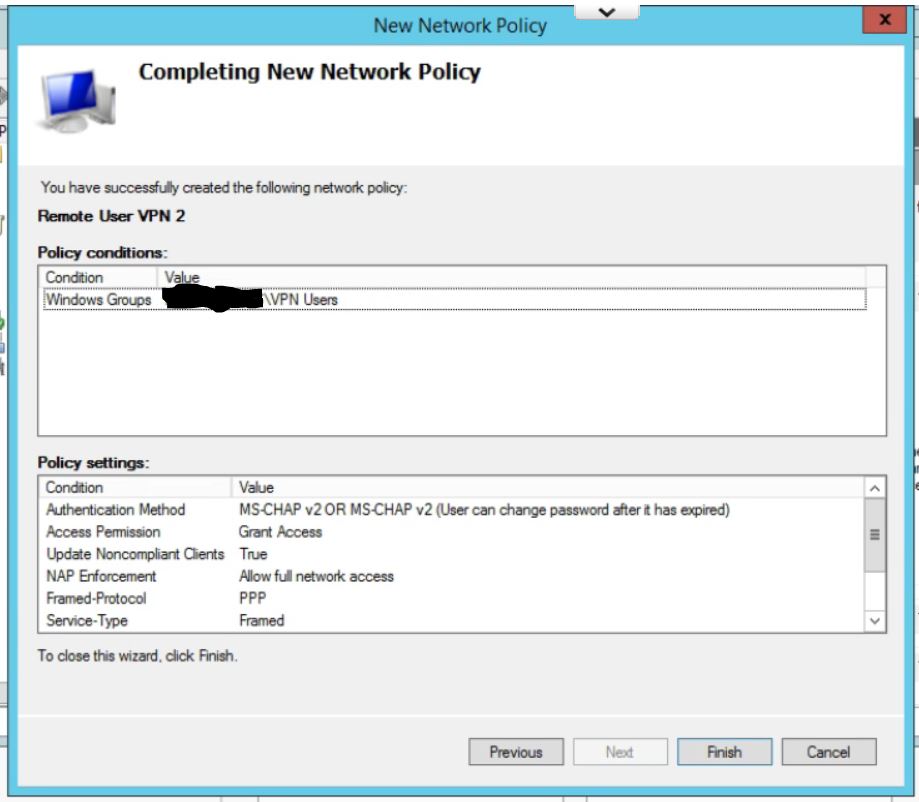
Check your settings on the last page. Click Finish.
Finally, move the new policy above the two default policies in the list by right clicking and choosing Move Up.
Step 2: Configure the USG Remote User VPN
To create the remote access network, in the UniFi controller, go to Settings, then Networks, and click Create New Network, give the network a name and select Remote User VPN.
Fill in the appropriate Gateway/Subnet information for your environment. Make sure it is not the same as any of your current networks.
Add Manual DNS servers, if required for your environment.
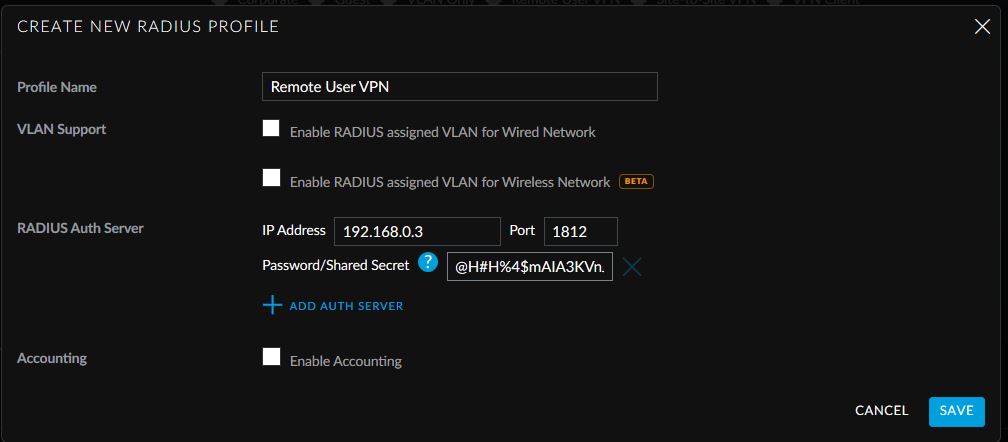
Click on Create New RADIUS Profile.
Give the Profile a name, enter in the IP address of the Windows Server 2012 R2 server that will be used for RADIUS authentication and paste in the generated shared secret.
Click Save. Click on Save again.
This allows easy access from Windows default VPN connections to network assets behind the USG device.
If your company is currently using a Ubiquiti USG device and need a Remote User VPN setup, then contact us for assistance.
This article will leave out the names of the internet providers to protect against defamation of character issues, but they include a local cable internet provider and a local reseller of DSL connections who also provide T1 lines. Had a client that recently changed from using a bonded T1 line to cable internet in order to get substantially better speeds. During the winter months they experienced the issues that are typical for remote installations of cable – downtime due to issues with the vendors hardware on the poles. After consulting with them, it was decided to go with a DSL PPPoE failover connection as part of some more expansive upgrades. Here is the setup that had to take place on the provided C1100Z modem / router and the Ubiquiti USG Pro.
Setup of C1100Z Modem Router
The modem / router defaults to router mode, which puts all traffic behind a Network Address Translation (NAT) router and allows this DSL vendor their usual practice of monitoring and reselling traffic information. I chose instead to change the settings to make the device into a standard modem in “Transparent Bridge” mode. You will need to contact the DSL vendor in question to get the PPPoE username and password before performing these steps to ensure that you can setup the Ubiquiti USG Pro later. Here are the steps from their website:
1. Open a web browser and go to http://192.168.0.1.
2. Login to your modem by doing the following:
Enter the Administrator Username
Enter the Administrator Password
Select “Apply”.
3. Select “Advanced Setup”.
4.. Select “WAN Settings”.
5. Select “Transparent Bridging”.
6. Select “Tagged-201” for the transport mode.
7. Select “Apply” to save your changes.
Setup of DSL PPPoE Failover Connection on Ubiquiti USG Pro
The second part of this is to setup the failover portion of the Ubiquiti USG Pro to use the PPPoE Connection.
Login to your Ubiquiti Controller
Choose the correct site from the list at the top right
Click on the Devices icon on the left hand column
Click on the Ubiquiti USG Pro device at that site to open up its properties
Click on Configuration
Expand the WAN2 connection and add the username / password acquired from the vendor earlier along with the preferred DNS then make sure to choose the Load Balancing type as Failover then Queue Changes and Apply Changes
This will setup the DSL PPPoE failover connection to be used whenever the primary WAN1 connection goes down. If your company is currently using an unreliable internet provider and need to setup failover, then contact us for assistance.
Had another tech firm that needed some Tier 3 assistance as they were having trouble with their VPN connection. I helped them setup Azure to Unifi USG IPSec VPN to connect their headquarters to the hosted RemoteApps server. This tutorial will go into detail about the creation of this tunnel starting with the Microsoft Azure side first using Resource Manager. It will be using the following parameters:
VNet Name: TestNetwork
Address Space: 10.10.0.0/16
Subnets:
Primary: 10.10.10.0/24
GatewaySubnet: 10.10.0.0/24
Resource Group: TestResourceGroup
Location: West US
DNS Server: Azure Default
Gateway Name: TestVPNGateway
Public IP: TestVPNGatewayIP
VPN Type: Route-based
Connection Type: Site-to-site (IPsec)
Gateway Type: VPN
Local Network Gateway Name: TestSite
Local Subnet: 10.20.20.0/24
Connection Name: VPNtoTestSite
Configure an Azure VPN gateway
This part takes the longest, so it should be done first:
Click on the “+” icon at the top left hand side of the Resource Manager, then search for “Virtual Network Gateway” and click on the “Create” button.
Give the Virtual Network Gateway a name
Select matching Region to where Azure resources are located
Leave Gateway & VPN type the defaults
Choose a SKU <- These have changed since the article was created, so my “standard” now is WpnGw1 with Active / Active turned off (this is a good balance of performance and cost)
Choose or create a local network (not covered here) that matches internal resources
Choose or create a Public IP Address
Leave the remaining values as their defaults and then click the “Create” button. (Please note the reminder that this takes 45 minutes to create!)
Configure an Azure Local Network Gateway
This is a reference to your on-premise network so that subnets can pass traffic:
Click on the “+” icon at the top left hand side of the Resource Manager, then search for “Local Network Gateway” and click on the “Create” button.
Give the Local Network Gateway a name
Select matching Region to where Azure resources are located
Specify the external IP address of the local on-premise site
Specify the on-premise address space (subnet)
Leave the remaining values as their defaults and then click the “Create” button.
Configure an Azure VPN Connection
This will create the tunnel from Azure to the on-premise site:
Click on the “+” icon at the top left hand side of the Resource Manager, then search for “Connection” and click on the “Create” button.
Choose “Site-to-site (IPSec)” as the connection type
Give the Connection a name
Select matching Region to where Azure resources are located
Leave the remaining values as their defaults and then click the “OK” button. On the summary screen click on the “OK” button to create the connection.
Choose the newly created Virtual Network Gateway
Choose the newly created Local Network Gateway
Specify a shared key
Leave the remaining values as their defaults and click the “Create” button.
This completes the setup of the Azure side of the VPN tunnel. Now to work on the Ubiquiti USG side.
Configuring an Ubiquiti USG VPN Network
This is a fairly simple process but it has to be precise:
Choose the Current Site from the top right hand side of the portal.
Click on the Settings gears down on the bottom left side of the portal.
Click on Networks then on the “Create New Network” button.
Give the connection a name, choose “Site-to-Site VPN” as the Purpose
Choose “IPSec VPN” as the VPN Type
Choose to Enable this Site-to-Site VPN
Add the Azure subnet under Remote Subnets
Get the newly created Virtual Network Gateway IP address from Azure for the Peer IP
Enter the on-premise external IP address for Local WAN IP
Enter the same shared key as used in the Azure VPN Connection for the Pre-Shared Key
Choose “Azure Dynamic Routing” as the IPSec Profile
Expand Advanced Options
Leave Key Exchange Version, Encryption, Hash & DH Group as default and uncheck the PFS & Dynamic Routing boxes.
That is all there is to it. If you have any difficulties with connection then delete and re-create the Ubiquiti USG side first (those two check boxes at the bottom of the Advanced Options will check themselves again, but don’t be fooled by this quirk in the software). If your company is currently using either Microsoft Azure or Ubiquiti USG routers and would like a VPN created, then contact us for assistance.
And God will generously provide all you need. Then you will always have everything you need and plenty left over to share with others. As the Scriptures say,
“They share freely and give generously to the poor. Their good deeds will be remembered forever.”
For God is the one who provides seed for the farmer and then bread to eat. In the same way, he will provide and increase your resources and then produce a great harvest of generosity in you. - 2 Corinthians 9:8-10
We use cookies to ensure that we give you the best experience on our website. If you continue to use this site we will assume that you are happy with it.