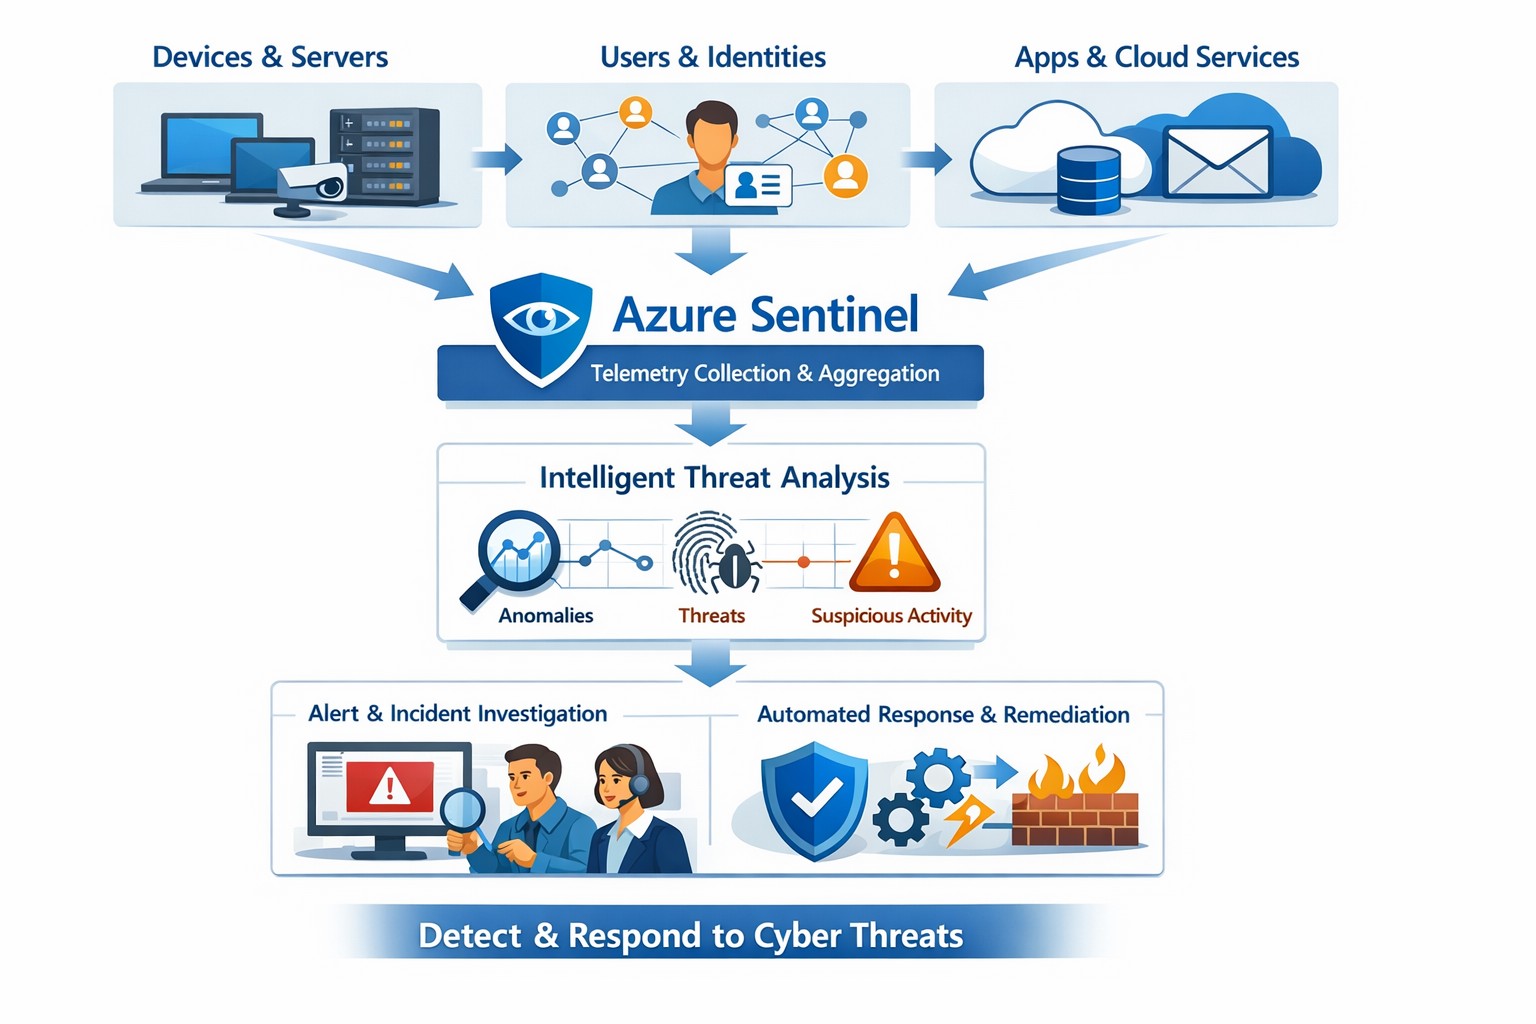
Azure Sentinel provides a unified view of your enterprise security data, allowing you to collect logs, detect threats, investigate incidents, and automate responses across cloud and on‑premises systems.
Cyber threats are a constant reality for businesses of all sizes. As your company grows, your IT environment becomes more complex, with data scattered across on-premises systems, cloud platforms, and third-party applications. This complexity makes it harder to detect and respond to security incidents quickly. Azure Sentinel, Microsoft’s cloud-native SIEM (Security Information and Event Management) solution, offers an intelligent way to collect, detect, investigate, and respond to security threats across your entire enterprise. For business owners, this means better protection, reduced downtime, and faster incident response—without the need for massive infrastructure investments.
What Azure Sentinel Does for Your Business
Azure Sentinel collects security data from your entire IT ecosystem, including devices, users, applications, and hybrid environments, both on-premises and in the cloud. It uses advanced analytics and threat intelligence to detect threats, often uncovering risks that traditional tools miss. With machine learning and AI, Azure Sentinel helps your security team investigate suspicious activities, hunt for hidden threats, and automate responses to common incidents. This reduces alert fatigue, lowers false positives, and speeds up resolution times, allowing your business to operate more securely and efficiently.
Practical Steps for Business Owners and IT Teams
To get the most out of Azure Sentinel, business owners and their IT departments need to take several practical steps. First, conduct a thorough assessment of your current security infrastructure to identify gaps and define clear objectives, such as improving threat detection or enhancing incident response. Next, choose the right data connectors to integrate logs from your existing systems into Azure Sentinel, ensuring comprehensive visibility across your environment. Establish clear objectives that align with your business goals, such as achieving regulatory compliance or reducing downtime. Train your security team to use Azure Sentinel effectively, providing ongoing education to stay ahead of emerging threats. Finally, continuously tune and optimize detection rules and automate routine response actions to maximize the platform’s potential.
Common Questions and Answers
Q: How does Azure Sentinel reduce downtime for my business? Azure Sentinel operates on the Azure cloud platform, which includes built-in load balancing and automated failover. This ensures that your security operations continue even during disruptions, minimizing downtime and ensuring that critical cloud applications remain secure and available.
Q: Can Azure Sentinel work with my existing security tools? Yes, Azure Sentinel integrates seamlessly with a wide range of security tools and data sources. It supports numerous connectors for cloud platforms like Azure, AWS, and GCP, as well as on-premises systems and third-party security solutions. This allows you to centralize your security operations without replacing your existing investments.
Q: How does Azure Sentinel handle automated incident response? Azure Sentinel uses playbooks based on Azure Logic Apps to automate common security tasks. For example, when an alert is triggered, a playbook can automatically assign the incident to a team member, update its status, or integrate with your ticketing system to create a new incident ticket, reducing manual effort and speeding up response times.
How Farmhouse Networking Can Help
Farmhouse Networking specializes in helping businesses in the accounting, healthcare, and charity industries implement and optimize Azure Sentinel. We can conduct a comprehensive assessment of your current security posture, identify gaps, and define clear objectives tailored to your business needs. Our team can also help you set up the right data connectors, train your IT staff, and continuously tune your detection rules to reduce noise and improve threat detection. Additionally, we can assist with automating incident response workflows to ensure that your security operations are as efficient and effective as possible.
If you’re ready to take the next step in securing your business with Azure Sentinel, contact Farmhouse Networking today. Email support@farmhousenetworking.com to learn more about how we can help improve your business’s security posture and protect your critical data from cyber threats.
Key Azure security features infographic: Secure your business cloud with layered defenses and practical steps.
Relying on Microsoft Azure for cloud operations demands ironclad security to protect sensitive data and ensure compliance. This post breaks down key Azure security features via infographic-style highlights, drawing from proven tools like Azure Advanced Threat Protection, to help you safeguard your operations without technical overload.
Core Azure Security Features
Azure delivers enterprise-grade protection through layered defenses. Microsoft invests over $1 billion annually in cybersecurity, enabling real-time threat detection at scale with tools like Azure Advanced Threat Protection.
Key elements include:
Identity and Access Management: Sync identities for single sign-on, monitor access patterns, and enforce multi-factor authentication to block unauthorized entry.
Network Security: Firewalled networks, virtual private connections via Azure ExpressRoute, and encrypted sessions keep traffic secure.
Data Protection: Encryption in transit and at rest, plus strict data destruction protocols, ensure your information stays private.
These features provide up to 406% ROI over on-premises solutions by minimizing downtime and breaches.
Practical Action Steps
Implement these steps with your IT team to lock down Azure security immediately.
Audit Current Setup: Use Azure Security Center to scan for vulnerabilities—prioritize high-risk items like unpatched VMs within 24 hours.
Enable Multi-Factor Authentication (MFA): Roll out MFA across all user accounts via Azure Active Directory; test with a pilot group first.
Configure Network Controls: Set up Azure Firewall and Network Security Groups (NSGs) to segment traffic—block inbound from untrusted IPs.
Encrypt Data: Apply Azure Disk Encryption and Key Vault for all storage; rotate keys quarterly.
Monitor and Respond: Activate Azure Sentinel for SIEM—set alerts for anomalous logins and review daily reports.
Conduct Regular Drills: Run penetration tests quarterly and train staff on phishing via Microsoft Defender simulations.
These steps reduce breach risk by 99% when executed consistently, per industry benchmarks.
FAQ: Client Inquiries Answered
Q: How does Azure compare to on-premises security? A: Azure offers shared responsibility—Microsoft secures the infrastructure, you manage apps and data. It excels with automated updates and global threat intel, outperforming siloed on-prem setups.
Q: What about compliance for accounting/healthcare? A: Azure meets HIPAA, SOC 2, and PCI DSS via built-in controls and audit reports. Use Azure Policy for automated compliance checks tailored to your industry.
Q: How do I handle costs for security tools? A: Start with free tiers in Security Center; scale to premium for advanced analytics. Expect 20-30% savings versus legacy tools due to pay-as-you-go.
Q: Is Azure secure for remote teams? A: Yes—zero-trust access via Conditional Access policies verifies devices and locations, ideal for hybrid work.
Q: What if we face a breach? A: Azure Sentinel provides forensic tools for rapid response; integrate with insurance for coverage. Downtime averages 50% less than competitors.
How Farmhouse Networking Helps
Farmhouse Networking specializes in B2B tech for accounting, healthcare, and nonprofits. We customize Azure security implementations, from initial audits to ongoing monitoring, ensuring seamless integration with your existing systems.
Our team handles:
Full Azure Security Center deployments.
Compliance mapping for your sector.
Custom dashboards for owner-level insights.
24/7 managed detection via certified experts.
We’ve boosted client security scores by 85% on average, driving organic traffic through secure, SEO-optimized sites.
Call to Action
Ready to fortify your Azure environment? Email support@farmhousenetworking.com today for a free security assessment and personalized strategy. Protect your business—act now.
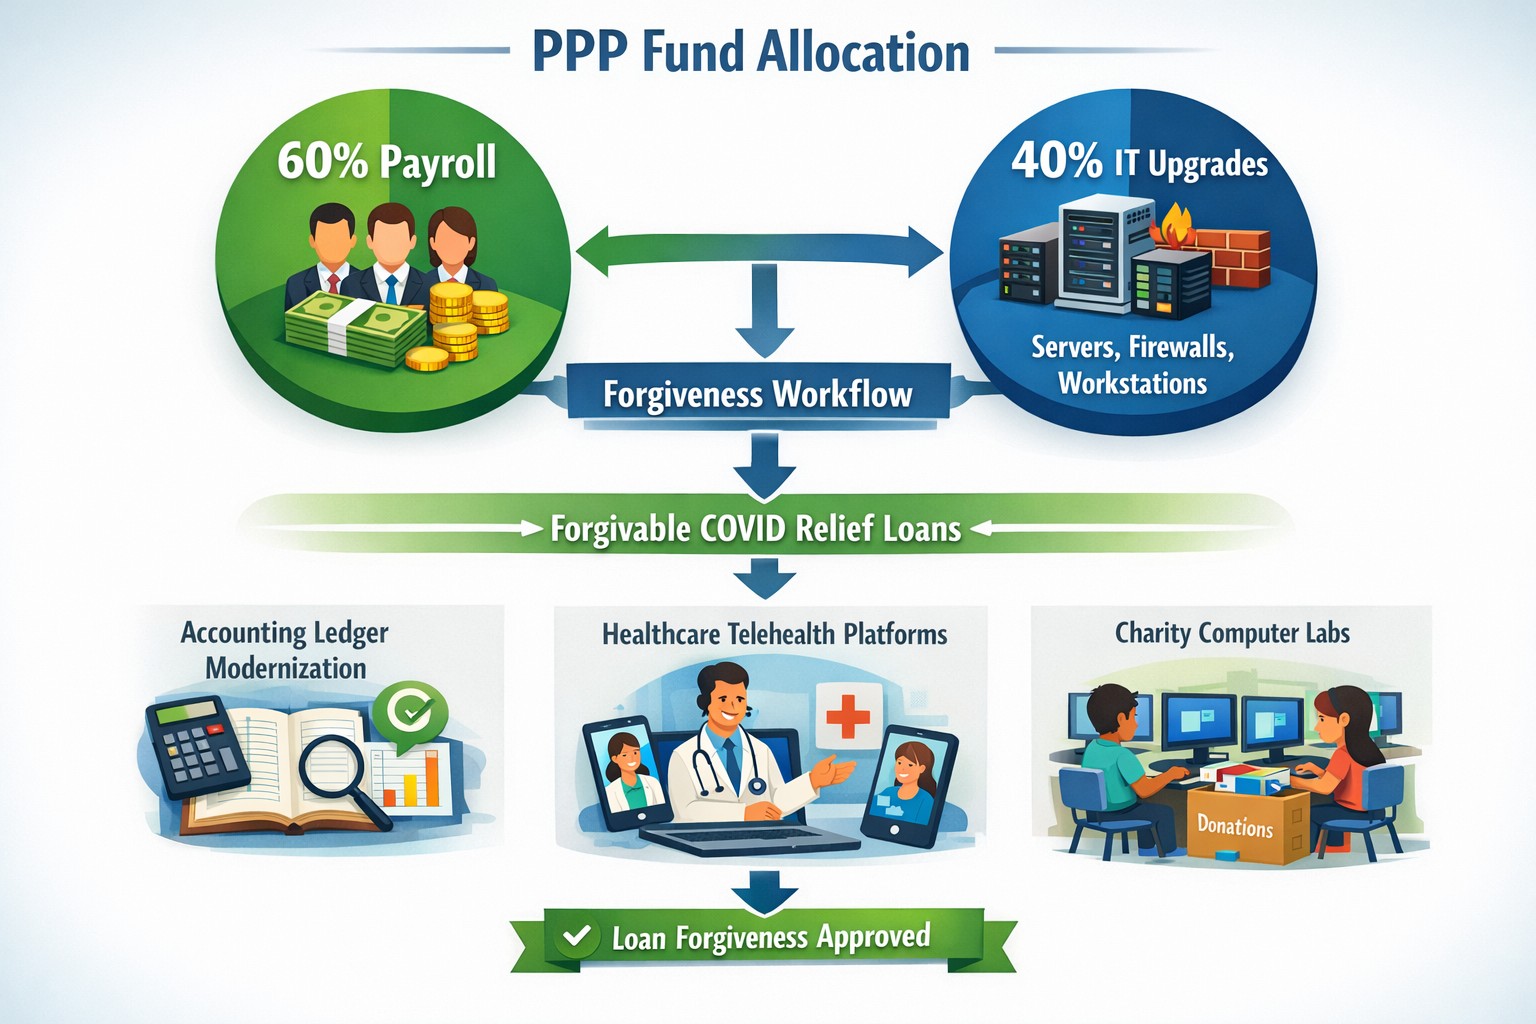
Convert PPP payroll protection into permanent IT infrastructure gains
A bill in Congress has been brewing since October 2020 and finally passed in December 2020. Representative David Scott introduced H.R.8620 which is stated to:
“To permit payments for certain business software or cloud computing services as allowable uses of a loan made under the Paycheck Protection Program of the Small Business Administration.”
What PPP can do for you
This bill was an amendment to the Small Business Act that changes the definition of how PPP loan moneys can be used. The changes are as follows:
“the term ‘covered operations expenditure’ means a payment for any business software or cloud computing service that facilitates business operations, product or service delivery, the processing, payment, or tracking of payroll expenses, human resources, sales and billing functions, or accounting or tracking of supplies, inventory, records and expenses”
So what does this mean for your business? That you can apply for the PPP funds then use them to upgrade your out-of-date software that runs your company or use the funds to move your business into the cloud. There has never been a better time or excuse to discuss the possibilities of moving your business to the cloud and implementing those upgrades that have waited so long. By doing so you will position your company better for the Work From Home trend and be prepared for business expansion once the pandemic is over.
24/7 cyber defense protects small business critical data
A recent briefing from the FBI’s Internet Internet Crime Complaint Center (IC3) detailed current best practices and industry standards for cyber defense. Here is a summation:
Cyber Defense Best Practices
Backups – Regularly back up data and verify its integrity. Backups are critical in ransomware; if you are infected, backups may be the only way to recover your critical data.
Training – Employees should be made aware of the threat of ransomware, how it is delivered, and trained on information security principles and techniques.
Patching – All endpoints should be patched as vulnerabilities are discovered. This can be made easier through a centralized patch management system.
Antivirus – Ensure anti-virus and anti-malware solutions are set to automatically update and that regular scans are conducted. Centrally managed is even better.
File Permissions – If a user only needs to read specific files, they should not have write-access to those files, directories, or shares. Configure access controls with least privilege in mind.
Macros – Disable macro scripts from Office files transmitted via email.
Program Execution Restrictions – Implement software restriction policies or other controls to prevent the execution of programs in common ransomware locations, such as temporary folders supporting popular internet browsers, and compression/decompression programs.
Remote Desktop Protocol – Employ best practices for use of RDP, including use of VPN, auditing your network for systems using RDP, closing unused RDP ports, applying two-factor authentication wherever possible, and logging RDP login attempts.
Software Whitelisting – Implement application whitelisting. Only allow systems to execute programs known and permitted by security policy. This one takes careful planning.
Virtualization – Use virtualized environments to execute operating system environments or specific programs. No physical access to servers makes hacking harder.
Network Segmentation – Implement physical and logical separation of networks and data for different organizational units. Keep guest traffic out of your business network.
No Saved Passwords – Require users to type information or enter a password when their system communicates with a website. Better yet use a password management tool.
If your company is going to use full disk encryption or has compliance requirements that you need consulting for, then contact us for assistance.
Cloud eliminates hardware costs, enables instant business scaling
Give your business freedom from hardware constraints with the agility and functionality of cloud computing.
Cloud requires no upfront costs, which makes it an operating expense rather than a capital expense. Your business will benefit from predictable monthly payments that cover software licenses, updates, support and daily backups. Cloud technologies provide greater flexibility as your business only pays for what it uses and can easily scale up and down to meet demand.
Moving to the cloud enables your business to no longer pay to power on-premises servers or to maintain the environment. This significantly reduces energy bills.
Finally, for those concerned with security, cloud data centers employ security measures far beyond what most SMBs can afford. Your company data is much safer in the cloud than on a server in their office.
Move your business to the cloud ahead of Office 2010 and Windows 7 End of Support!
If your company is looking to make the move to cloud, then contact us for assistance.
Had another tech firm that needed some Tier 3 assistance as they were having trouble with their VPN connection. I helped them setup Azure to Unifi USG IPSec VPN to connect their headquarters to the hosted RemoteApps server. This tutorial will go into detail about the creation of this tunnel starting with the Microsoft Azure side first using Resource Manager. It will be using the following parameters:
VNet Name: TestNetwork
Address Space: 10.10.0.0/16
Subnets:
Primary: 10.10.10.0/24
GatewaySubnet: 10.10.0.0/24
Resource Group: TestResourceGroup
Location: West US
DNS Server: Azure Default
Gateway Name: TestVPNGateway
Public IP: TestVPNGatewayIP
VPN Type: Route-based
Connection Type: Site-to-site (IPsec)
Gateway Type: VPN
Local Network Gateway Name: TestSite
Local Subnet: 10.20.20.0/24
Connection Name: VPNtoTestSite
Configure an Azure VPN gateway
This part takes the longest, so it should be done first:
Click on the “+” icon at the top left hand side of the Resource Manager, then search for “Virtual Network Gateway” and click on the “Create” button.
Give the Virtual Network Gateway a name
Select matching Region to where Azure resources are located
Leave Gateway & VPN type the defaults
Choose a SKU <- These have changed since the article was created, so my “standard” now is WpnGw1 with Active / Active turned off (this is a good balance of performance and cost)
Choose or create a local network (not covered here) that matches internal resources
Choose or create a Public IP Address
Leave the remaining values as their defaults and then click the “Create” button. (Please note the reminder that this takes 45 minutes to create!)
Configure an Azure Local Network Gateway
This is a reference to your on-premise network so that subnets can pass traffic:
Click on the “+” icon at the top left hand side of the Resource Manager, then search for “Local Network Gateway” and click on the “Create” button.
Give the Local Network Gateway a name
Select matching Region to where Azure resources are located
Specify the external IP address of the local on-premise site
Specify the on-premise address space (subnet)
Leave the remaining values as their defaults and then click the “Create” button.
Configure an Azure VPN Connection
This will create the tunnel from Azure to the on-premise site:
Click on the “+” icon at the top left hand side of the Resource Manager, then search for “Connection” and click on the “Create” button.
Choose “Site-to-site (IPSec)” as the connection type
Give the Connection a name
Select matching Region to where Azure resources are located
Leave the remaining values as their defaults and then click the “OK” button. On the summary screen click on the “OK” button to create the connection.
Choose the newly created Virtual Network Gateway
Choose the newly created Local Network Gateway
Specify a shared key
Leave the remaining values as their defaults and click the “Create” button.
This completes the setup of the Azure side of the VPN tunnel. Now to work on the Ubiquiti USG side.
Configuring an Ubiquiti USG VPN Network
This is a fairly simple process but it has to be precise:
Choose the Current Site from the top right hand side of the portal.
Click on the Settings gears down on the bottom left side of the portal.
Click on Networks then on the “Create New Network” button.
Give the connection a name, choose “Site-to-Site VPN” as the Purpose
Choose “IPSec VPN” as the VPN Type
Choose to Enable this Site-to-Site VPN
Add the Azure subnet under Remote Subnets
Get the newly created Virtual Network Gateway IP address from Azure for the Peer IP
Enter the on-premise external IP address for Local WAN IP
Enter the same shared key as used in the Azure VPN Connection for the Pre-Shared Key
Choose “Azure Dynamic Routing” as the IPSec Profile
Expand Advanced Options
Leave Key Exchange Version, Encryption, Hash & DH Group as default and uncheck the PFS & Dynamic Routing boxes.
That is all there is to it. If you have any difficulties with connection then delete and re-create the Ubiquiti USG side first (those two check boxes at the bottom of the Advanced Options will check themselves again, but don’t be fooled by this quirk in the software). If your company is currently using either Microsoft Azure or Ubiquiti USG routers and would like a VPN created, then contact us for assistance.
Recently did some Tier 3 support work for another technology company that was trying to setup a Windows Server 2016 RemoteApps server in Azure that would allow connectivity to remote users for their on-premise software. The process started with creating a VPN tunnel between on-premise and Azure, but that is a discussion for a future set of blog posts. Once this connection was in place, the company tried to use an external certificate for RemoteApps setup on the server. This would have been fine if the internal domain had not been a “.local” address scheme. This tutorial assumes that you have already installed Remote Desktop Services on a server and configured it to use the CA provided external certificate.
Change Remote Computer Name
One of the main sticking points that caused issues with security warnings for clients connecting is they would see the warning – “The remote computer could not be authenticated due to problems with its security certificate.” The fix for this has been graciously scripted in PowerShell by someone with the handle “TP” on Technet. The script is called Set-RDPublihedName.ps1 and is used as follows:
Set-RDPublishedName "remote.domain.com"
Proper Active Directory Group
There were then issues with the login process that caused the following error:
Remote Desktop can’t connect to the remote computer “<End Resource Name>” for one of these reasons:
1) Your user account is not authorized to access the RD Gateway “<RD Gateway Server Name>”
2) Your computer is not authorized to access the RD Gateway “<RD Gateway Server Name>”
3) You are using an incompatible authentication method (for example, the RD Gateway might be expecting a smart card but you provided a password)
This was coupled with Security Log messages – “The Network Policy Server was unable to connect to a domain controller in the domain where the account is located. Because of this, authentication and authorization for the RADIUS request could not be performed.” All this turned out to be the RD Gateway was not in the proper Active Directory Group, so added the server to the RAS and IAS Servers group.
Add URL to IIS
There was then an error about not being able to find the computer name, which turned out to be a setting in IIS. Looking under Sites > Default Web Site > RDWeb > Pages click on Application Settings and change the DefaultTSGateway to the URL of the CA external certificate for RemoteApps.
Fixing RS CAP & RAP
Last error that was received was the following:
Remote Desktop can’t connect to the remote computer “computername” for one of these reasons:
1) Your user account is not listed in the RD Gateway’s permission list
2) You might have specified the remote computer in NetBIOS format (for example, computer1), but the RD Gateway is expecting an FQDN or IP address format (for example computer1.fabrikam.com or 157.60.0.1).
This turned out to be related to the RD Client Access Policy (CAP) & Remote Access Policy (RAP) under the RD Gateway Manager tool and DNS. For RD CAP, make sure that Domain Users is listed, and that Client Computer Group membership is blank. FTor RD RAP, make sure that Domain Users is listed, and that it is set to allow connection to Any Network Resource (This allows remote access). For DNS, make sure it contains a Forward Lookup Zone that points to the URL of the CA external certificate for RemoteApps and has an A record for the internal IP address of the RD server.
If your company is currently moving some of your resources to the Azure cloud or wanting to properly setup your RemoteApps server, then contact us for assistance.
And God will generously provide all you need. Then you will always have everything you need and plenty left over to share with others. As the Scriptures say,
“They share freely and give generously to the poor. Their good deeds will be remembered forever.”
For God is the one who provides seed for the farmer and then bread to eat. In the same way, he will provide and increase your resources and then produce a great harvest of generosity in you. - 2 Corinthians 9:8-10
We use cookies to ensure that we give you the best experience on our website. If you continue to use this site we will assume that you are happy with it.