Real-world fix for server disappearance using co-managed IT proactive monitoring
Today’s story highlights how we helped a Co-Managed client resolve a perplexing issue with their network. Random workstations were losing connection to the server at inconsistent intervals throughout the day. Despite the on-site technician’s best efforts, the root cause remained elusive, so they called us in to investigate.
We began by examining the suspected source of the problem: the server. Tracing all network cables from the server to the connected switches, we discovered a secondary failover server designed to take over in case of primary server failure. However, both servers had multiple network connections that weren’t properly configured. We corrected this setup, confident it would resolve the issue. Yet, the very next day, we received reports that the problem persisted.
In response, the on-site technician replaced the main server with the failover server, configuring it with the same name and IP address as the original. Unfortunately, this didn’t fix the issue, so we were called back for further investigation.
Drawing on our experience with similar cases, we suspected an IP address conflict. Specifically, two devices might have been assigned the same IP—one set statically and the other dynamically via DHCP. To test this theory, we asked the on-site tech to power down the server.
Our hunch was correct. A misconfigured network allowed an iPhone on the guest wireless network to obtain the same IP address as the server, causing both devices to compete for network traffic. We resolved the issue by isolating the guest wireless network from the main network, ensuring no overlap could occur.
With this fix in place, our client’s network has been running smoothly, allowing them to return to business as usual.
Uncover the Ghosts in Your Network! Contact Farmhouse Networking today to solve your IT mysteries and get back to business seamlessly. Don’t let hidden issues slow you down—schedule your consultation now!
As our business continues to grow our focus is on providing white labeled Tier 3 IT support services, RMM as a service, and co-managed IT services. This blog will be highlighting tips for using PowerShell to deploy Synology Active Backup for Business.
Research
Found a support page from Synology that details how to edit the MSI file and deploy it via a Group Policy Object. We are using a similar method to edit the MSI package and deploy it from a local share to all computers via the RMM. You will need to configure a Synology Active Backup for Business template for PCs and download the MSI installer. We use a software called InstEd to edit the MSI installer as follows:
Click Property in the Tables list on the left. Enter the values for the following properties3:
USERNAME: Enter the username for accessing the Synology NAS.
NO_SHORTCUT: Enter “1” if you want to hide the Active Backup for Business Agent’s icon from the main menu of the end user’s device.
ADDRESS: Enter the IP address of the Synology NAS.
PASSWORD: Enter the password for accessing the Synology NAS.
ALLOW_UNTRUST: Enter “1” if you want to connect to the Synology NAS using an IP address instead of a domain or DDNS.
PROXY_ADDR, PROXY_PORT, PROXY_USERNAME, PROXY_PASSWORD: Enter these values only when users have to access your Synology NAS via proxy.
Click File > Save
Once done, upload to the local network share and take note of the share path – i.e. \\192.168.20.10\Support
Variables
$MSIArguments = This will include full file name of the Synology Active Backup for Business MSI installer – i.e. ‘Synology Active Backup for Business Agent-2.7.0-3221-x64.msi’
Script Snippet
Push-Location -Path '\\192.168.20.10\Support' -StackName 'Backup'
Set-Location -StackName 'Backup'

$MSIArguments = "/i Synology Active Backup for Business Agent-2.7.0-3221-x64.msi"

Start-Process "msiexec.exe" -ArgumentList $MSIArguments -Wait -NoNewWindow
The script will take several seconds to minutes to run based on the speed of the computer. The computers will start populating on their own into the Synology Active Backup for Business app.
If your company is a MSP or wants to become one and automation just seems out of reach, then contact usto run your RMM for you.
Stepping over dollars to pick up pennies with backup can cost your business more than it saves—invest in reliable online backup instead.
It’s story time again!
This time we are talking about Dave a former client of ours. He decided several years ago to change his accounting practice’s IT support to a national company that produced one of the software packages he used. Dave listened to their sales pitch about a better understanding and support of their software for less money per month. Dave still called us once and awhile to help do things in person because this national company did not have any local presence. It had been almost a year since we had heard from Dave last when we got a phone call from another local computer repair shop asking us for any information we could provide to help them – Dave’s server had crashed and was not booting after a power outage.
It turns out that Dave’s national IT support company did not have any backups of the server. They had no idea how the server was configured and this forced Dave to reach out to the local computer repair shop. We gave them credentials that we had for the backup system we had put in place previously and talked them through reconnecting a network storage device to the server to get the server back to complete functionality. This process took them about a week to complete.
During the time that we did support Dave there was a similar incident with one of his computers. We used the backup system we had recommended to get him back to fully functional in a matter of hours – in the middle of tax season no less.
The moral of the story is that Dave should have stayed with Farmhouse Networking or moved to a managed IT support company that understands both the software and the things that can go wrong in a company like Dave’s account practice so that he could be properly protected.
Neglected IT infrastructure quickly turns into costly downtime and data loss, but proactive managed IT services help businesses stay online and protected.
Has your business ever experienced a technology crisis that could have been easily prevented? Learn from the cautionary tale of a non-managed client who recently faced a major setback due to neglected IT infrastructure. This compelling story underscores the importance of proactive IT management and the need for robust backup solutions.
The Story: A Cautionary Tale
Neglected IT Infrastructure: After 5 years of radio silence, a panicked non-managed client reached out to us when their aging computer, hosting their crucial order processing system, malfunctioned.
DIY Mishap: Attempting to fix the issue themselves, the client inadvertently worsened the situation by installing the wrong part, leading to a cascade of problems.
Costly Consequences: The subsequent visit to a local repair shop and improper part replacement led to the corruption of critical files, including the Windows Operating System and the database containing vital client data.
Backup Oversight: The client’s failure to maintain updated database backups exacerbated the crisis, with the only available backup being approximately 5 years old.
The Solution: Managed IT Services
Proactive Maintenance: With managed IT services, critical components like the aged computer would have been promptly replaced before catastrophic failure, averting the entire crisis.
Remote Support: Swift remote intervention by a managed IT provider would have prevented the corruption of the operating system and database, substantially reducing the overall cost of the incident.
Comprehensive Backup Strategy: Every business should prioritize regular, imaged-based backups to safeguard their crucial data, ensuring seamless restoration in the event of a disaster.
Expert Guidance: Embracing managed IT services equips businesses with expert recommendations and proactive measures to avoid potentially devastating technology pitfalls.
Take the Right Step for Your Business!
Don’t let your business fall victim to preventable IT disasters. Embrace the proactive protection and expert guidance offered by a managed IT service provider to ensure uninterrupted business operations.
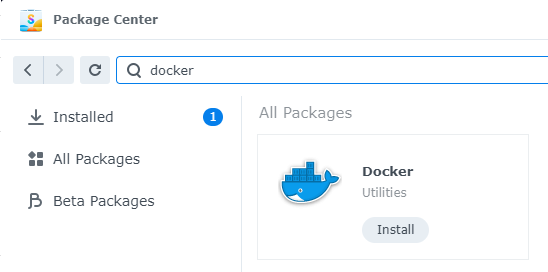
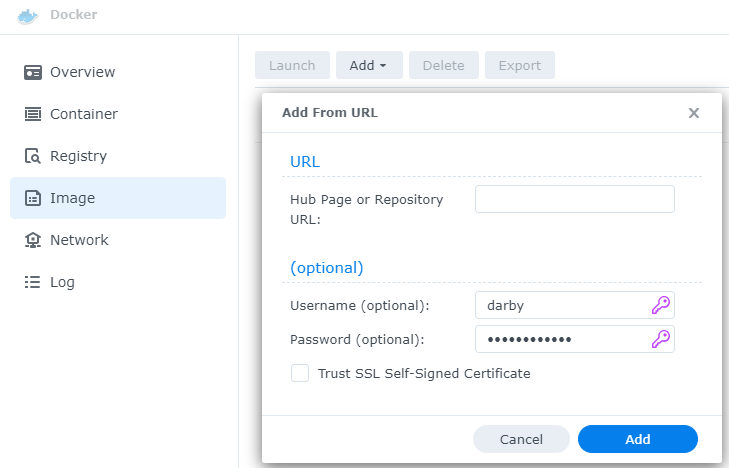
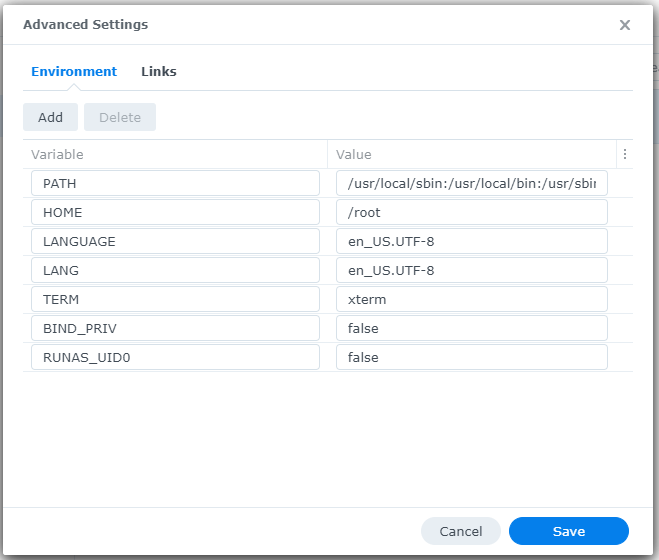
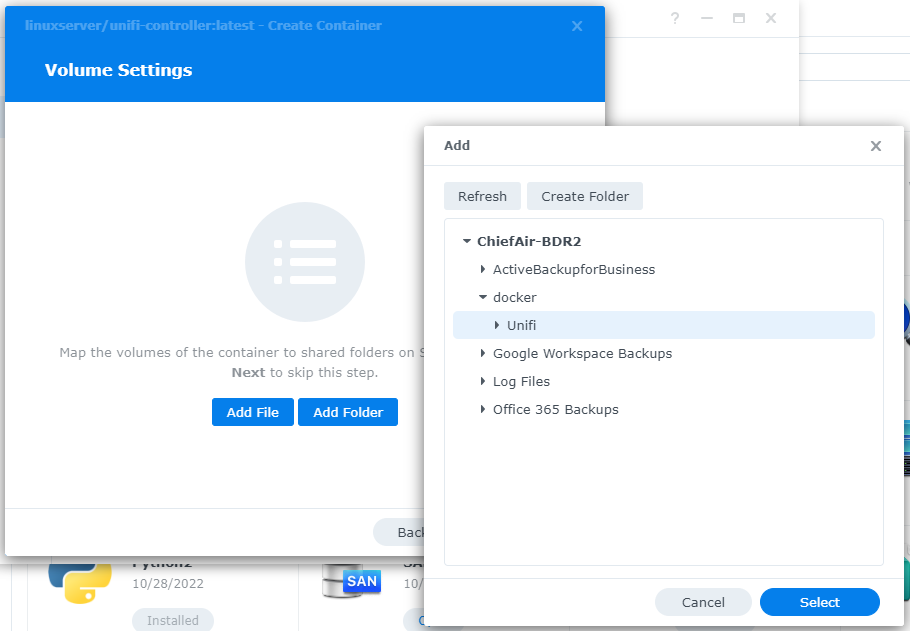
This is the third in a series that documents the Tier 3 / Co-Managed IT work we did to setup a wireless test bed for a Linux based scientific device. The testing environment included two different wireless network hardware types (Ubiquiti and Cisco). There was also a Synology device used for various purposes including hosting the Ubiquiti controller inside a Kubernetes container, providing certificate services, providing LDAP authentication, and providing RADIUS authentication. Each article will detail a separate piece of the project. This article shows the basic setup of Ubiquiti Wireless Controller as a Docker instance on the Synology.
Synology NAS DSM wizard for storage pool volume and initial configuration.
This is the second in a series that documents the Tier 3 / Co-Managed IT work we did to setup a wireless test bed for a Linux based scientific device. The testing environment included two different wireless network hardware types (Ubiquiti and Cisco). There was also a Synology device used for various purposes including hosting the Ubiquiti controller inside a Kubernetes container, providing certificate services, providing LDAP authentication, and providing RADIUS authentication. Each article will detail a separate piece of the project. This article shows the basic setup of Cisco Wireless Controller.
Setup of Synology NAS
Physically install hard drives into bays
Plug into network
Plug into power
Find IP address by pinging ‘Diskstation’ on network
Start web browser and connect to IP address
Run Setup Wizard
Install Synology OS on drives
Wait for reboot
Start setup
Give it a name
Create admin account / password
Install only important updates automatically
Sign-In to or Create Synology Account
Create quickconnect ID
Enable DSM backups
Create storage pool
If it states that no drives are available – check under HDD/SSD to see if there are required firmware updates. Install all available.
Use SHR-2 RAID
Choose all drives to be in the RAID (not m.2 cache drive)
Use Max Allocated size
Use Btrfs file system
Click Apply
Click OK to erase all drives
Open Package Center App
Accept terms of service
Update any Installed
Install LDAP Server and RADIUS Server
Close Package Manager
If your company has highly customized setup requirements that you need consulting for, then contact us for assistance.
Make sure Hyper-V Host has CPUs than the combined total of CPUs for all servers being restored as these static until after the VMs are completely restored. If there is not enough CPU resources then the VMs will not boot.
Make sure Hyper-V Host has more than the combined total of RAM for all servers being restored as these settings are static until after the VMs are completely restored. If there is not enough memory then the VMs will not boot.
Create a SET NIC Team on the server (if you have multiple NICs)
Open Powershell as administrator
User the New-VMSwitch command to setup an external virtual switch to connect to for live connections
The AllowManagementOS is needed if you are using the same NIC team to access the VM host
Setup secondary Internal vSwitch to allow for testing before deploying
Setup Synology LUN targets for each VM to be restored. Make sure that they are big enough to hold all the full uncompressed size of the entire thick provisioned hard drives for the entire server.
Connect each LUN to the iSCSI Initiator on the VM Host. Make sure to bring them online, initialize them, and give them a drive letter. Synology needs this because it uses the SMB protocol to transfer the files during restore.
Make sure to allow the File and Printer Sharing app through the Windows firewall and open port 5986 to allow HTTP traffic for WinRM to allow Synology to query the Hyper-V settings.
Add the Hyper-V Host to the Active Backup for Business app.
Synology Active Backup Restore to Hyper-V
Open the Active Backup for Business app
Click on the Physical Server tab on the left
Select the server and click the Restore button
Select the point in time to restore from
Choose Restore to Microsoft Hyper-V
Choose Full Virtual Machine Restore
Change the Restore Name
Select a folder on the Hyper-V Host to place the configuration files
Select a folder on the Hyper-V Host to place each of the restore VHD files
Select a Virtual Switch on the Hyper-V Host to connect the VM to
Confirm the settings by clicking on the Done button.
After:
The VMs will boot with a single NIC and no network settings. Keep them offline and add additional NICs as needed to match the original setup. Then configure the NICs as before upon reboot. Make sure to connect to Internal Test Switch for initial steps.
Check hardware configuration of CPUs and RAM to determine if adjustments can be made. In particular, the RAM settings can be changed to startup, minimum, and maximum to allow for distribution of resources to VMs that have heavier workloads.
Boot VM to make sure it is functioning correctly. (first bootup can take upwards of 15 minutes)
Convert the VM from Gen1 to Gen2
Download Windows 10 ISO – https://www.microsoft.com/en-us/software-download/windows10
As our business continues to focus on providing white labeled Tier 3 IT support services, RMM as a service, and co-managed IT services this blog will be highlighting tips for Synology resource monitoring. We have developed best practices for alerting on a Synology device for resources like CPU, Memory, and Disk Usage. When these Synology resource monitoring alerts are consistently triggered it show that the device is over utilized or if they remain triggered for long periods of time then it shows there is an issue on the device itself. We also setup weekly Storage Reports to get an accurate view of the changes and growth going on with client storage.
Setup Notifications
Make sure that Notifications are setup on the Synology first
Open Control Panel
Click on Notifications
Check enable email notifications
Choose Service Provider
Login to Gmail or use Custom SMTP server for Office 365 as the sender
Change Subject to indicate name of device
Add recipient email (Best to use one that ties into a PSA or RMM)
Click Apply
Send a Test Email
Setup Synology Resource Monitoring
Open Resource Monitor app
Click on Performance Alarm to the left
Click on Rules tab
Click Create
Create the following Rules one by one
Volume Critical
Select which volume [create multiple rules if more than one volume]
Select Disk I/O utilization
Greater than 90%
Level Critical
Volume Warning
Select which volume [create multiple rules if more than one volume]
Select Disk I/O utilization
Greater than 75%
Level Warning
System Memory Critical
Memory Usage
Greater than 90%
Level Critical
System Memory Warning
Memory Usage
Greater than 75%
Level Warning
System CPU Critical
CPU Usage
Greater than 90%
Level Critical
System CPU Warning
CPU Usage
Greater than 75%
Level Warning
Click Settings and check box to Enable usage history then click Save
Setup Storage Reports
Open Storage Analyzer
Select new location
Create new shared folder named Log Files – hide from network
Go back to Storage Analyzer and select new folder
Set volume usage data to be collected Daily at 2am
Create report task
Send to email (Best to use one that ties into a PSA)
Generate reports at Monday 4am
Keep 60 reports then click Next
Select report items
Volume Usage
Shared Folders
Potential Duplicate Files
Large Files
Least Recently Modified Files then click Next
Analyze all folders then click Next
Leave duplicate file defaults then click Next
Click Done
Close App
Once this is setup you will start getting email alerts sent to you or better yet your PSA / RMM for ticket creation and review.
If your company is a MSP or wants to become one and automation just seems out of reach, then contact us to run your RMM for you.
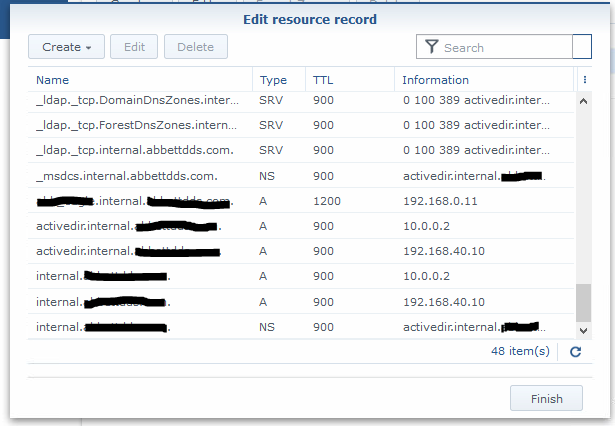
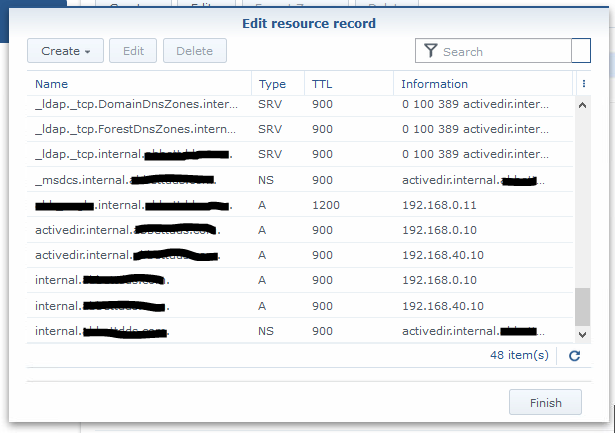
Got a email from one of our co-managed IT / Tier3 / managed RMM clients that was having issues with DNS resolution. The network consists of a Synology NAS acting as Domain Controller / DNS Server and a VM on the Synology that runs the clients main application. Several of the workstations were having an issue where they could not browse to the IP address (\\192.168.0.11\sharename)of the application server at one time and could not browse to the UNC path (\\servername\sharename) of the same server on another day. First tried setting the external forwarders to Google DNS and the Forward Policy to Forward First, but the problem resurfaced. So we dug deeper into the DNS settings and found the following:
Stale DNS records break Synology name resolution—simple record cleanup fixes it
If you look closely the IP address of the server is 192.168.0.11 and the records for DNS servers associated with the domain above and below it point to servers outside the subnet of the application server (10.0.0.2). Upon further investigation this DNS server address was blocked by the firewall because it was an old IP address scheme that was no longer in use. The current good DNS server IP addresses are 192.168.40.10 and 192.168.0.10.
Turns out the stale DNS records were the problem. Made the needed changes to the DNS records and things are working great.
If your company needs a little extra help running the IT department, then contact us to setup a co-managed IT evaluation.
And God will generously provide all you need. Then you will always have everything you need and plenty left over to share with others. As the Scriptures say,
“They share freely and give generously to the poor. Their good deeds will be remembered forever.”
For God is the one who provides seed for the farmer and then bread to eat. In the same way, he will provide and increase your resources and then produce a great harvest of generosity in you. - 2 Corinthians 9:8-10
We use cookies to ensure that we give you the best experience on our website. If you continue to use this site we will assume that you are happy with it.