Why SMBs Need Smart Network Infrastructure Management
Optimizing SMB network infrastructure for stronger, scalable business networks
For small and midsize business owners, every minute of uptime counts. A slow or vulnerable network isn’t just frustrating—it costs productivity, damages customer trust, and drains revenue. Network Infrastructure Management, guided by CIS (Center for Internet Security) standards, is the key to keeping your technology reliable, secure, and scalable.
Practical Action Steps
Audit Your Current Network: Compare your systems to CIS-recommended controls to uncover risks.
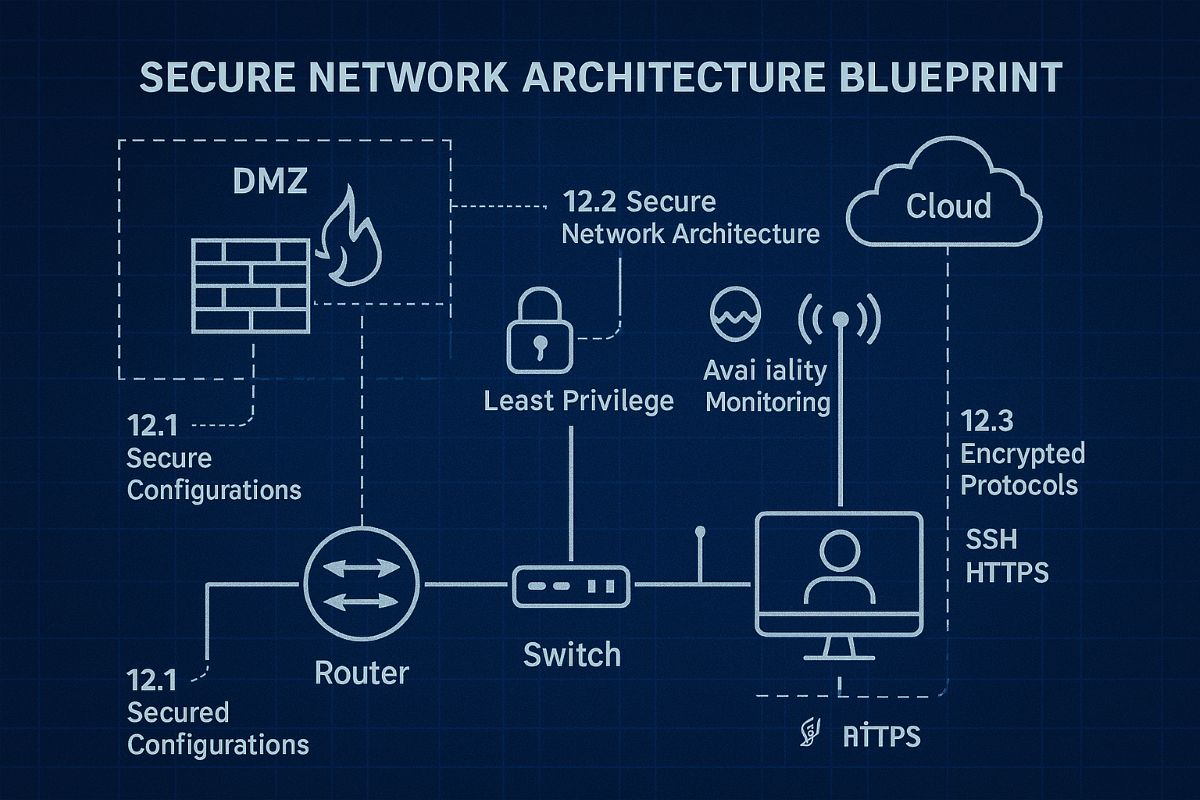
Secure Data Flows: Implement firewalls, intrusion detection, and CIS baseline configurations.
Plan for Growth: Ensure your infrastructure supports cloud, remote work, and future expansion.
Continuous Monitoring: Use real-time alerts to prevent disruption before it happens.
Employee Awareness: Provide staff training on cybersecurity aligned with CIS best practices.
Client Q&A
“Do CIS standards apply to smaller companies?” – Absolutely; they’re designed to scale to all business sizes.
“Will I need to overhaul my whole network?” – Not necessarily. Often, a phased approach is more cost-effective.
“What if I already have an IT person?” – Farmhouse Networking’s role is to extend their expertise, not replace it.
How Farmhouse Networking Helps We align your systems with CIS benchmarks, secure your infrastructure, and monitor it constantly. That means less downtime, stronger client trust, and more bandwidth for business growth.
Call to Action Ready to protect your network and grow confidently? Email us today at support@farmhousenetworking.com to learn how Farmhouse Networking can keep your systems strong and compliant.
SSO for BYOD provides secure, convenient single sign-on access across apps on personal devices for small business teams.
Individuals and organizations rely heavily on various online platforms and services, the need for a secure and convenient way to access these resources is paramount. This is where SSO Single Sign-On comes into play. SSO Single Sign-On is a powerful authentication method that allows users to securely sign in to multiple applications and platforms using just one set of credentials. In this article, we will explore the benefits of SSO Single Sign-On, its implementation, and how it enhances security while streamlining the user experience.
Understanding SSO Single Sign-On
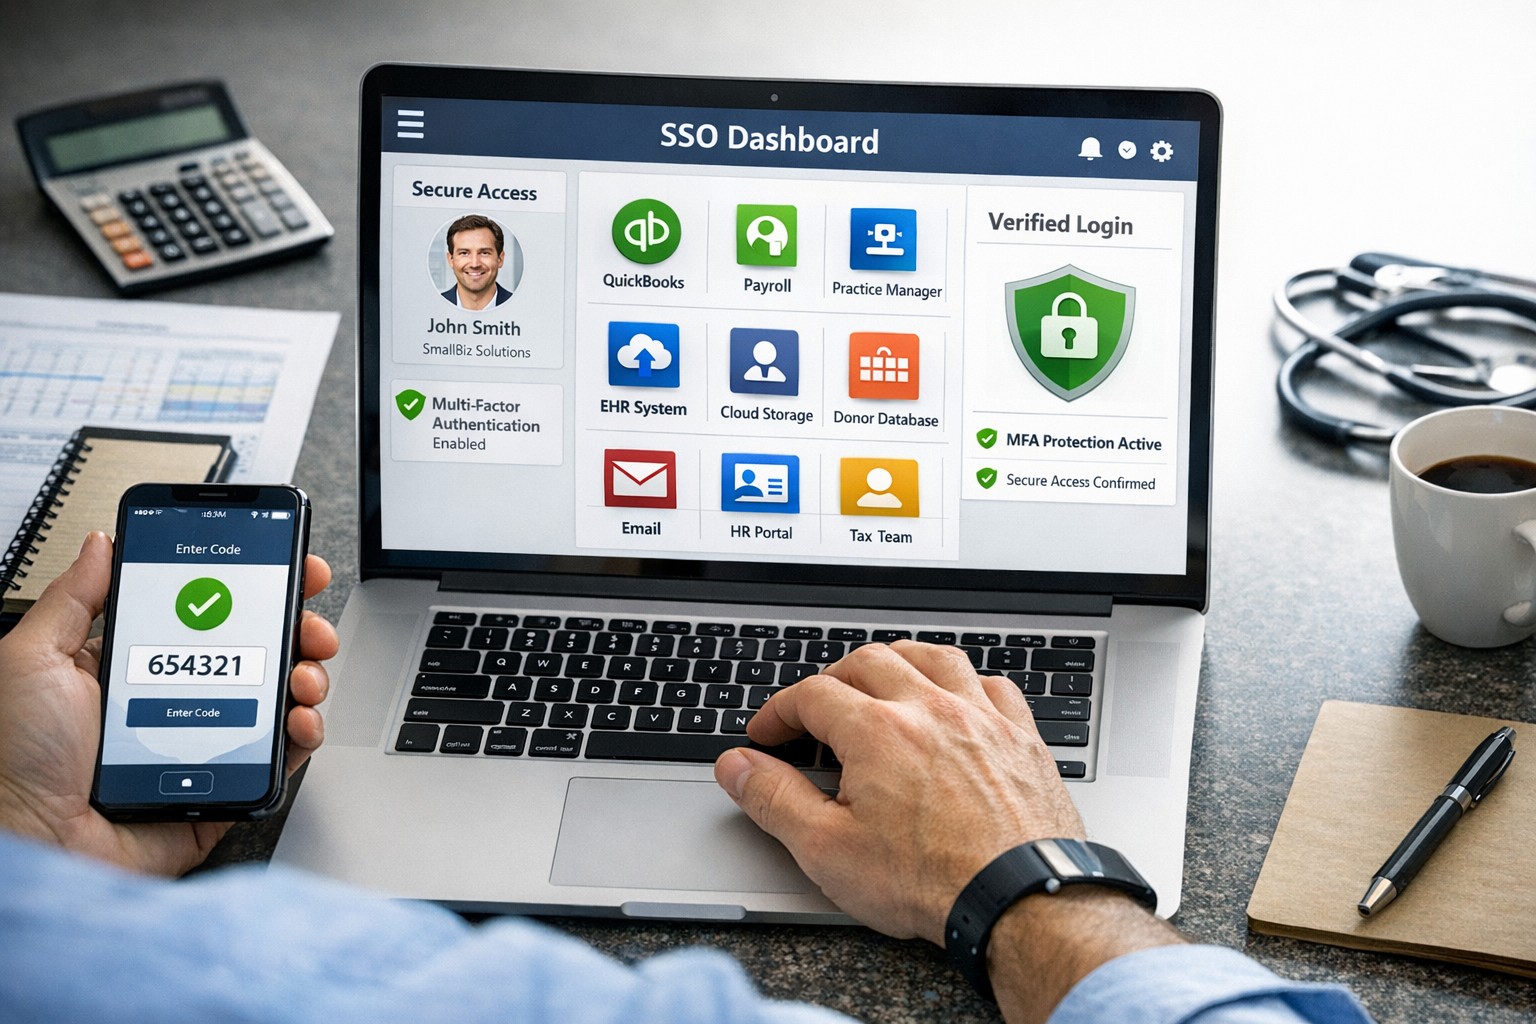
What is SSO Single Sign-On? SSO Single Sign-On is an authentication process that enables users to access multiple applications and platforms using a single set of login credentials. With SSO Single Sign-On, users only need to remember one username and password, eliminating the hassle of managing multiple credentials for different services. This not only saves time but also enhances convenience for users.
How does SSO Single Sign-On work? SSO Single Sign-On works by establishing a trust relationship between an identity provider (IdP) and the various service providers (SPs). When a user attempts to access a service, the IdP verifies the user’s identity and provides a token to the SP, which grants the user access without requiring additional authentication. This seamless process simplifies the login experience and eliminates the need for users to repeatedly enter their credentials.
Benefits of SSO Single Sign-On
Enhanced Security: One of the key advantages of SSO Single Sign-On is its ability to enhance security. By consolidating login credentials into a single set, users are less likely to resort to weak passwords or reuse passwords across multiple platforms. This reduces the risk of password-related security breaches. Additionally, SSO Single Sign-On allows for stronger authentication methods, such as two-factor authentication, further bolstering security without requiring multiple accounts.
Streamlined User Experience: With SSO Single Sign-On, users no longer have to remember and enter multiple sets of login credentials. This significantly reduces the login friction and streamlines the user experience. Users can seamlessly navigate between different applications and platforms without the need for repetitive logins. This convenience not only saves time but also improves productivity.
Centralized Access Management: SSO Single Sign-On provides organizations with centralized access management capabilities. Administrators can easily control user access to various applications and platforms from a centralized dashboard. This simplifies user provisioning and deprovisioning, ensuring that employees have timely access to the resources they need while maintaining security and compliance.
Cost and Time Savings: Implementing SSO Single Sign-On can lead to cost and time savings for organizations. By reducing the number of password-related support requests, IT teams can focus on more strategic initiatives. Additionally, the streamlined login experience reduces the time spent by employees on authentication, leading to increased productivity and efficiency.
Implementing SSO Single Sign-On
To implement SSO Single Sign-On, organizations need to follow a few key steps:
Evaluate SSO Solutions: Begin by evaluating various SSO solutions available in the market. Consider factors such as compatibility with existing systems, scalability, security features, and ease of integration.
Choose an Identity Provider: Select an identity provider that aligns with your organization’s requirements. The identity provider will be responsible for authenticating users and issuing tokens for accessing service providers. Office 365 and Google Workspace are usually the best, most prolific IdP sources to use.
Configure Service Providers: Configure the service providers that you want to integrate with SSO Single Sign-On. This involves establishing trust relationships between the identity provider and the service providers.
User Provisioning and Deprovisioning: Implement a user provisioning and deprovisioning process to ensure that users have the necessary access to the applications and platforms they require. This process should be integrated with the SSO Single Sign-On solution to maintain centralized access management.
Test and Monitor: Thoroughly test the SSO Single Sign-On implementation to ensure its functionality and security. Regularly monitor the system to identify and address any potential issues or vulnerabilities.
Best Practices for SSO Single Sign-On Implementation
When implementing SSO Single Sign-On, it is essential to follow best practices to maximize security and usability:
Strong Authentication: Implement strong authentication methods such as two-factor authentication or biometric authentication to enhance security.
Regular Auditing: Conduct regular audits of user access rights and permissions to ensure compliance and detect any unauthorized access.
User Education: Educate users about the benefits of SSO Single Sign-On and best practices for password management to promote secure behavior.
Continuous Monitoring: Implement a robust monitoring system to detect and respond to any suspicious activities or potential security threats.
Regular Updates: Keep the SSO Single Sign-On solution and all integrated applications up to date with the latest security patches and updates.
Remember, security should never be compromised, and SSO Single Sign-On provides a robust solution to protect user identities and streamline access to applications and platforms. Embrace the power of SSO Single Sign-On and enjoy the benefits of enhanced security and convenience.
Synology NAS DSM wizard for storage pool volume and initial configuration.
This is the second in a series that documents the Tier 3 / Co-Managed IT work we did to setup a wireless test bed for a Linux based scientific device. The testing environment included two different wireless network hardware types (Ubiquiti and Cisco). There was also a Synology device used for various purposes including hosting the Ubiquiti controller inside a Kubernetes container, providing certificate services, providing LDAP authentication, and providing RADIUS authentication. Each article will detail a separate piece of the project. This article shows the basic setup of Cisco Wireless Controller.
Setup of Synology NAS
Physically install hard drives into bays
Plug into network
Plug into power
Find IP address by pinging ‘Diskstation’ on network
Start web browser and connect to IP address
Run Setup Wizard
Install Synology OS on drives
Wait for reboot
Start setup
Give it a name
Create admin account / password
Install only important updates automatically
Sign-In to or Create Synology Account
Create quickconnect ID
Enable DSM backups
Create storage pool
If it states that no drives are available – check under HDD/SSD to see if there are required firmware updates. Install all available.
Use SHR-2 RAID
Choose all drives to be in the RAID (not m.2 cache drive)
Use Max Allocated size
Use Btrfs file system
Click Apply
Click OK to erase all drives
Open Package Center App
Accept terms of service
Update any Installed
Install LDAP Server and RADIUS Server
Close Package Manager
If your company has highly customized setup requirements that you need consulting for, then contact us for assistance.
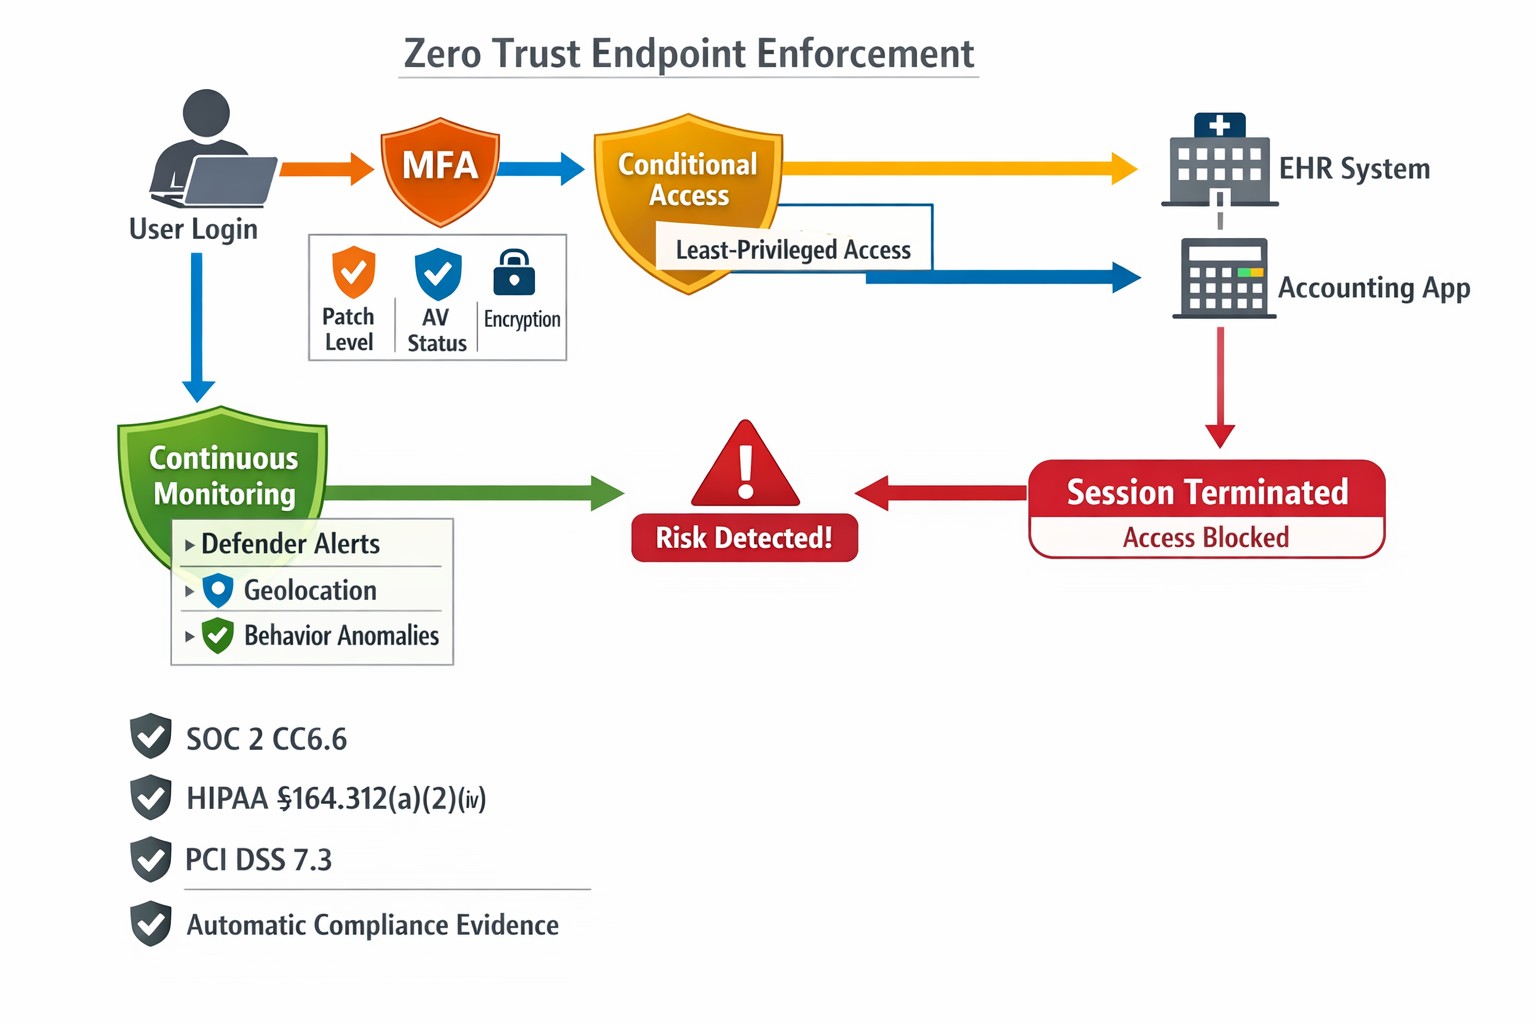
This is the sixth in a series about the concept of Zero Trust, which means in the IT sense that you trust nothing and always verify everything surrounding and connected to your network. Today’s discussion will be on endpoint security.
Endpoint Security
Endpoint security is a fancy term used to describe how the computers on the network are protected. This used to be done by antivirus but due to the complexity of the attacks hackers are using to compromise networks these days, the definition has expanded greatly. This now includes things like Enhanced Detection & Response software, Security Operations Centers, DNS Filtering, employee train and more. Here are some questions that you should be asking yourself:
Are your endpoints protected by antivirus or enhanced detection & response?
Is website traffic being monitored? Restricted?
Are your employees being trained in cyber security?
Are computer logs being monitored for malicious activity?
Would unusual or suspicious activity on a computer be noticed? Alerted on?
Do you have security permissions set on all file shares?
Do you have least privileged access configured on those shares?
Do you keep track of what software is installed on all workstations?
Do you block access to unauthorized software?
Are files encrypted on servers and workstations?
Are your mobile devices managed? Can you wipe them remotely?
Are USB ports blocking removeable storage devices?
Are endpoints set to automatically log-out?
If your company is going to use full disk encryption or has compliance requirements that you need consulting for, then contact us for assistance.
The following steps will setup Windows Server 2012 R2 RADIUS authentication via Network Policy Server (NPS) with your Ubiquiti UniFi Security Gateway (USG) for a USG Remote User VPN. This will allow users to use their current Active Directory Domain Services (AD DS) credentials to authenticate to the Virtual Private Network (VPN).
I am using the UniFi controller version 5.4.14 hosted in Microsoft Azure on a Linux Server with PostFix for alerting.
Step 1: Configure Windows NPS Server
From the Server Manager Dashboard, install the Network Policy and Access Server role using Add Roles and Features accepting all defaults.
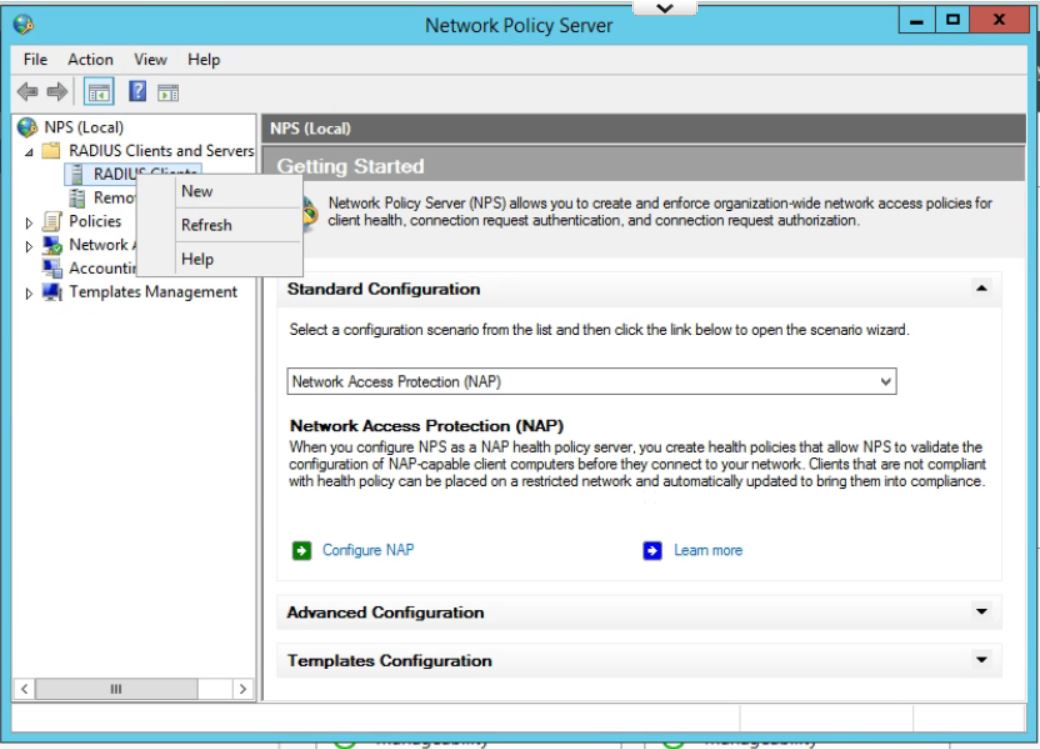
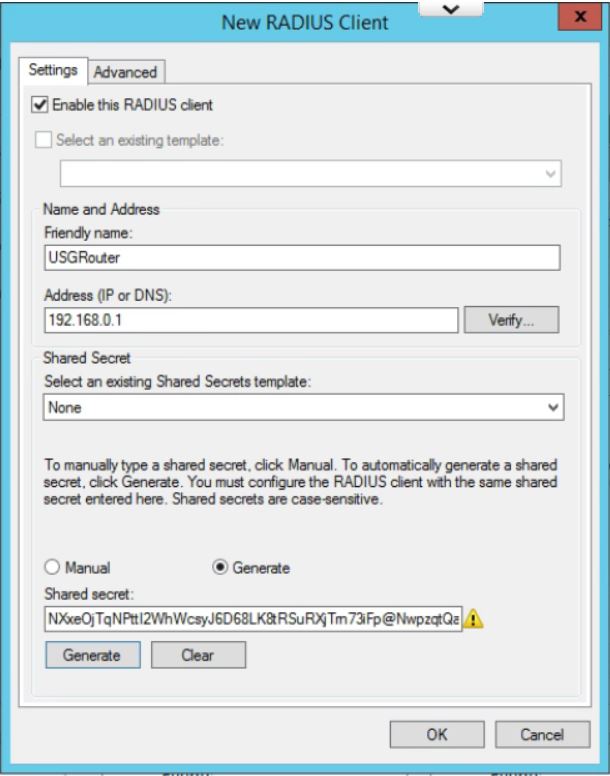
Once installed, open the Network Policy Server Administrator Tool. Expand the RADIUS Clients and Servers, then right Click on RADIUS Clients and click New.
Give the USG router a Friendly Name. Type in the IP Address of the inside interface of the USG on the same network as the Windows Server. (This is the IP that the RADIUS requests will come from.) Click the Generate radio button, then click the generate button. Copy this Shared Secret to be pasted later. Click OK.
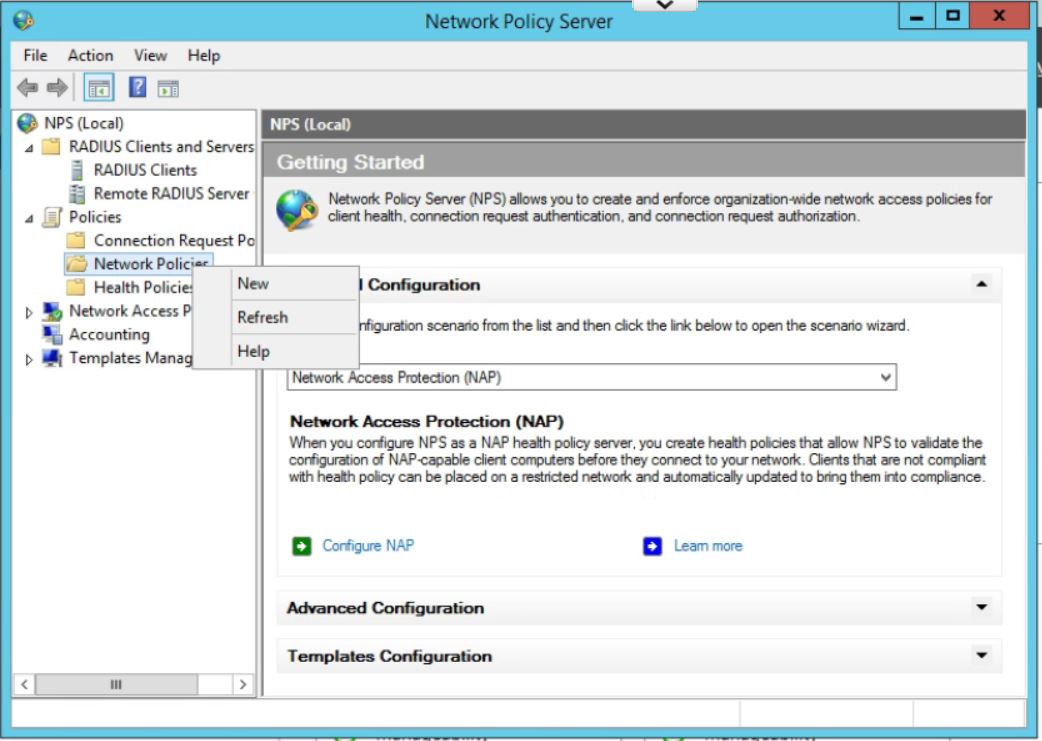
In the Network Policy Server window, expand Policies, right click on Network Policies, and then click New.
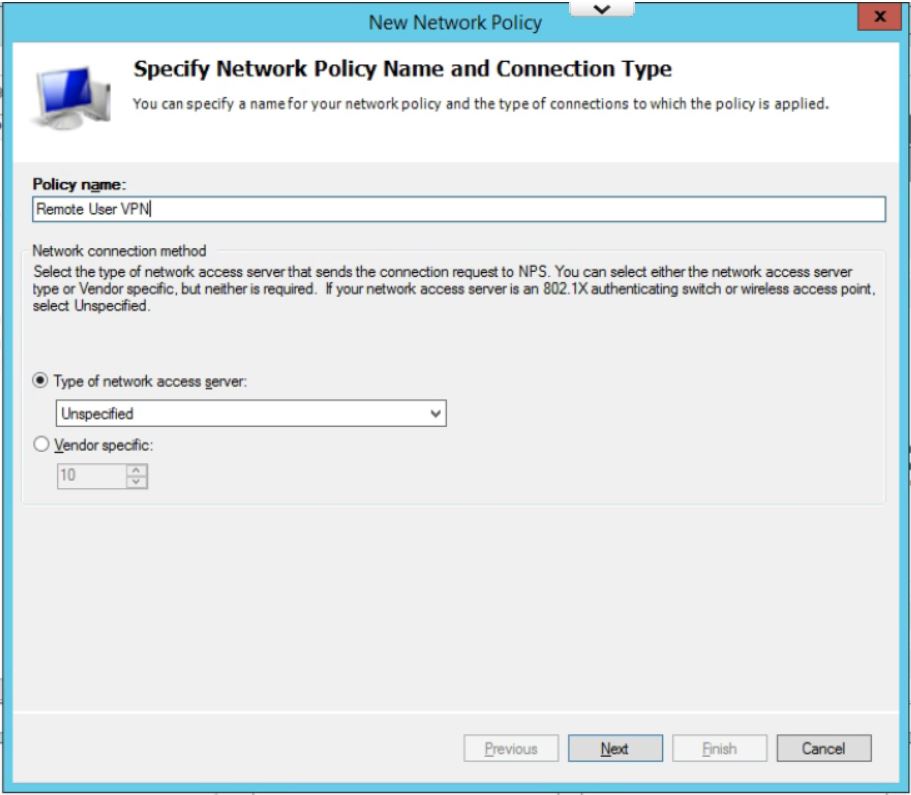
Enter a policy name and leave Type of Network Access Server as Unspecified. Click on Next.
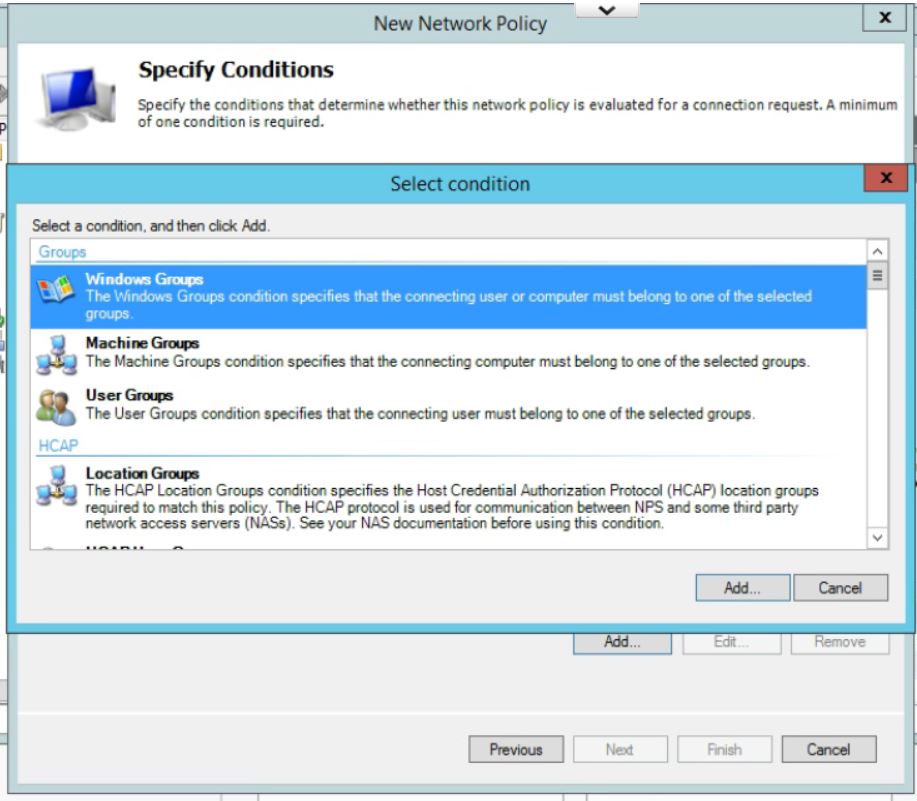
In Specify Conditions click Add.. and then select Windows Group, and pick the AD Group you want to use to allow VPN access. (If you have not already then you will need to add all users who will be accessing the VPN into a seperate group.) Click Add… then Add Groups… which brings up the typical AD search box. Type in the name of the VPN Windows Group and click on OK. Click OK again. Click on Next
Leave the Specify Access Permissions at the defaults (Access Granted, Dial-in box unchecked). Click Next.
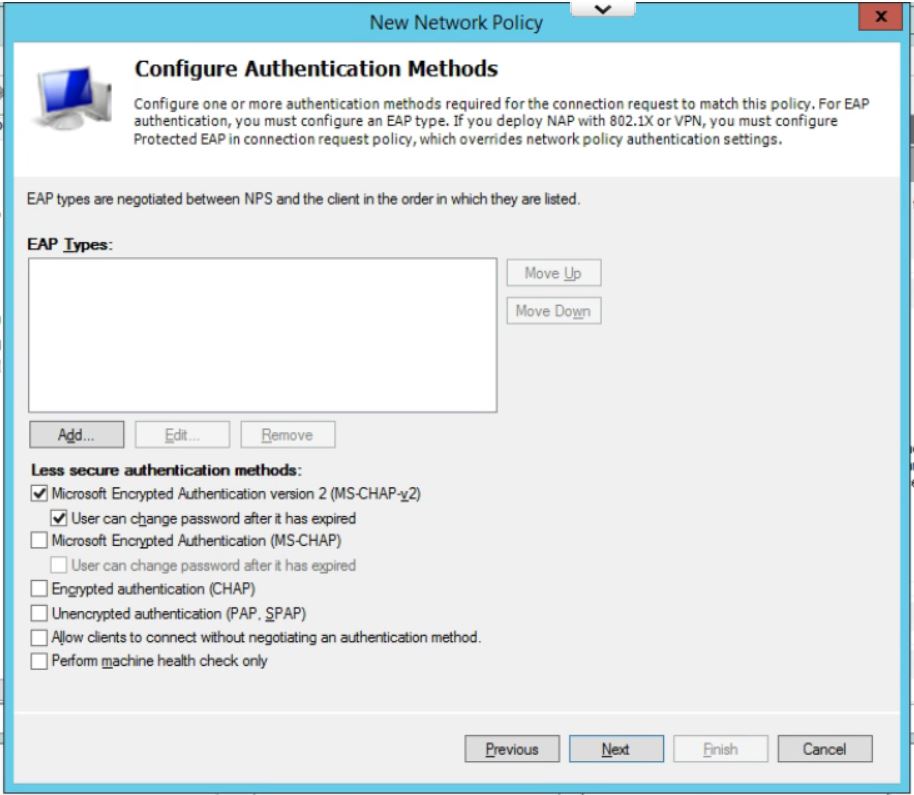
Uncheck all authentication methods other than MS-CHAPv2. Click on Next.
Accept the defaults under Configure Constraints. Click Next.
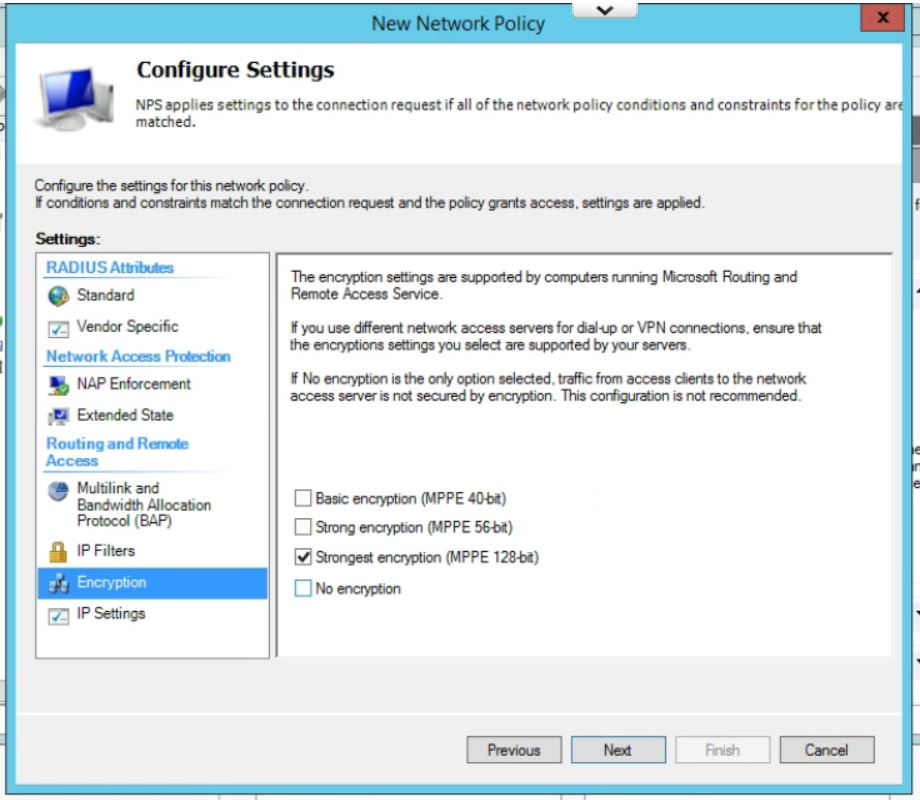
Leave all setting at the default on this page except for under Encryption. Uncheck everything except for MPPE 128-bit. Click Next.
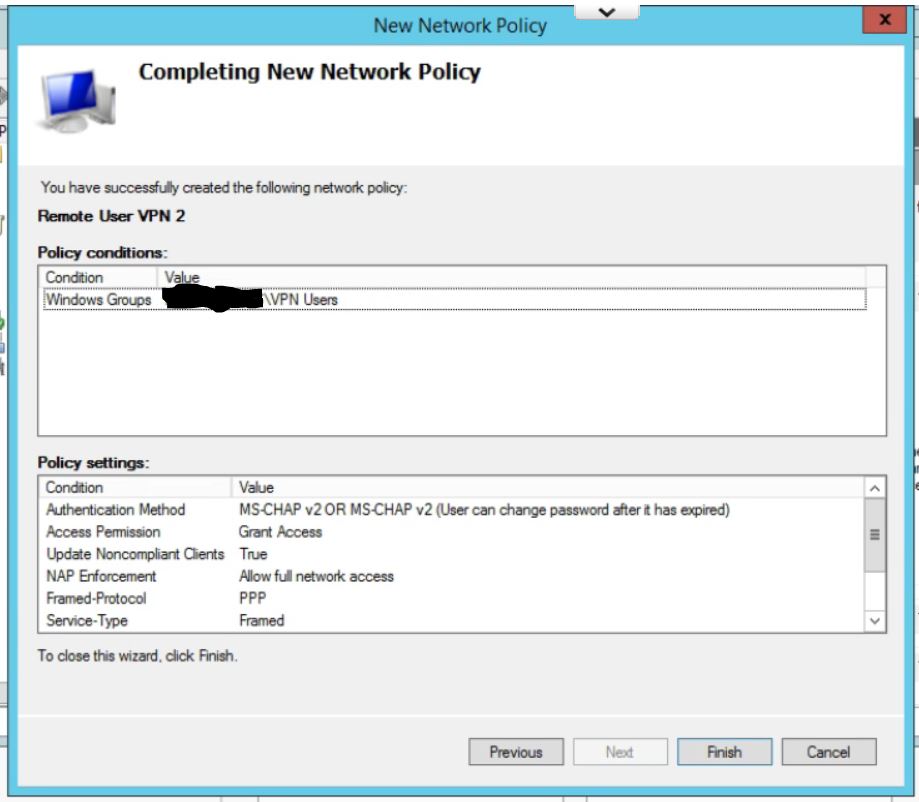
Check your settings on the last page. Click Finish.
Finally, move the new policy above the two default policies in the list by right clicking and choosing Move Up.
Step 2: Configure the USG Remote User VPN
To create the remote access network, in the UniFi controller, go to Settings, then Networks, and click Create New Network, give the network a name and select Remote User VPN.
Fill in the appropriate Gateway/Subnet information for your environment. Make sure it is not the same as any of your current networks.
Add Manual DNS servers, if required for your environment.
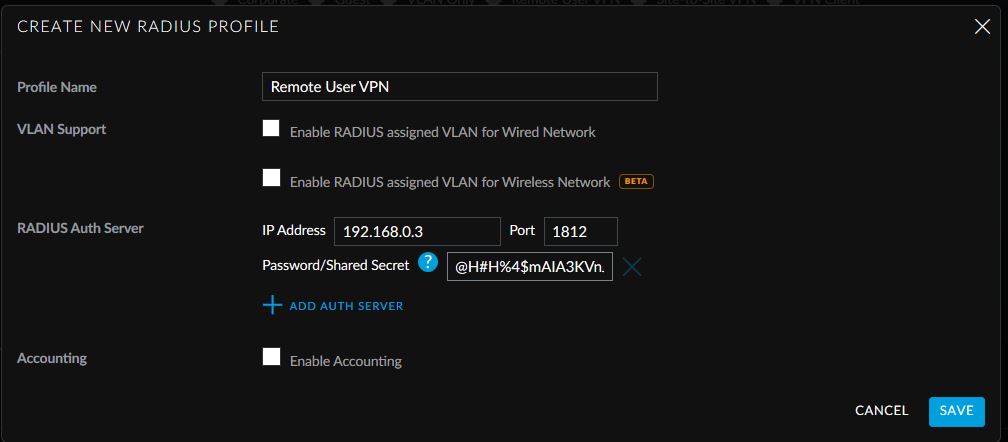
Click on Create New RADIUS Profile.
Give the Profile a name, enter in the IP address of the Windows Server 2012 R2 server that will be used for RADIUS authentication and paste in the generated shared secret.
Click Save. Click on Save again.
This allows easy access from Windows default VPN connections to network assets behind the USG device.
If your company is currently using a Ubiquiti USG device and need a Remote User VPN setup, then contact us for assistance.
And God will generously provide all you need. Then you will always have everything you need and plenty left over to share with others. As the Scriptures say,
“They share freely and give generously to the poor. Their good deeds will be remembered forever.”
For God is the one who provides seed for the farmer and then bread to eat. In the same way, he will provide and increase your resources and then produce a great harvest of generosity in you. - 2 Corinthians 9:8-10
We use cookies to ensure that we give you the best experience on our website. If you continue to use this site we will assume that you are happy with it.