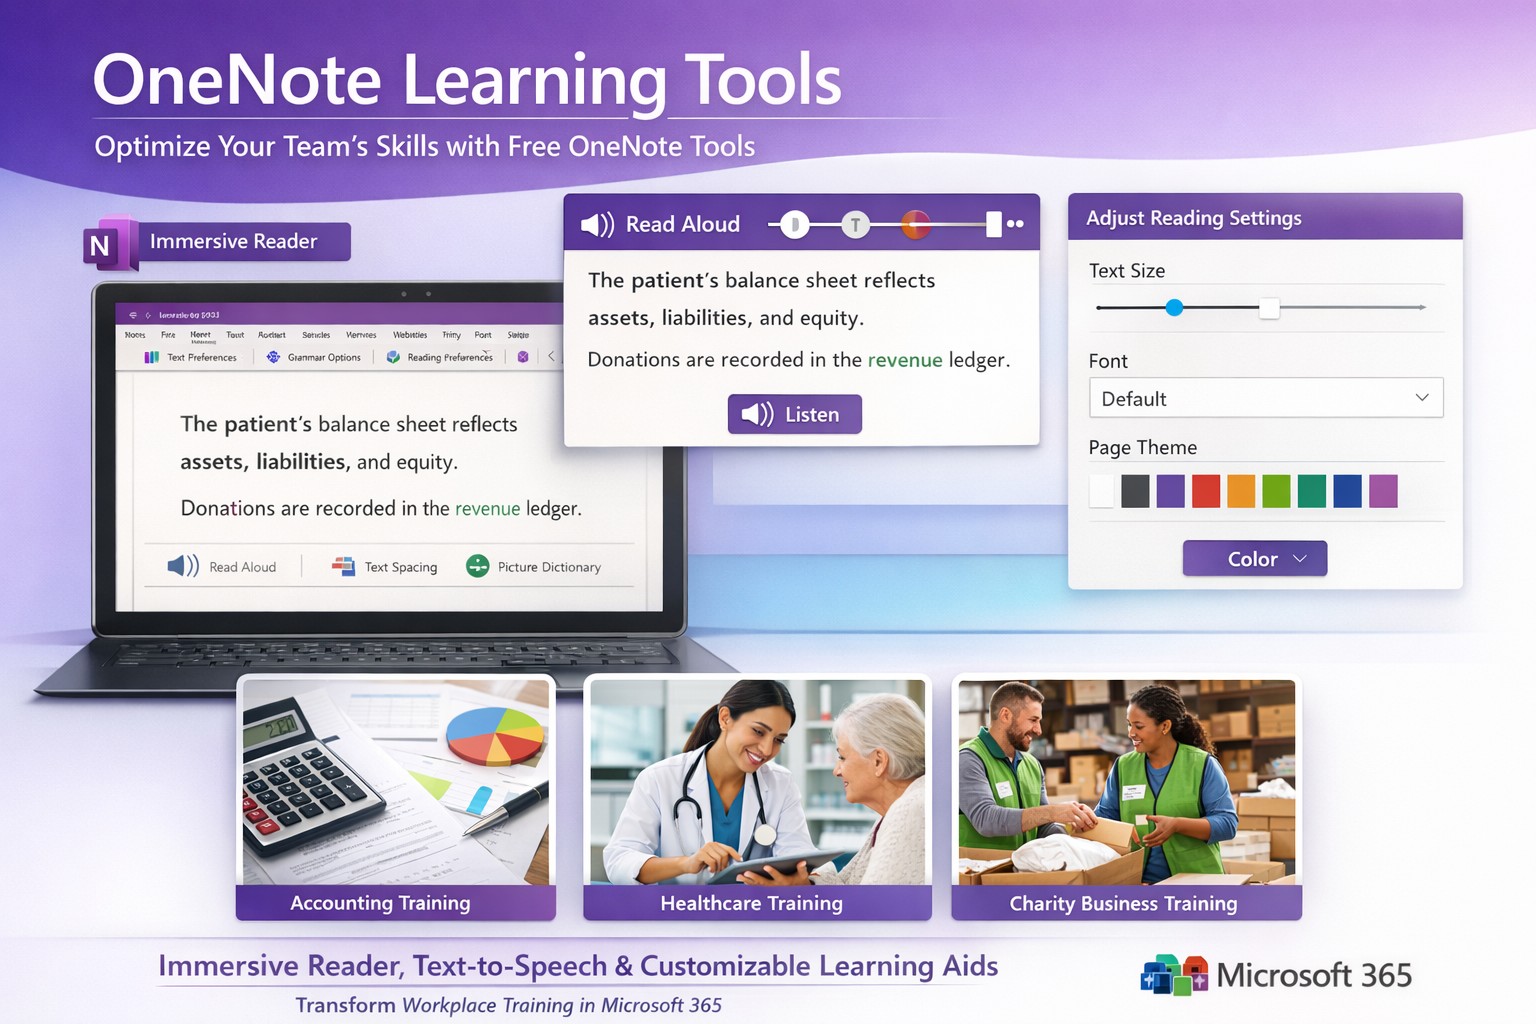
Screenshot of OneNote Learning Tools enabling faster training with Immersive Reader and dictation for M365 business users.
Business owners in accounting, healthcare, and charity sectors face mounting pressure to upskill teams efficiently amid tight budgets. Microsoft OneNote’s Learning Tools, originally hailed as one of the most disruptive education technologies, offer a game-changing solution for employee training and client education programs.
Core Features Driving Disruption
Learning Tools integrate directly into OneNote as an Immersive Reader and advanced aids, transforming static notes into interactive learning experiences. Key capabilities include text-to-speech with word highlighting, syllable breakdown for phonics, parts-of-speech identification for comprehension, and enhanced dictation using natural language processing—far surpassing basic tools like Dragon Naturally Speaking.
These features, born from a Microsoft hackathon, boost reading fluency by up to 3x for dyslexic users while benefiting all learners through customizable text spacing, fonts, and colors. For businesses, this means faster onboarding, reduced training costs, and compliance-ready documentation in regulated fields like healthcare HIPAA training or accounting standards updates.
Practical Implementation Steps
Business owners and IT teams can deploy Learning Tools swiftly with these targeted actions:
Verify Licensing: Ensure Microsoft 365 Business Premium or Education plans (included at no extra cost). Check via admin center: Settings > Apps > OneNote.
Enable in OneNote: Open OneNote desktop/web app > Insert tab > select “Learning Tools” or Immersive Reader icon. IT: Push via Intune for organization-wide rollout.
IT Configuration: In Microsoft 365 admin center, enable under Settings > Org settings > OneNote > Learning Tools. Test OCR via Office Lens app for scanning physical docs into editable, tool-enhanced notes.
Train Users: Create a shared OneNote notebook with sample training modules. Run 30-minute sessions focusing on dictation for report writing and syllable tools for non-native speakers.
Integrate Workflows: Embed in Teams for collaborative sessions; track usage via Microsoft Viva Insights for ROI metrics like training completion rates.
Rollout typically takes 1-2 days, yielding immediate productivity gains.
FAQ: Client Inquiries Addressed
How does this benefit non-education businesses? Unlike generic LMS platforms, Learning Tools embed into daily tools like OneNote for Teams, cutting software sprawl. Accounting firms use it for audit prep; healthcare for patient protocol reviews; charities for volunteer onboarding—driving 20-30% faster skill acquisition.
Is it secure for sensitive data? Fully compliant with GDPR, HIPAA via Microsoft Purview. Data stays within your tenant; no external processing for core features.
What about mobile/customization? Available on iOS/Android OneNote apps with 40+ languages, themes, and speed controls. Customize per user group via admin policies.
Does it replace trainers? No—it augments them. Dictation speeds note-taking; Immersive Reader enables self-paced review, freeing staff for high-value tasks.
Cost and scalability? Zero add-on cost in M365 subscriptions. Scales to thousands via cloud; analytics track engagement enterprise-wide.
Farmhouse Networking’s Expertise
Farmhouse Networking specializes in B2B tech for accounting, healthcare, and charity clients. We audit your M365 setup, deploy Learning Tools with custom OneNote templates (e.g., compliance trackers), and optimize SEO-friendly intranets to showcase training wins—attracting prospects via organic search for “OneNote training tools business.”
Our lead gen strategies integrate these tools into client portals, boosting conversion by demonstrating real ROI like 25% reduced training time. Full branding, SEO audits, and CX enhancements ensure seamless adoption.
Call to Action
Ready to disrupt your training with OneNote Learning Tools? Email support@farmhousenetworking.com for a free M365 assessment and custom rollout plan.
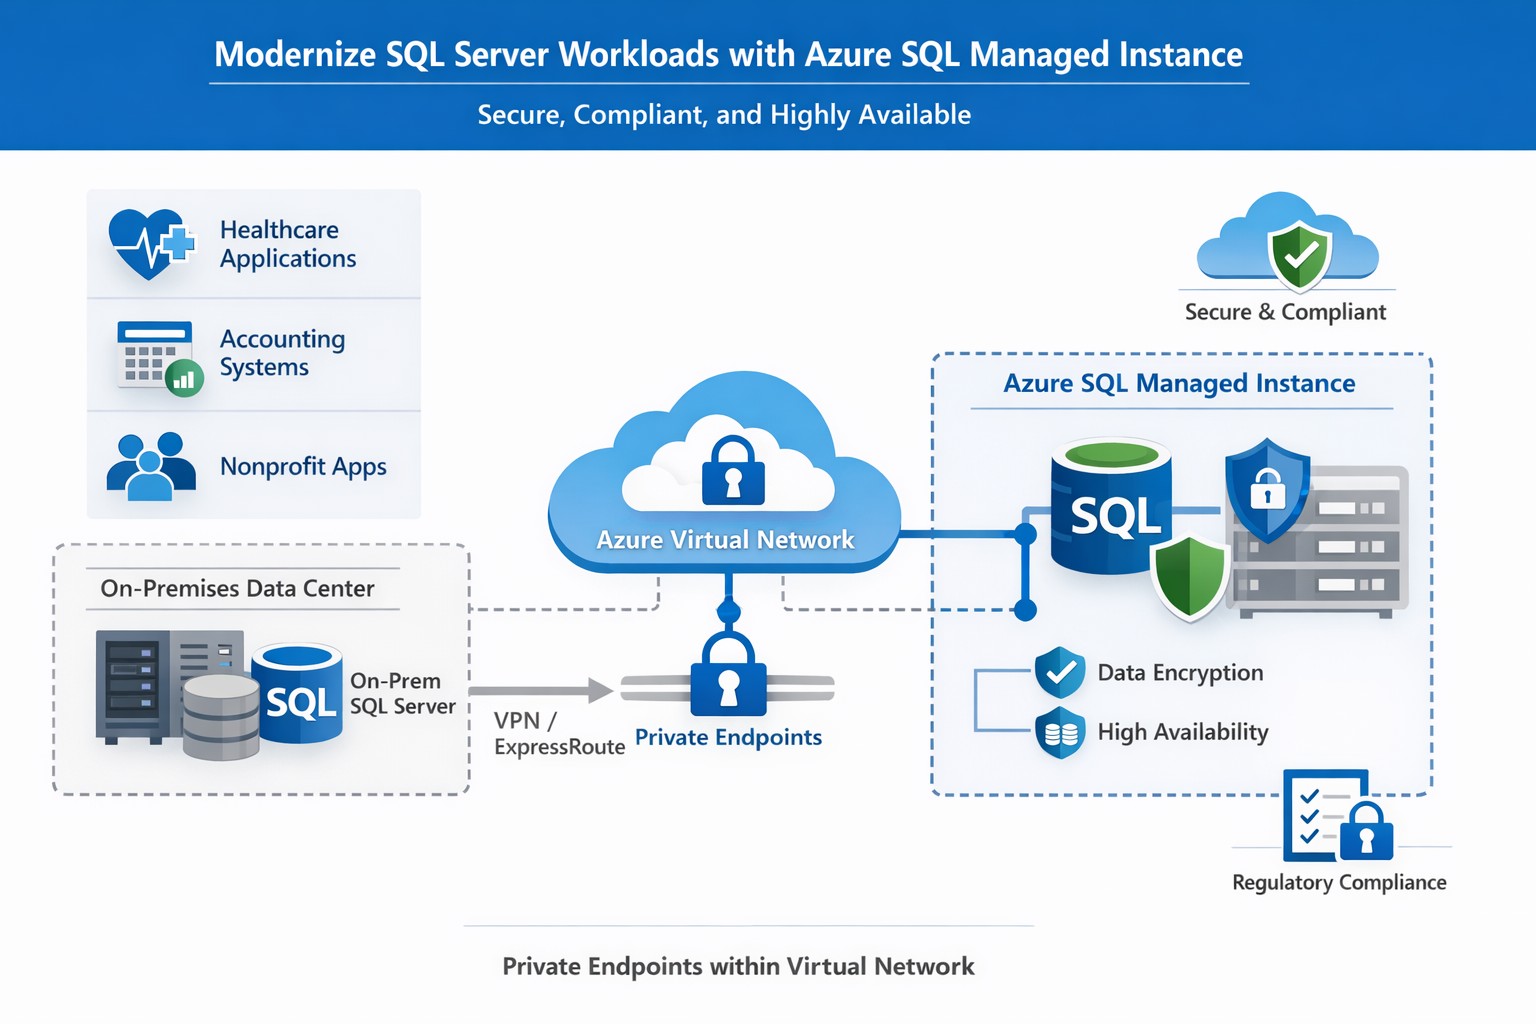
How Azure SQL Managed Instance integrates into your Azure environment, providing secure, managed SQL Server‑compatible databases for business‑critical workloads.
If you run a business that still relies on on‑premises SQL Server databases, “Azure SQL Database Managed Instance” might sound like just another cloud buzzword. In reality, it is one of the most powerful ways to modernize your data infrastructure without ripping and replacing your core applications. Azure SQL Managed Instance is a fully managed, cloud‑based SQL Server environment that gives you near‑complete compatibility with your existing SQL Server workloads, while off‑loading backups, patching, high‑availability setup, and security overhead to Microsoft.
For a business owner, this means lower operational risk, reduced IT labor, and a more predictable, scalable database platform that can grow as your customers, transactions, and data do.
What Azure SQL Managed Instance Really Is
Azure SQL Managed Instance is a Platform‑as‑a‑Service (PaaS) offering that sits between traditional on‑premises SQL Server and the more locked‑down Azure SQL Database. It runs on the latest stable version of the SQL Server Database Engine, with automatic patching and 99.99% built‑in high availability, while staying inside your own virtual network (VNet) for security and isolation.
Key things it gives you out‑of‑the‑box:
Near‑100% feature compatibility with SQL Server Enterprise Edition (including cross‑database queries, linked servers, SQL Server Agent, and many advanced security features).
Automated backups, point‑in‑time restore, and disaster‑recovery options backed by Azure’s global infrastructure.
Managed high availability and maintenance, so your team spends less time on patching and downtime coordination.
For a business owner, this translates to fewer “SQL Server emergencies,” lower total cost of ownership, and a smoother path to cloud‑based applications and analytics.
Why This Matters to Your Business
If your accounting, healthcare, or nonprofit systems depend on complex SQL Server features (multi‑tenant SaaS, reporting servers, integration services, or legacy apps), a simple lift‑and‑shift to Azure SQL Managed Instance is often the safest and most cost‑effective upgrade.
Benefits you can communicate internally:
Lower IT overhead: Microsoft handles engine and OS updates; your staff focuses on business‑specific reporting, compliance, and optimization.
Stronger security and compliance: Managed Instance supports Microsoft Entra ID, Transparent Data Encryption (TDE), Always Encrypted, auditing, and dynamic data‑masking—critical for healthcare and finance.
Better scalability and uptime: You can scale compute and storage without major re‑architecting, and rely on built‑in 99.99% availability for mission‑critical workloads.
Practical Steps for Your Business and IT Team
Here is a realistic, step‑by‑step path a business owner can ask their IT team (or a partner like Farmhouse Networking) to execute:
Inventory and prioritize databases
Document all SQL Server instances, databases, and applications that depend on them.
Identify which systems are mission‑critical (patient records, financial data, donor systems) and which can be migrated first.
Assess compatibility and readiness
Use Microsoft’s compatibility assessment tools and check which SQL Server features your workloads depend on (linked servers, SQL Agent jobs, cross‑database transactions, etc.).
Map databases to the two main service tiers:
General Purpose: typical web apps and reporting.
Business Critical: low‑latency, high‑availability needs (core transactional systems).
Design networking and security
Create a dedicated Azure Virtual Network (VNet) and subnet for SQL Managed Instances.
Configure private endpoints so databases are not exposed to the public internet.
Integrate with your existing identity provider (Microsoft Entra ID or on‑prem Active Directory via hybrid connectivity).
Plan and execute migration
For many on‑prem SQL Server workloads, use the Managed Instance link or Azure Database Migration Service to perform low‑downtime, near‑online migrations.
Start with a non‑production environment to validate performance, security, and connectivity.
Gradually shift production workloads once testing passes.
Establish monitoring and governance
Enable Azure Monitor, SQL‑level auditing, and alerts for latency, storage, and failover events.
Define backup retention, geo‑backup policies, and RPO/RTO targets for key workloads.
Train and document
Ensure your IT team knows how to use the Azure portal, SQL Server Management Studio (SSMS), and PowerShell/CLI for ongoing management.
Common Questions Business Owners Ask
Below are likely questions from your stakeholders, phrased in owner‑friendly language.
Q: Is this “just another cloud database,” or is it really the same SQL Server we already use? Azure SQL Managed Instance uses the same SQL Server Database Engine as on‑prem SQL Server, with near‑complete compatibility of enterprise features such as cross‑database queries, SQL Agent, and many security controls. In practice, many existing applications can be moved with minimal code changes.
Q: How does this improve security and compliance? Managed Instance runs inside your own virtual network, with private endpoints and deep integration with Azure security tools. It supports encryption‑at‑rest and‑in‑transit, auditing, and role‑based access, which simplifies HIPAA, financial, and nonprofit compliance requirements.
Q: What happens to backups and disaster recovery? Azure automatically manages backups, including long‑term retention and geo‑backups if you choose. You can restore to any point‑in‑time within your retention window, and failover to another region for disaster recovery.
Q: How much will this cost us monthly? Costs depend on compute (vCores), storage, and service tier (General Purpose vs. Business Critical). While you trade some licensing cost for Azure subscription fees, you often reduce spending on hardware, on‑prem licenses, and operational labor.
How Farmhouse Networking Can Help
Farmhouse Networking specializes in helping accountants, healthcare providers, and charities successfully migrate and manage Azure‑based data platforms without disrupting day‑to‑day operations. For Azure SQL Managed Instance, we can:
Assess your current SQL Server environment and identify which databases and apps are best suited for Managed Instance.
Design secure, compliant architectures that meet your industry’s regulatory needs (e.g., HIPAA‑aligned designs for clinics, FERPA‑friendly setups for nonprofits).
Plan and execute low‑downtime migrations using Microsoft’s recommended tools and best practices.
Train your internal IT team on monitoring, governance, and cost‑management so you retain control while reducing risk.
Your Next Step
If you’re ready to explore whether Azure SQL Managed Instance is the right fit for your business, reach out to Farmhouse Networking today. Email support@farmhousenetworking.com with a brief overview of your current database environment, and we’ll schedule a consultation to walk through your options, costs, and migration roadmap tailored to your accounting, healthcare, or nonprofit workload.
After rounding the year 2 mark on their Personalized Learning Initiative, Fresno Unified School District has gained new insights into what exactly has made the initiative so exceptional in its ability to transform learning outcomes for students. Take a look at their findings in this article.
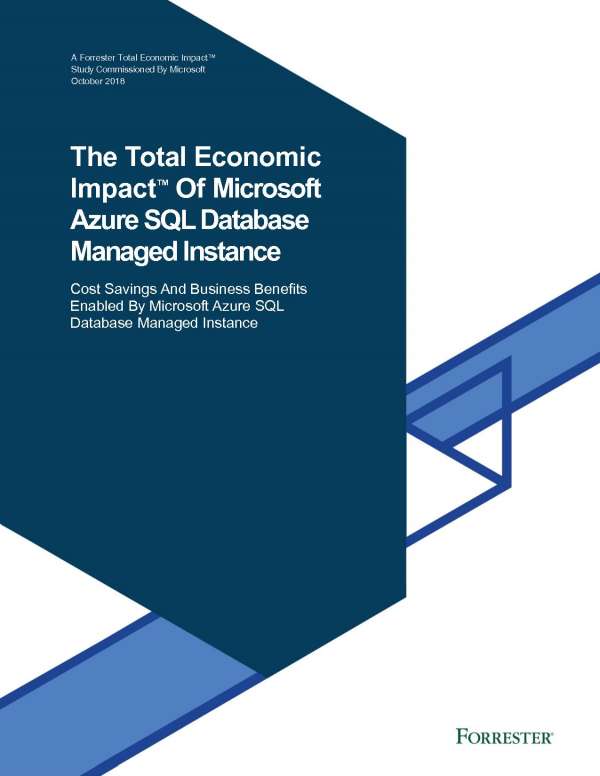
What is the economic impact of switching from an on-premises SQL Server to Azure? Microsoft asked Forrester to find out. Four client interviews later, the results are in: See how you can save by switching to Azure!
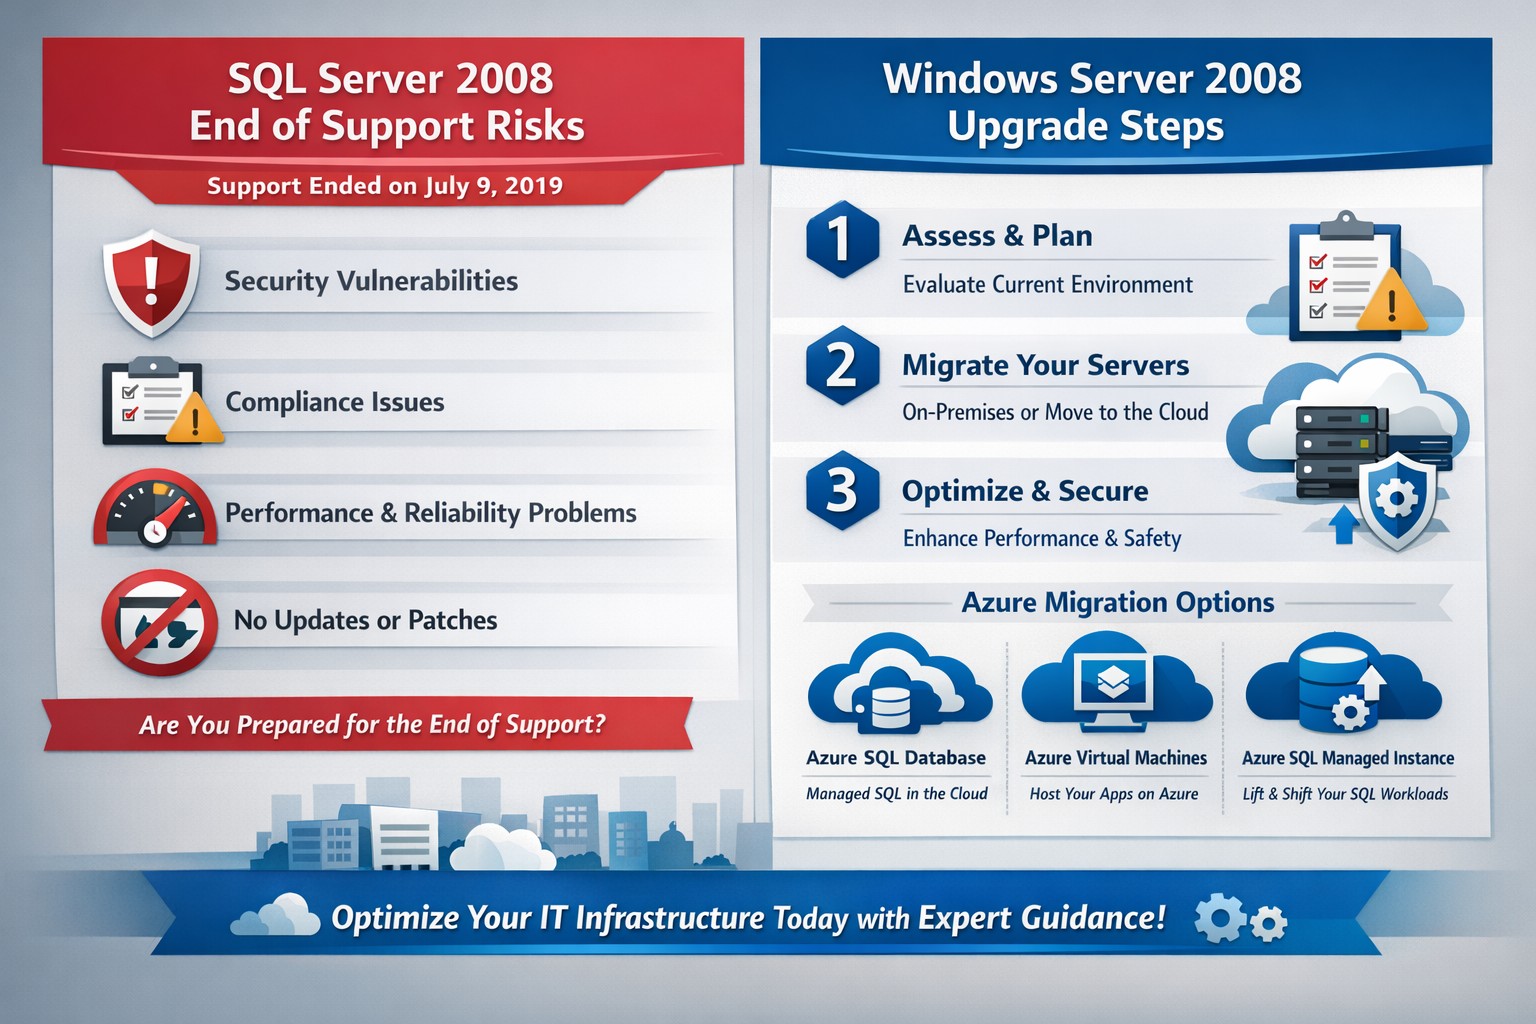
Visual timeline: SQL Server 2008 end of support (2019) and Windows Server 2008 EOS (2020)—start your secure migration now.
Relying on SQL Server 2008 or Windows Server 2008 exposes your operations to severe security risks since both reached end of support years ago—SQL Server on July 9, 2019, and Windows Server on January 14, 2020. Without Microsoft’s security patches, your databases and servers are vulnerable to exploits, data breaches, and compliance failures that could cost millions in fines, downtime, and lost trust.
Critical Risks for Your Business
Unpatched systems like these attract cyberattacks targeting outdated databases and servers, often holding sensitive customer data in accounting, healthcare, or charity sectors. Regulatory mandates (e.g., HIPAA, PCI-DSS) demand supported software, risking penalties if breached. Performance lags and incompatibility with modern apps further erode efficiency, directly hitting your bottom line.
Action Steps for You and Your IT Team
Follow these prioritized steps to migrate securely and minimize disruption.
Inventory Assets: Use tools like Microsoft Assessment and Planning Toolkit (MAP) to scan for SQL Server 2008/R2 and Windows Server 2008 instances across on-premises, VMs, and apps.
Assess Compatibility: Run SQL Server Upgrade Advisor to identify migration blockers; test apps on newer versions like SQL Server 2022 or Azure SQL.
Choose Path: Upgrade in-place to supported versions, lift-and-shift to Azure, or modernize with containers—avoid Extended Security Updates (ESU) as they’re costly and temporary (up to 3 years extra, post-2023).
Plan Migration: Phase workloads by risk; start with dev/test environments. Budget 3-6 months for complex setups.
Test and Go Live: Validate post-migration with backups, failover tests, and monitoring; cut over during low-traffic windows.
Secure and Monitor: Enable Azure Defender, multi-factor auth, and ongoing patching on new platforms.
Option
Pros
Cons
Cost Estimate
On-Prem Upgrade
Familiar setup
Hardware refresh needed
High upfront
Azure Migration
Scalable, pay-as-you-go
Learning curve
Lower TCO long-term
ESU (Temporary)
Quick fix
Expensive, no new features
$30K+ per core/year
FAQs: Client Questions Answered
Q: What if we can’t migrate immediately? A: Purchase ESU for critical security patches, but it’s a stopgap—plan full migration to avoid doubled costs later.
Q: Will our apps break on upgrade? A: Most do fine; use upgrade advisors early. Legacy apps may need refactoring, but Azure compatibility is high for 2008 workloads.
Q: How much downtime? A: Near-zero with Azure Site Recovery or Database Migration Service; test to confirm.
Q: What’s the breach risk? A: High—unpatched flaws enable ransomware/data theft. Post-EOS, no auto-updates mean manual fixes only if Microsoft deems critical.
Q: Cloud or on-prem? A: Cloud cuts costs 30-50% via scaling; ideal for variable workloads in your industries.
How Farmhouse Networking Helps
Farmhouse Networking specializes in B2B migrations for accounting, healthcare, and charity clients, driving organic traffic via SEO-optimized sites while securing infrastructure. We conduct free EOS assessments, execute inventory/scans, and handle end-to-end migrations to Azure/SQL Managed Instance—reducing risk and boosting performance. Our branding/SEO strategies ensure your site ranks for terms like “SQL Server 2008 migration,” converting visitors to leads. Past projects cut downtime 90% and compliance risks to zero.
STIR/SHAKEN authentication prevents legitimate business calls from spam filters
Here is a quick tip for anyone doing advertising from their phone number, you can be marked as SPAM LIKELY or SPAM RISK by phone companies. Each phone carrier keeps a list of numbers they determine to be spam risks based on the history of the number. Unfortunately, there is no central database or service so far that manages this number designation.
What Causes the SPAM Designation?
In short, here are the most obvious reasons for designation:
Volume of Outbound Calls Per Day Per Number
Someone Flagged a call from your number in that carrier’s app as spam
Outbound Caller ID number is not set properly from your system and incomplete will probably be flagged as spam automatically
How to Get De-Listed
You can use the links or email addresses below to register legitimate numbers and also address any incorrect labeling or call blocking with other carriers:
As our business continues to focus on providing white labeled Tier 3 IT support services, RMM as a service, and co-managed IT services this blog will be highlighting tips for RMM automation. Here is one of the recent scripts we added to our RMM. We often find ourselves wanting to modify the registry for all users:
Variables
It is important to not store variables in scripts especially when they are credentials for a user on the local computer, so make sure to define variables accordingly. In this script there are no variables like that, but wanted to explain some that are in the script:
$PatternSID = this is the Regular Expression pattern for the Security ID of the users to look for (found it was different for local / domain vs. Azure)
$ProfileList = List of SIDs and other information from the HKLM folders
$LoadedHives = List of logged in users from HKU
$UnloadedHives = List of not logged in users from HKU
Script Snippet
# Regex pattern for Local or Domain SIDs
$PatternSID = 'S-1-5-21-\d+-\d+\-\d+\-\d+$'

# Get Username, SID, and location of ntuser.dat for all users
$ProfileList = gp 'HKLM:\SOFTWARE\Microsoft\Windows NT\CurrentVersion\ProfileList\*' | Where-Object {$_.PSChildName -match $PatternSID} |
    Select  @{name="SID";expression={$_.PSChildName}},
            @{name="UserHive";expression={"$($_.ProfileImagePath)\ntuser.dat"}},
            @{name="Username";expression={$_.ProfileImagePath -replace '^(.*[\\\/])', ''}}

# Get all user SIDs found in HKEY_USERS (ntuder.dat files that are loaded)
$LoadedHives = gci Registry::HKEY_USERS | ? {$_.PSChildname -match $PatternSID} | Select @{name="SID";expression={$_.PSChildName}}

# Get all users that are not currently logged
$UnloadedHives = Compare-Object $ProfileList.SID $LoadedHives.SID | Select @{name="SID";expression={$_.InputObject}}, UserHive, Username

# Loop through each profile on the machine
Foreach ($item in $ProfileList) {
    # Load User ntuser.dat if it's not already loaded
    IF ($item.SID -in $UnloadedHives.SID) {
        reg load HKU\$($Item.SID) $($Item.UserHive) | Out-Null
    }

    #####################################################################
    # This is where you can read/modify a users portion of the registry

    # This example checks for a key, adds it if missing, and creates / changes a DWORD in that key
    "{0}" -f $($item.Username) | Write-Output
    If (!(Test-Path registry::HKEY_USERS\$($Item.SID)\SOFTWARE\Microsoft\Windows\CurrentVersion\UserProfileEngagement)) {
	    New-Item -Path registry::HKEY_USERS\$($Item.SID)\SOFTWARE\Microsoft\Windows\CurrentVersion\UserProfileEngagement -Force | Out-Null
	}
    Set-ItemProperty registry::HKEY_USERS\$($Item.SID)\SOFTWARE\Microsoft\Windows\CurrentVersion\UserProfileEngagement -Name “ScoobeSystemSettingEnabled” -Value “0” -Type DWord

    #####################################################################

    # Unload ntuser.dat
    IF ($item.SID -in $UnloadedHives.SID) {
        ### Garbage collection and closing of ntuser.dat ###
        [gc]::Collect()
        reg unload HKU\$($Item.SID) | Out-Null
    }
}
# Regex pattern for AzureAD SIDs
$PatternSID = 'S-1-12-1-\d+-\d+\-\d+\-\d+$'

# Get Username, SID, and location of ntuser.dat for all users
$ProfileList = gp 'HKLM:\SOFTWARE\Microsoft\Windows NT\CurrentVersion\ProfileList\*' | Where-Object {$_.PSChildName -match $PatternSID} |
    Select  @{name="SID";expression={$_.PSChildName}},
            @{name="UserHive";expression={"$($_.ProfileImagePath)\ntuser.dat"}},
            @{name="Username";expression={$_.ProfileImagePath -replace '^(.*[\\\/])', ''}}

# Get all user SIDs found in HKEY_USERS (ntuder.dat files that are loaded)
$LoadedHives = gci Registry::HKEY_USERS | ? {$_.PSChildname -match $PatternSID} | Select @{name="SID";expression={$_.PSChildName}}

# Get all users that are not currently logged
$UnloadedHives = Compare-Object $ProfileList.SID $LoadedHives.SID | Select @{name="SID";expression={$_.InputObject}}, UserHive, Username

# Loop through each profile on the machine
Foreach ($item in $ProfileList) {
    # Load User ntuser.dat if it's not already loaded
    IF ($item.SID -in $UnloadedHives.SID) {
        reg load HKU\$($Item.SID) $($Item.UserHive) | Out-Null
    }

    #####################################################################
    # This is where you can read/modify a users portion of the registry

    # This example checks for a key, adds it if missing, and creates / changes a DWORD in that key
    "{0}" -f $($item.Username) | Write-Output
    If (!(Test-Path registry::HKEY_USERS\$($Item.SID)\SOFTWARE\Microsoft\Windows\CurrentVersion\UserProfileEngagement)) {
	    New-Item -Path registry::HKEY_USERS\$($Item.SID)\SOFTWARE\Microsoft\Windows\CurrentVersion\UserProfileEngagement -Force | Out-Null
	}
    Set-ItemProperty registry::HKEY_USERS\$($Item.SID)\SOFTWARE\Microsoft\Windows\CurrentVersion\UserProfileEngagement -Name “ScoobeSystemSettingEnabled” -Value “0” -Type DWord

    #####################################################################

    # Unload ntuser.dat
    IF ($item.SID -in $UnloadedHives.SID) {
        ### Garbage collection and closing of ntuser.dat ###
        [gc]::Collect()
        reg unload HKU\$($Item.SID) | Out-Null
    }
}
Checking whether each item already exists helps the RMM to get the proper exit code and not show the script as failed when run.
If your company is a MSP or wants to become one and automation just seems out of reach, then contact us to run your RMM for you.
Nobody wants to be hacked, breached, compromised, or whatever else they are calling it now. Here is a quick list of things to think about to keep your company safe:
Compromise Prevention
Keep track of your inventory, both software and hardware.
Make sure to properly dispose of these things (recycle or responsible destruction)
Scan your network for vulnerabilities
Patch or remediate everything you find
Manage your antivirus & keep it up-to-date
Keep your passwords complex & safely stored
Remove all users / accounts when no longer in use
Look at best practices to harden your computers / network to attacks
Monitor your network for strange activity (indicators of compromise)
If your company is concerned about security, then contact us to take care of it for you.
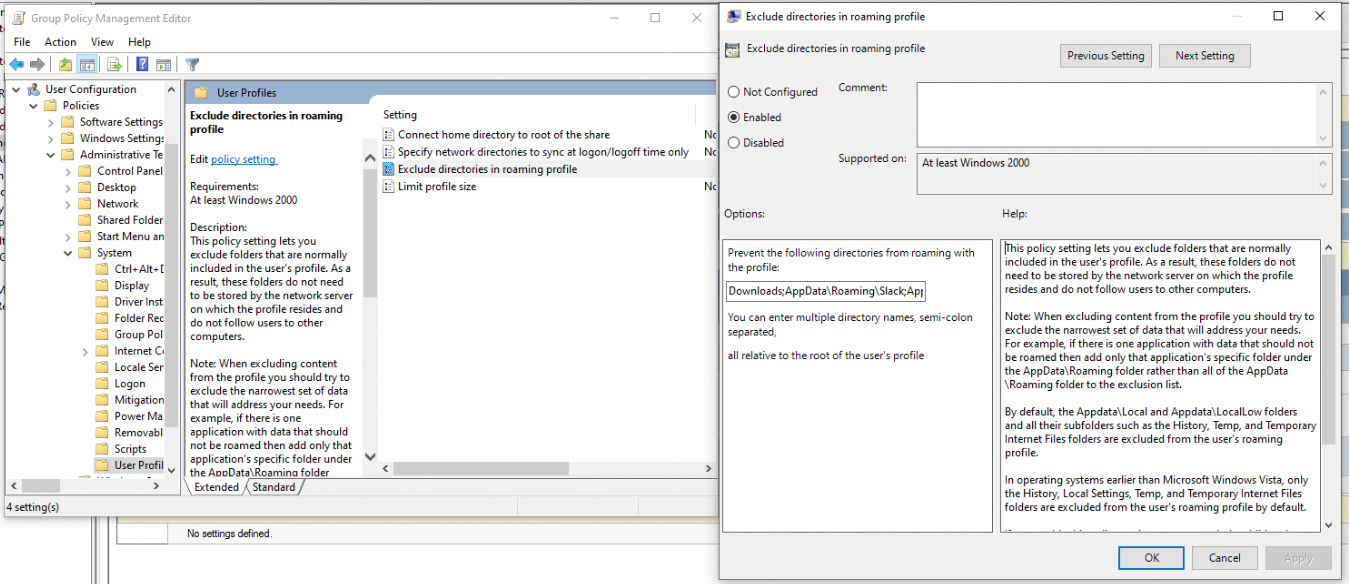
Researching issues that several clients were having with slow Windows Roaming Profile logins and found that the common denominator was profiles being too large. Looked at Event Viewer and found nothing but Event ID 6005 – “The winlogon notification subscriber is taking long time to handle the notification event (Logon).” Looked at their Group Policy settings and found the folder that profiles were being saved in. Ran WinDirStat on the user.v6 folder and found some interesting details. It looks like downloads, Slack, Teams, and Zoom were taking up 13+GB of data that was then trying to be synced over the network. Looks like it is time to update the Group Policy to exclude some folders:If your company is looking to virtualize your servers or take them to the cloud, then contact us to setup migration evaluation.
GPO – Exclude directories in Roaming Profile
GPO exclusions slash roaming profile sync time from minutes to seconds
Open Group Policy Management
Edit the Roaming Profile policy
Open User Configuration > Policies > Administrative Templates > System > User Profiles
Enable – Exclude directories in roaming profiles
Add the following directories – Downloads;AppData\Roaming\Slack;AppData\Roaming\Microsoft\Teams;AppData\Roaming\Zoom
Ok your way out
Open Windows Explorer and navigate to the user.v6 folder and delete the following folders:
Downloads
AppData\Roaming\Slack
AppData\Roaming\Microsoft\Teams
AppData\Roaming\Zoom
Wait 15 minutes for changes to propagate then reboot the effected machines and login again.
If your company is using roaming profiles to keep employees agile in the office, then contact us to setup a group policy evaluation.
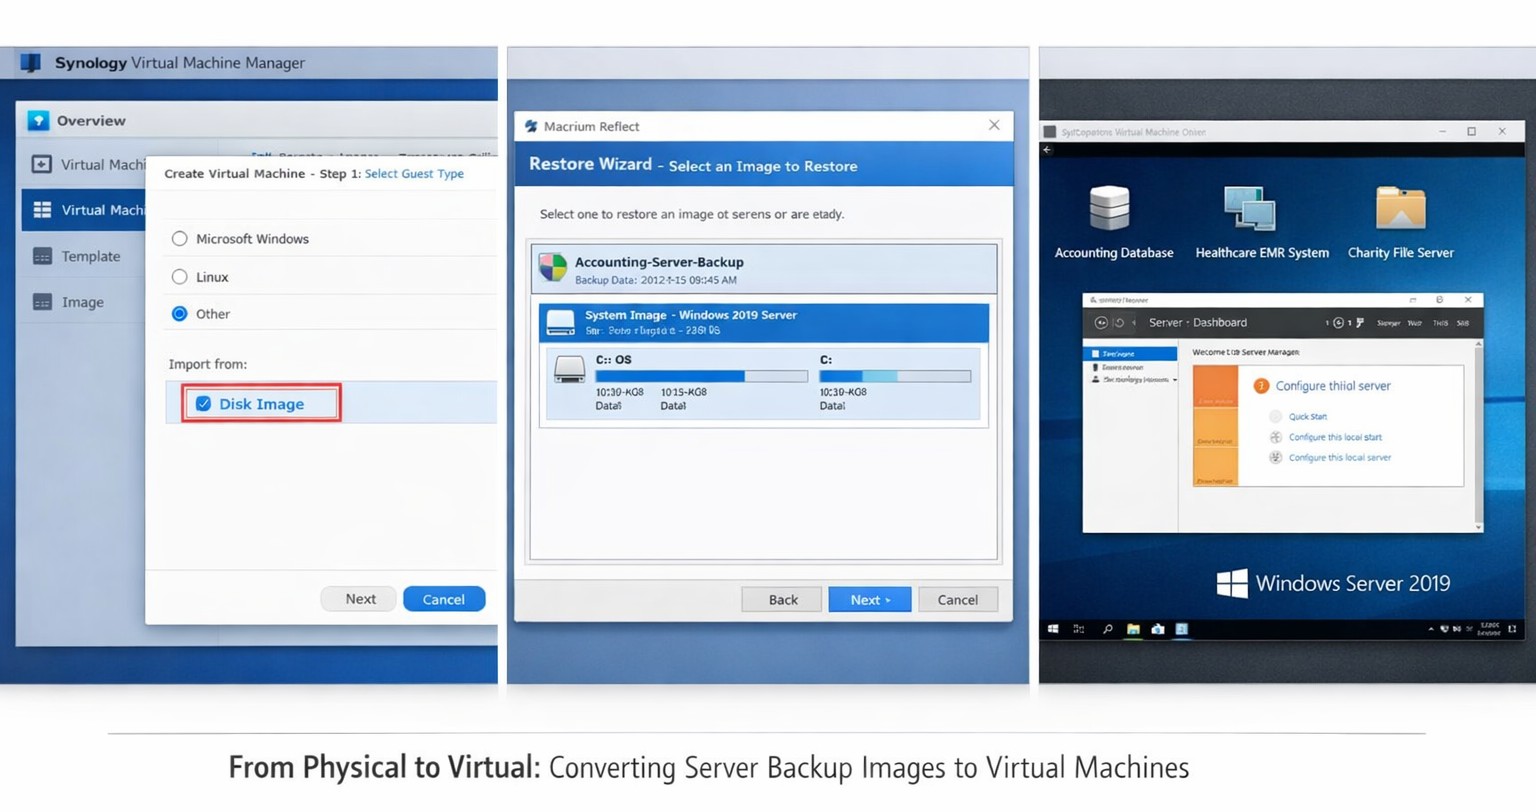
Macrium images restore seamlessly to Synology VMs for rapid virtualization
This was a strange one, but I have done it now more than once for a Tier 3 / Co-Managed IT client. They use the Macrium Reflect software to do image backups of client servers. They are looking to virtualize these servers going forward and wanted to know if it was possible to restore from Macrium Reflect to a Synology VM. Here is the process that we found to make it work:
Assumptions
We assume that you already have a Synology device setup and functioning properly.
We assume that you already installed the Virtual Machine Manager app on the Synology
We assume you already went through the initial setup wizard of the Virtual Machine Manager app
We assume that you have been backing up the server and have a valid image backup file
We assume you know the network path to these backup files
We assume you already know (and possess on the Synology) the required amount of CPU, Memory, and HDD space.
Process
Create Macrium Reflect bootable Rescue media
Open Macrium Reflect
Click on the Restore tab
Open Other Tasks on the left hand side
Choose Create bootable Rescue media
Browse to where the current backups are stored and save it there (this makes finding everything easier later)
Click Build (You may need to install some pre-requisites to make this possible, but Macrium Reflect with prompt you for it)
Create Virtual Machine
Open the Synology Virtual Machine Manager app
Click on Image
Click on the Add button
Find the Macrium Reflect Rescue media and add it to local storage
Click on Virtual Machine on the left
Click the Create button
Choose the Microsoft Windows option (if appropriate)
Select the proper storage amount
Give it a name, CPU, Memory (as needed)
Give it the needed storage amount(s)
Leave it connected to the default network
Download the Synology Guest Tools if needed.
Select Macrium Reflect Rescue media for the ISO file for bootup
Do not start the automatically
Edit the VM and change it to start from the CD ROM
Power it on
Restore from backup
Connect to the VM
Wait for Macrium Reflect Rescue media to boot (this can take awhile)
Click on the blue computer icon at the bottom
Click on the Map Network Drive icon
Type in need information and click OK
Go back to the Macrium Reflect window
Click on Browse for an image or backup file to restore
Find the appropriate file in the newly mapped network drive
Click on Restore Image
Select the target drive(s)
Click Next, Finished
Wait for restore to complete (this will take a long time)
Prepare restored image
Once completed, click on the ReDeploy restored image to new hardware
Add drivers if needed
Accept any drivers it finds
Accept the default options
Finish the wizard by closing
Power off the VM
Edit the VM Storage to make the disk a SATA controller instead
Edit the VM Others to make the BIOS UEFI
Edit the VM Network to Not Connected
Power on the VM
Login and install the Synology Guest Tools from the attached CD-ROM drive
Power off the VM
Edit the VM Network to use the default connection
Power on the VM if you are ready to deploy
If your company is looking to virtualize your servers or take them to the cloud, then contact us to setup migration evaluation.
And God will generously provide all you need. Then you will always have everything you need and plenty left over to share with others. As the Scriptures say,
“They share freely and give generously to the poor. Their good deeds will be remembered forever.”
For God is the one who provides seed for the farmer and then bread to eat. In the same way, he will provide and increase your resources and then produce a great harvest of generosity in you. - 2 Corinthians 9:8-10
We use cookies to ensure that we give you the best experience on our website. If you continue to use this site we will assume that you are happy with it.