Here is a quick bit of Powershell that helped me to track down a “shared calendar” in a Co-Managed IT / Tier3 client’s Office 365 tenant. After looking in Shared Mailboxes and Resources for the calendar with no luck, we tried to get into the Exchange Management Console (EMC). The loading circle of death went on for an eternity, so switched to good old Powershell. Found the commands as follows after connecting to Exchange Online in Powershell:
If your company is looking for local management of your Office 365 tenant or need advanced support for your IT team, then contact us to find out how much you can save with us.
Here is a quick tip for anyone doing advertising from their phone number, you can be marked as SPAM LIKELY or SPAM RISK by phone companies. Each phone carrier keeps a list of numbers they determine to be spam risks based on the history of the number. Unfortunately, there is no central database or service so far that manages this number designation.
What Causes the SPAM Designation?
In short, here are the most obvious reasons for designation:
Volume of Outbound Calls Per Day Per Number
Someone Flagged a call from your number in that carrier’s app as spam
Outbound Caller ID number is not set properly from your system and incomplete will probably be flagged as spam automatically
How to Get De-Listed
You can use the links or email addresses below to register legitimate numbers and also address any incorrect labeling or call blocking with other carriers:
As our business continues to focus on providing white labeled Tier 3 IT support services, RMM as a service, and co-managed IT services this blog will be highlighting tips for RMM automation. Here is one of the recent scripts we added to our RMM. We often find ourselves wanting to modify the registry for all users:
Variables
It is important to not store variables in scripts especially when they are credentials for a user on the local computer, so make sure to define variables accordingly. In this script there are no variables like that, but wanted to explain some that are in the script:
$PatternSID = this is the Regular Expression pattern for the Security ID of the users to look for (found it was different for local / domain vs. Azure)
$ProfileList = List of SIDs and other information from the HKLM folders
$LoadedHives = List of logged in users from HKU
$UnloadedHives = List of not logged in users from HKU
Script Snippet
# Regex pattern for Local or Domain SIDs
$PatternSID = 'S-1-5-21-\d+-\d+\-\d+\-\d+$'

# Get Username, SID, and location of ntuser.dat for all users
$ProfileList = gp 'HKLM:\SOFTWARE\Microsoft\Windows NT\CurrentVersion\ProfileList\*' | Where-Object {$_.PSChildName -match $PatternSID} |
    Select  @{name="SID";expression={$_.PSChildName}},
            @{name="UserHive";expression={"$($_.ProfileImagePath)\ntuser.dat"}},
            @{name="Username";expression={$_.ProfileImagePath -replace '^(.*[\\\/])', ''}}

# Get all user SIDs found in HKEY_USERS (ntuder.dat files that are loaded)
$LoadedHives = gci Registry::HKEY_USERS | ? {$_.PSChildname -match $PatternSID} | Select @{name="SID";expression={$_.PSChildName}}

# Get all users that are not currently logged
$UnloadedHives = Compare-Object $ProfileList.SID $LoadedHives.SID | Select @{name="SID";expression={$_.InputObject}}, UserHive, Username

# Loop through each profile on the machine
Foreach ($item in $ProfileList) {
    # Load User ntuser.dat if it's not already loaded
    IF ($item.SID -in $UnloadedHives.SID) {
        reg load HKU\$($Item.SID) $($Item.UserHive) | Out-Null
    }

    #####################################################################
    # This is where you can read/modify a users portion of the registry

    # This example checks for a key, adds it if missing, and creates / changes a DWORD in that key
    "{0}" -f $($item.Username) | Write-Output
    If (!(Test-Path registry::HKEY_USERS\$($Item.SID)\SOFTWARE\Microsoft\Windows\CurrentVersion\UserProfileEngagement)) {
	    New-Item -Path registry::HKEY_USERS\$($Item.SID)\SOFTWARE\Microsoft\Windows\CurrentVersion\UserProfileEngagement -Force | Out-Null
	}
    Set-ItemProperty registry::HKEY_USERS\$($Item.SID)\SOFTWARE\Microsoft\Windows\CurrentVersion\UserProfileEngagement -Name “ScoobeSystemSettingEnabled” -Value “0” -Type DWord

    #####################################################################

    # Unload ntuser.dat
    IF ($item.SID -in $UnloadedHives.SID) {
        ### Garbage collection and closing of ntuser.dat ###
        [gc]::Collect()
        reg unload HKU\$($Item.SID) | Out-Null
    }
}
# Regex pattern for AzureAD SIDs
$PatternSID = 'S-1-12-1-\d+-\d+\-\d+\-\d+$'

# Get Username, SID, and location of ntuser.dat for all users
$ProfileList = gp 'HKLM:\SOFTWARE\Microsoft\Windows NT\CurrentVersion\ProfileList\*' | Where-Object {$_.PSChildName -match $PatternSID} |
    Select  @{name="SID";expression={$_.PSChildName}},
            @{name="UserHive";expression={"$($_.ProfileImagePath)\ntuser.dat"}},
            @{name="Username";expression={$_.ProfileImagePath -replace '^(.*[\\\/])', ''}}

# Get all user SIDs found in HKEY_USERS (ntuder.dat files that are loaded)
$LoadedHives = gci Registry::HKEY_USERS | ? {$_.PSChildname -match $PatternSID} | Select @{name="SID";expression={$_.PSChildName}}

# Get all users that are not currently logged
$UnloadedHives = Compare-Object $ProfileList.SID $LoadedHives.SID | Select @{name="SID";expression={$_.InputObject}}, UserHive, Username

# Loop through each profile on the machine
Foreach ($item in $ProfileList) {
    # Load User ntuser.dat if it's not already loaded
    IF ($item.SID -in $UnloadedHives.SID) {
        reg load HKU\$($Item.SID) $($Item.UserHive) | Out-Null
    }

    #####################################################################
    # This is where you can read/modify a users portion of the registry

    # This example checks for a key, adds it if missing, and creates / changes a DWORD in that key
    "{0}" -f $($item.Username) | Write-Output
    If (!(Test-Path registry::HKEY_USERS\$($Item.SID)\SOFTWARE\Microsoft\Windows\CurrentVersion\UserProfileEngagement)) {
	    New-Item -Path registry::HKEY_USERS\$($Item.SID)\SOFTWARE\Microsoft\Windows\CurrentVersion\UserProfileEngagement -Force | Out-Null
	}
    Set-ItemProperty registry::HKEY_USERS\$($Item.SID)\SOFTWARE\Microsoft\Windows\CurrentVersion\UserProfileEngagement -Name “ScoobeSystemSettingEnabled” -Value “0” -Type DWord

    #####################################################################

    # Unload ntuser.dat
    IF ($item.SID -in $UnloadedHives.SID) {
        ### Garbage collection and closing of ntuser.dat ###
        [gc]::Collect()
        reg unload HKU\$($Item.SID) | Out-Null
    }
}
Checking whether each item already exists helps the RMM to get the proper exit code and not show the script as failed when run.
If your company is a MSP or wants to become one and automation just seems out of reach, then contact us to run your RMM for you.
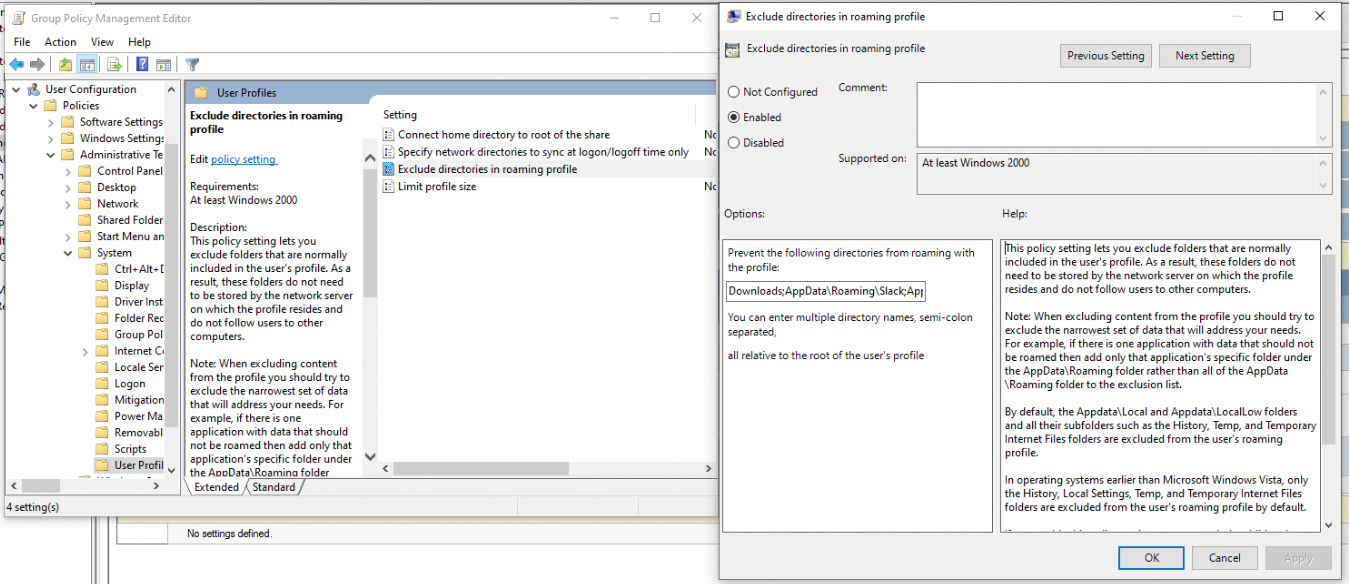
Researching issues that several clients were having with slow Windows Roaming Profile logins and found that the common denominator was profiles being too large. Looked at Event Viewer and found nothing but Event ID 6005 – “The winlogon notification subscriber is taking long time to handle the notification event (Logon).” Looked at their Group Policy settings and found the folder that profiles were being saved in. Ran WinDirStat on the user.v6 folder and found some interesting details. It looks like downloads, Slack, Teams, and Zoom were taking up 13+GB of data that was then trying to be synced over the network. Looks like it is time to update the Group Policy to exclude some folders:If your company is looking to virtualize your servers or take them to the cloud, then contact us to setup migration evaluation.
GPO – Exclude directories in Roaming Profile
Open Group Policy Management
Edit the Roaming Profile policy
Open User Configuration > Policies > Administrative Templates > System > User Profiles
Enable – Exclude directories in roaming profiles
Add the following directories – Downloads;AppData\Roaming\Slack;AppData\Roaming\Microsoft\Teams;AppData\Roaming\Zoom
Ok your way out
Open Windows Explorer and navigate to the user.v6 folder and delete the following folders:
Downloads
AppData\Roaming\Slack
AppData\Roaming\Microsoft\Teams
AppData\Roaming\Zoom
Wait 15 minutes for changes to propagate then reboot the effected machines and login again.
If your company is using roaming profiles to keep employees agile in the office, then contact us to setup a group policy evaluation.
This was a strange one, but I have done it now more than once for a Tier 3 / Co-Managed IT client. They use the Macrium Reflect software to do image backups of client servers. They are looking to virtualize these servers going forward and wanted to know if it was possible to restore from Macrium Reflect to a Synology VM. Here is the process that we found to make it work:
Assumptions
We assume that you already have a Synology device setup and functioning properly.
We assume that you already installed the Virtual Machine Manager app on the Synology
We assume you already went through the initial setup wizard of the Virtual Machine Manager app
We assume that you have been backing up the server and have a valid image backup file
We assume you know the network path to these backup files
We assume you already know (and possess on the Synology) the required amount of CPU, Memory, and HDD space.
Process
Create Macrium Reflect bootable Rescue media
Open Macrium Reflect
Click on the Restore tab
Open Other Tasks on the left hand side
Choose Create bootable Rescue media
Browse to where the current backups are stored and save it there (this makes finding everything easier later)
Click Build (You may need to install some pre-requisites to make this possible, but Macrium Reflect with prompt you for it)
Create Virtual Machine
Open the Synology Virtual Machine Manager app
Click on Image
Click on the Add button
Find the Macrium Reflect Rescue media and add it to local storage
Click on Virtual Machine on the left
Click the Create button
Choose the Microsoft Windows option (if appropriate)
Select the proper storage amount
Give it a name, CPU, Memory (as needed)
Give it the needed storage amount(s)
Leave it connected to the default network
Download the Synology Guest Tools if needed.
Select Macrium Reflect Rescue media for the ISO file for bootup
Do not start the automatically
Edit the VM and change it to start from the CD ROM
Power it on
Restore from backup
Connect to the VM
Wait for Macrium Reflect Rescue media to boot (this can take awhile)
Click on the blue computer icon at the bottom
Click on the Map Network Drive icon
Type in need information and click OK
Go back to the Macrium Reflect window
Click on Browse for an image or backup file to restore
Find the appropriate file in the newly mapped network drive
Click on Restore Image
Select the target drive(s)
Click Next, Finished
Wait for restore to complete (this will take a long time)
Prepare restored image
Once completed, click on the ReDeploy restored image to new hardware
Add drivers if needed
Accept any drivers it finds
Accept the default options
Finish the wizard by closing
Power off the VM
Edit the VM Storage to make the disk a SATA controller instead
Edit the VM Others to make the BIOS UEFI
Edit the VM Network to Not Connected
Power on the VM
Login and install the Synology Guest Tools from the attached CD-ROM drive
Power off the VM
Edit the VM Network to use the default connection
Power on the VM if you are ready to deploy
If your company is looking to virtualize your servers or take them to the cloud, then contact us to setup migration evaluation.
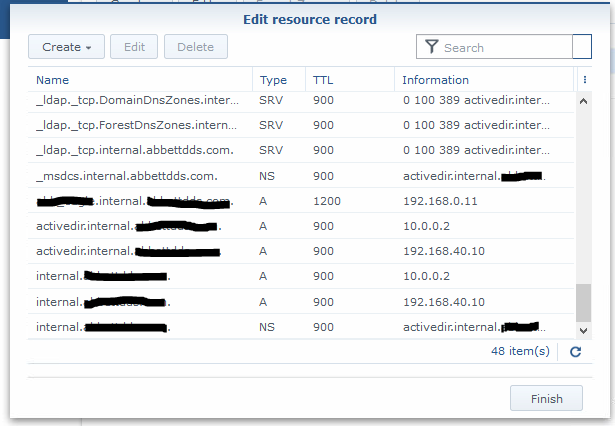
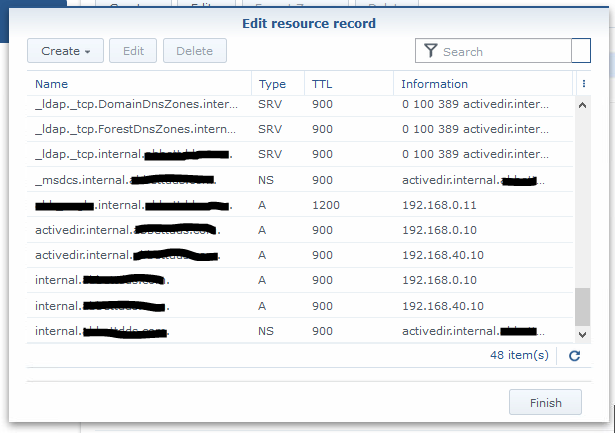
Got a email from one of our co-managed IT / Tier3 / managed RMM clients that was having issues with DNS resolution. The network consists of a Synology NAS acting as Domain Controller / DNS Server and a VM on the Synology that runs the clients main application. Several of the workstations were having an issue where they could not browse to the IP address (\\192.168.0.11\sharename)of the application server at one time and could not browse to the UNC path (\\servername\sharename) of the same server on another day. First tried setting the external forwarders to Google DNS and the Forward Policy to Forward First, but the problem resurfaced. So we dug deeper into the DNS settings and found the following:
If you look closely the IP address of the server is 192.168.0.11 and the records for DNS servers associated with the domain above and below it point to servers outside the subnet of the application server (10.0.0.2). Upon further investigation this DNS server address was blocked by the firewall because it was an old IP address scheme that was no longer in use. The current good DNS server IP addresses are 192.168.40.10 and 192.168.0.10.
Turns out the stale DNS records were the problem. Made the needed changes to the DNS records and things are working great.
If your company needs a little extra help running the IT department, then contact us to setup a co-managed IT evaluation.
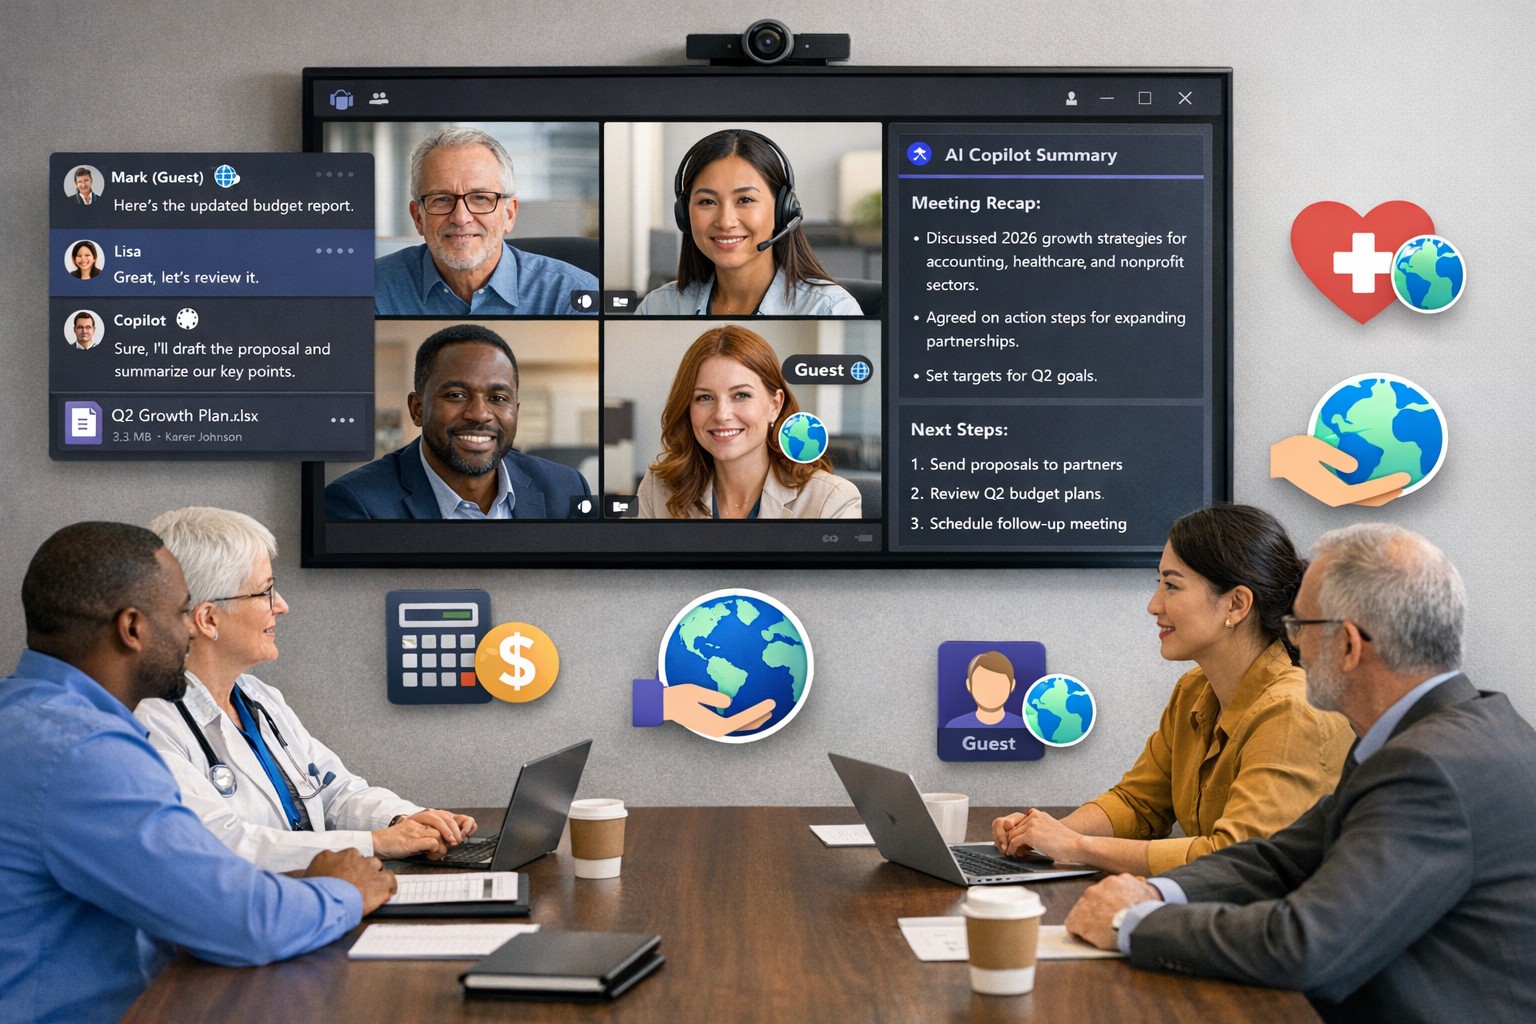
Scale your business: Unlock Microsoft Teams collaboration expansion with AI recaps and guest access.
Business owners face a constant challenge: keeping distributed teams aligned amid hybrid work and external partnerships. Microsoft Teams’ 2026 updates—like AI-powered recaps, email-to-chat, and smarter hybrid meetings—unlock seamless expansion of collaboration without tool fragmentation.
Key 2026 Teams Features for Growth
Teams now bridges internal and external comms via email invites, letting anyone join chats as temporary guests while staying compliant. Copilot integrates directly for chat summaries, task assignments, and decision highlights, cutting admin time. Hybrid upgrades include AI voice isolation, speaker recognition in rooms, and audio recaps so absentees catch up fast.
These tools reduce context-switching, boost inclusivity, and handle vendor or client coordination effortlessly—ideal for accounting firms tracking audits, healthcare practices managing referrals, or charities syncing volunteers.
Action Steps for Business Owners and IT
Expand collaboration systematically. Follow these steps:
Assess Needs: Audit current usage—survey teams on pain points like external email chains or meeting drop-offs. Prioritize hybrid features if >30% remote.
Upgrade Licensing: Switch to Teams Premium or Microsoft 365 E5 for Copilot, AI recaps, and guest controls. IT verifies via admin center; budget $7–$22/user/month.
Configure External Access: IT enables “email-to-chat” in Teams admin > Users > External access. Set policies for guest expiration (e.g., 30 days) and trust badges for unfamiliar users.
Deploy AI Tools: Activate Copilot in meetings/chats via Microsoft 365 admin. Train staff on prompts like “Summarize key decisions” during 15-min sessions.
Optimize Hybrid Setup: IT installs certified Teams Rooms hardware; enable voice isolation and live captions. Test with a cross-team pilot meeting.
Monitor and Scale: Use analytics dashboard for adoption metrics (e.g., chat volume up 20%). Automate with Power Automate for workflows like task follow-ups.
Expect 25–40% productivity gains in 3 months, per early 2026 reports.
Client FAQs on Teams Expansion
Q: How secure is external collaboration? A: Chats stay in your compliance boundary with granular guest controls, AI compliance alerts, and encryption. External users get trust badges (e.g., “verified”).
Q: Does everyone need a Teams license? A: No—email recipients join as guests without accounts. Internal users need Essentials ($4/user) or higher for full AI.
Q: What about integration with our CRM or accounting software? A: Teams connects via 250+ apps (e.g., Dynamics 365, QuickBooks). Copilot pulls data for unified views.
Q: How do we train non-tech staff? A: Use built-in templates, keyboard shortcuts, and “pin window” for multitasking. Roll out via Viva Engage communities.
Q: What’s the ROI for charities/healthcare? A: Reduced email overload frees 10+ hours/week per manager; hybrid tools cut no-shows by 30%.
How Farmhouse Networking Accelerates Your Teams Expansion
Farmhouse Networking specializes in B2B setups for accounting, healthcare, and nonprofits. We handle licensing audits, custom configs (e.g., HIPAA-compliant guest access), and AI onboarding—slashing setup from weeks to days. Our SEO-optimized sites and lead-gen strategies have driven 40% organic traffic growth for similar clients, converting Teams efficiency into client wins. Skip IT headaches; we integrate Teams with your branding for seamless scaling.
Automated FTP log export scales RMM diagnostics across client endpoints
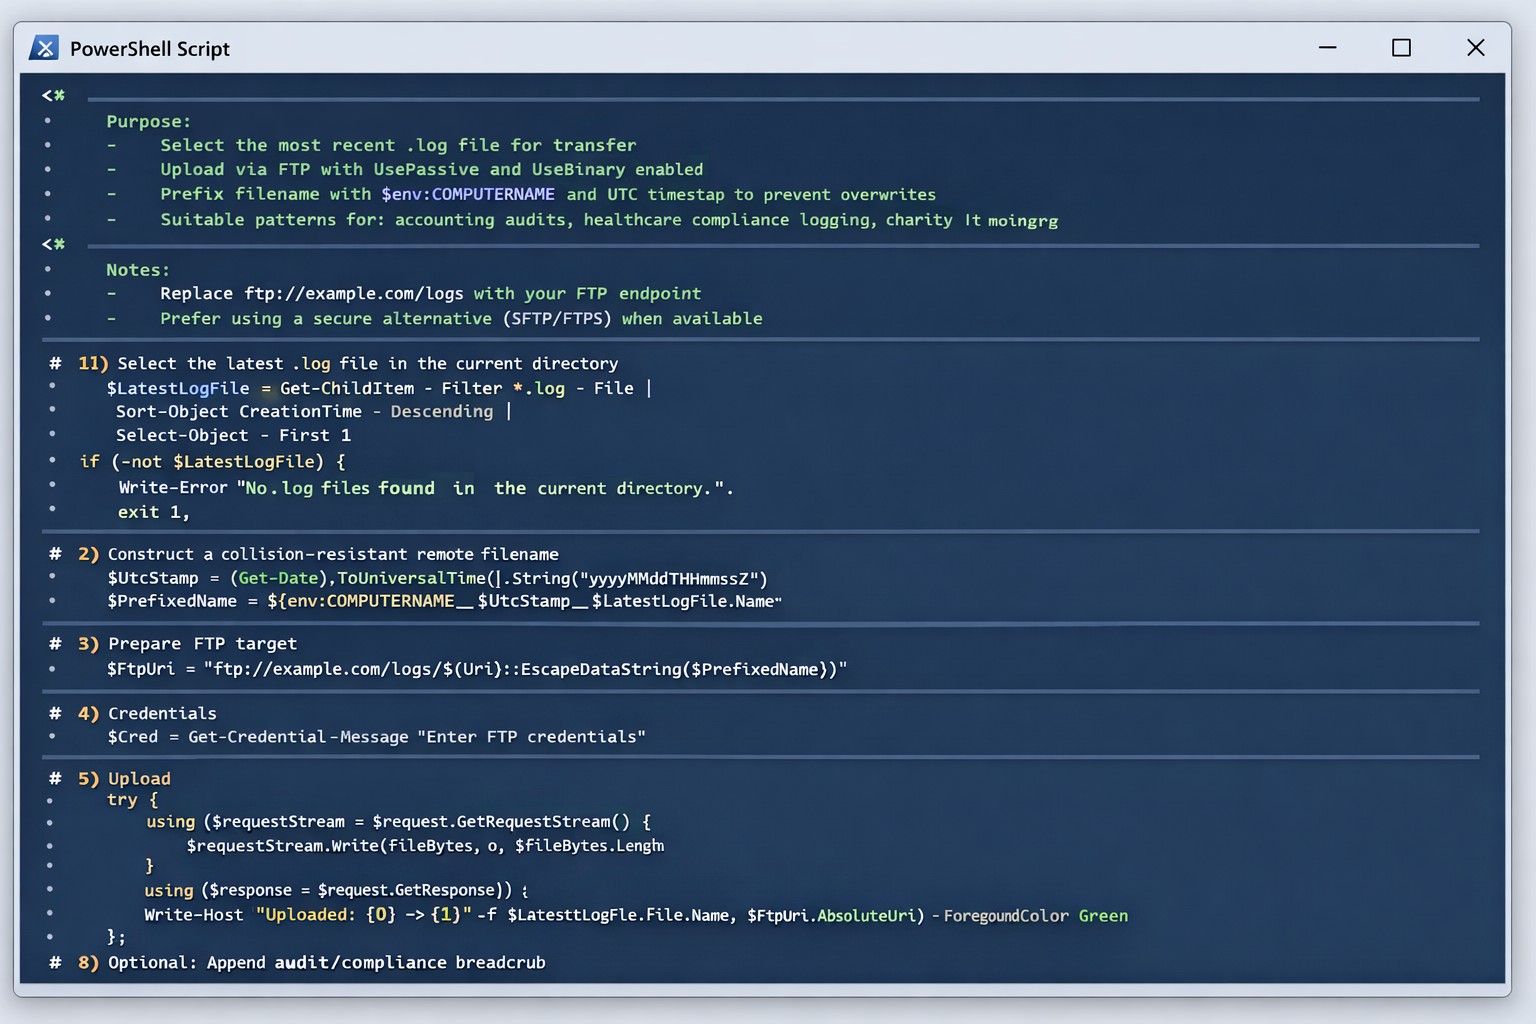
As our business continues to focus on providing white labeled Tier 3 IT support services, RMM as a service, and co-managed IT services this blog will be highlighting tips for RMM automation. Here is one of the recent updates we are making to several of our scripts. It is great to have a diagnostic script that outputs information and review those logs to help figure out issues or to write out the log file created to output for review from the RMM.
What if you have a software tool that aggregates log files to look for trends or security issues across the organization. Running the script and manually collecting log files from each computers gets tedious at scale, so I came up with the idea to automate the log collection via sending them to a FTP site. Here is what we are adding to scripts:
Variables
It is important to not store variables in scripts especially when they are credentials for the FTP server, so make sure to define variables accordingly. Here are the variables we are using for this script:
$LocalDir = the local directory where you expect to find the logs from the script
$RemoteDir = the FTP server address and file directory structure (ie ftp://myftpserver.com/LOGS)
Notice that we use the $LatestLogFile variable to find the most recent log file. Edit this as needed (ie *.txt or whatever) to get the newest log file name. Adding this to the end of the RMM automation script will allow the needed log files to be placed in the FTP server. Collecting from multiple machines means that each file collected should have a different file name, so make sure when you are scripting the diagnostic that you use to name the log file with $env:computername or some other identifier to make sure the files don’t overwrite themselves when uploaded.
If your company is a MSP or wants to become one and automation just seems out of reach, then contact us to run your RMM for you.
Strategic planning builds confidence in your company’s ability to recover from any data breach.
A data breach isn’t just an IT problem — it’s a leadership test. When sensitive information falls into the wrong hands or your systems go down, your organization’s credibility and resilience are on the line. The question every business owner should ask isn’t if a breach could happen, but how ready are we to recover when it does?
Cybersecurity confidence isn’t built overnight. It comes from preparation, policies, and partnerships designed to protect business operations long before a hacker strikes. Let’s look at the key actions every business leader needs to take to ensure their company can bounce back swiftly and securely.
Step 1: Create (and Test) a Data Breach Response Plan
A written incident response plan is the backbone of breach preparedness. It should clearly define:
Who leads the response effort — including IT, HR, legal, and communications.
Which systems are most critical to restore first.
How to notify affected clients, vendors, and regulatory authorities.
How often to review and test the plan (at least twice per year).
Running tabletop simulations helps ensure your team reacts calmly and effectively under pressure. Confidence grows through repetition — not theory.
Step 2: Back Up and Protect Mission‑Critical Data
Your business should maintain secure, versioned backups stored both onsite and in the cloud. Regularly verify that restorations actually work — many businesses discover backup failures only after a breach.
Use layered protections: encryption, multi‑factor authentication, and least‑privilege access. By separating sensitive client and financial data from general systems, you limit exposure and reduce recovery times.
Step 3: Build a Culture of Security Awareness
Technology alone can’t stop phishing or social‑engineering attacks. Train employees to identify suspicious links, unusual requests, and fake login screens. Encourage staff to report incidents without fear of reprisal — early detection is critical to limiting damage.
When every team member sees themselves as part of the security perimeter, recovery time drops significantly.
Step 4: Evaluate Cyber Insurance and Compliance
Cyber liability insurance can offset the financial impact of investigations, legal fees, and client notifications. Ensure your policy covers restoration costs and business interruption.
Also, verify compliance with industry regulations — for healthcare (HIPAA), financial services (GLBA), or nonprofits handling donor data. Knowing where you stand legally improves confidence during breach response and reporting.
Step 5: Partner With a Trusted IT Team
Most small and midsize businesses can’t maintain an internal 24/7 cybersecurity unit — and that’s okay. A proactive IT partner like Farmhouse Networking can monitor systems, detect intrusions, patch vulnerabilities, and guide you through post‑breach recovery.
Their experts specialize in risk assessments, compliance strategies, and disaster recovery planning tailored to your organization’s real‑world needs.
Questions Business Owners Often Ask
Q: How soon should I respond after a breach? A: Immediately. Containment during the first 24 to 48 hours is critical to prevent further compromise. Your IT team should isolate affected systems, preserve logs, and begin forensic analysis.
Q: Do I have to notify my clients? A: In most cases, yes. Many state privacy laws and industry regulations require prompt notification of affected parties. Transparency also helps rebuild trust.
Q: What if I don’t have a formal response plan yet? A: You’re not alone — many small businesses don’t. Start by working with a security expert to develop one that fits your scale and operations. Farmhouse Networking can help you create and test this plan efficiently.
Q: How can I measure my recovery readiness? A: Request a cybersecurity assessment. It benchmarks your preparedness across policies, technologies, and training — identifying gaps before they become major problems.
How Farmhouse Networking Helps Businesses Recover and Prepare
At Farmhouse Networking, we understand that a breach response is more than fixing systems — it’s about restoring confidence. Our data recovery and cybersecurity services include:
24/7 system monitoring and threat response.
Managed backups with rapid restoration testing.
Compliance assessments for regulated industries.
Employee training programs on cybersecurity awareness.
Customized breach recovery and incident response plans.
We turn uncertainty into preparedness, allowing you to focus on growth instead of risk.
Your Next Step
The cost of downtime and lost trust far outweighs the investment in prevention. Start by asking: If we were breached tomorrow, could we recover smoothly?
If that answer isn’t a confident “yes,” it’s time to act. Email support@farmhousenetworking.com to learn how Farmhouse Networking can strengthen your breach recovery plan and keep your business resilient and secure.
Smart technology integration helps employees collaborate effectively without digital overload.
Technology can be both a blessing and a burden. Mid-sized companies often find themselves on the front line of this tension — investing in new platforms to boost productivity, only to watch employees struggle with information overload, tool fatigue, and fragmented workflows.
As a business owner, your challenge is not choosing more technology but choosing the right technology — solutions that empower employees rather than overwhelm them. The goal is simple: create a digital ecosystem that enhances efficiency, fosters engagement, and reduces stress across your organization.
The Double Edge of Digital Transformation
Modern workforces depend on an expanding set of tools — from project management platforms and communication apps to cybersecurity systems and cloud file sharing. When managed well, these systems streamline operations, enable collaboration, and free up time for higher-value work.
However, when poorly integrated or excessively complex, they create barriers:
Tool fragmentation — Too many applications requiring logins, updates, and context switching.
Digital burnout — Employees experiencing fatigue from constant notifications and app switching.
Productivity decline — Time lost navigating systems rather than performing core job functions.
According to Gartner, 80% of employees report using more than six collaboration tools daily, and nearly half say they frequently feel fatigued by technology. The key is not just deploying technology — it’s creating enablement through thoughtful design, integration, and support.
Action Steps for Business Owners and IT Departments
To restore balance between enablement and overload, mid-sized businesses should take a deliberate, strategic approach.
Audit Your Digital Ecosystem Conduct a complete inventory of all software, platforms, and devices currently in use. Identify redundancies, unused tools, and areas where systems overlap.
Evaluate Employee Workflows Partner with department leaders to understand how employees use technology in practice. Look for pain points — such as repetitive data entry or slow cross-department coordination — and streamline accordingly.
Prioritize Integration and Automation Choose technologies that talk to each other. A well-integrated stack eliminates duplicate data entry and minimizes learning curves. Automation of routine tasks can return hours of productivity per week.
Promote Digital Literacy Invest in regular training and clear documentation. Empower employees with knowledge, ensuring they use technology effectively rather than bypassing it out of frustration.
Monitor and Adjust IT leadership should treat technology adoption as a continuous improvement process. Regularly gather feedback through quick pulse surveys or team meetings to monitor user experience and satisfaction.
Common Questions Business Owners Ask
Q: How can I tell if my employees are experiencing digital overload? A: Warning signs include rising support tickets, declining software adoption, missed communication, and increased employee fatigue or dissatisfaction. Regular engagement surveys and help desk analytics can reveal early signals.
Q: What should I look for when selecting new tools? A: Prioritize solutions that integrate seamlessly with your existing systems, have strong vendor support, and directly improve employee workflows. Avoid flashy features that add complexity without solving real problems.
Q: Is there a way to measure technology enablement? A: Yes. Metrics like time-to-completion for key tasks, help desk resolution times, adoption rates of new tools, and employee satisfaction scores can quantify how effectively your technology ecosystem supports your team.
How Farmhouse Networking Can Help
At Farmhouse Networking, we specialize in helping mid-sized businesses optimize their technology environment to drive performance while maintaining employee well-being. Our approach includes:
Comprehensive IT audits to uncover inefficiencies and redundant tools.
Custom integration planning to consolidate systems and improve cross-platform communication.
Network and cloud management that prioritizes speed, reliability, and user experience.
Ongoing IT support and training designed to reduce frustration and build digital confidence across your workforce.
By focusing on both technical and human factors, we help you achieve the right balance between digital enablement and operational simplicity — turning technology into a competitive advantage rather than a burden.
Take the Next Step
If your business is ready to enhance productivity while reducing employee technology fatigue, reach out today. Email support@farmhousenetworking.com to schedule a consultation and learn how Farmhouse Networking can help you design a smarter, more efficient digital workplace.
And God will generously provide all you need. Then you will always have everything you need and plenty left over to share with others. As the Scriptures say,
“They share freely and give generously to the poor. Their good deeds will be remembered forever.”
For God is the one who provides seed for the farmer and then bread to eat. In the same way, he will provide and increase your resources and then produce a great harvest of generosity in you. - 2 Corinthians 9:8-10
We use cookies to ensure that we give you the best experience on our website. If you continue to use this site we will assume that you are happy with it.