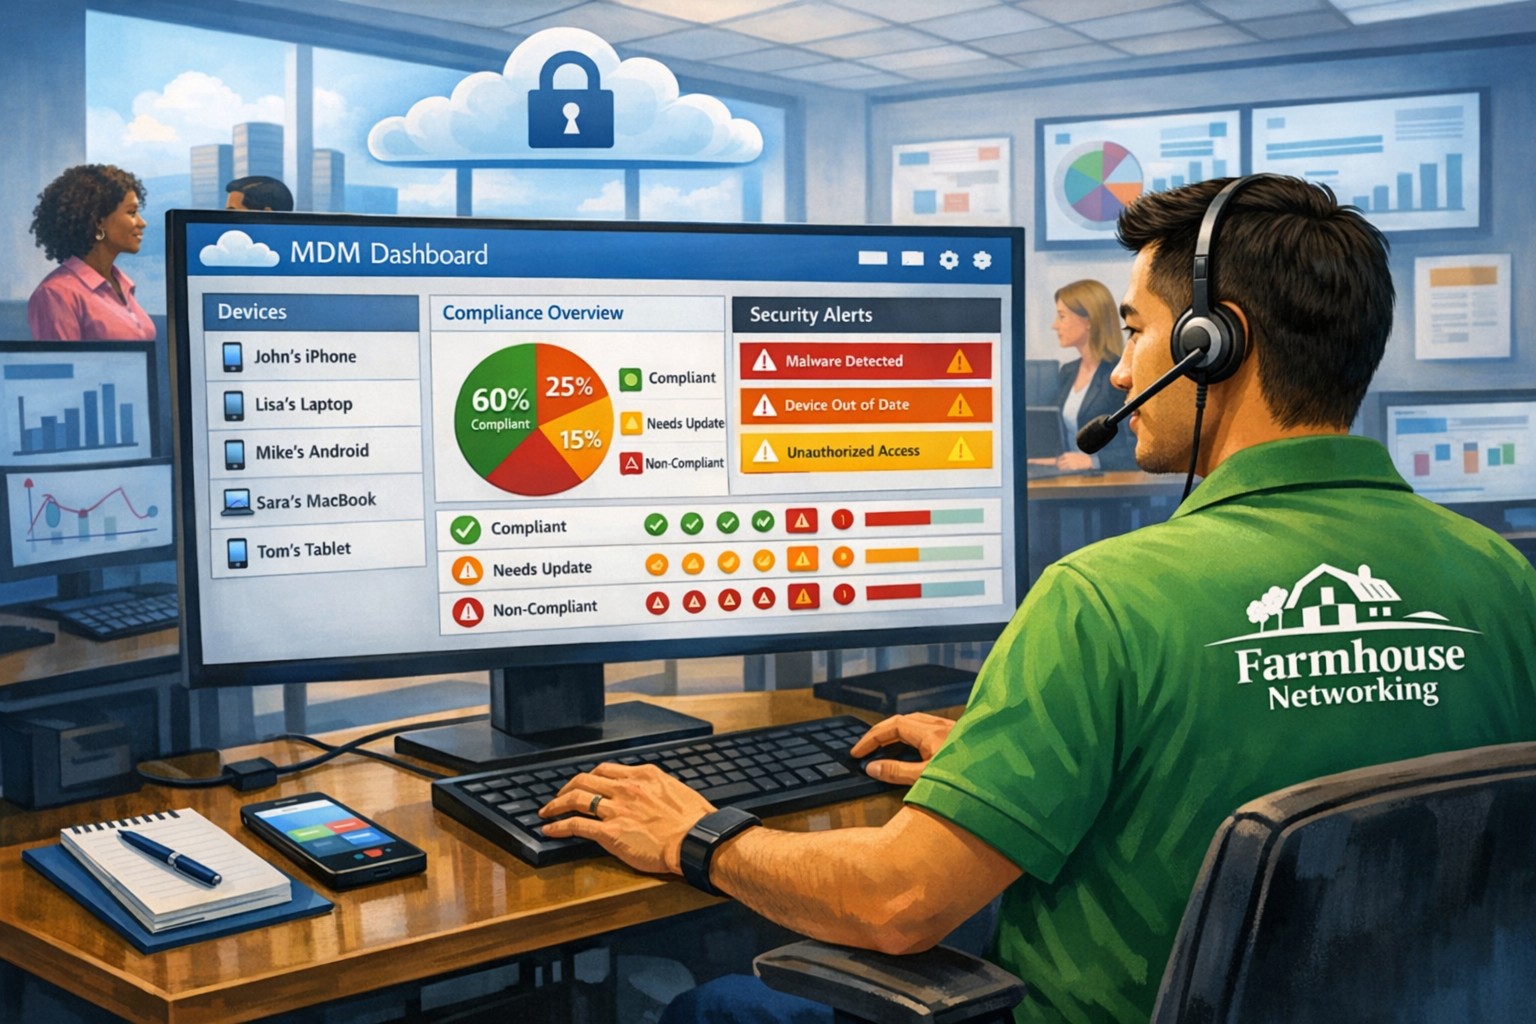
MSP console managing SMB BYOD smartphones and laptops with centralized MDM and security policies.
Small and medium-sized businesses (SMBs) face numerous challenges when it comes to managing their IT. Limited resources (both human and money), lack of expertise, and the need to focus on core business operations often make it difficult for SMBs to understand and manage technology needs. This is where Managed Service Providers (MSPs) come in. In this blog article, we will explore the reasons why SMBs should consider partnering with MSPs to enhance their IT capabilities and drive business growth.
Cost-Effective IT Solutions:
One of the primary reasons why SMBs need MSPs is the cost-effectiveness they offer. By outsourcing their IT needs to MSPs, SMBs can avoid the high costs associated with hiring and training an in-house IT team. MSPs provide a range of services, including network monitoring, data backup and recovery, cybersecurity, and software updates, all at a predictable monthly cost. This allows SMBs to allocate their resources more efficiently and focus on their core business.
Access to Expertise and Advanced Technology:
MSPs are experts in providing IT services and have a team of highly skilled professionals with expertise in variety of technology. By partnering with MSPs, SMBs gain access to the depth of knowledge and experience from IT experts who can handle complex tasks and provide strategic guidance. Additionally, MSPs stay up-to-date with the latest technology trends and can recommend and implement solutions that can help SMBs stay competitive in the market and safe from hackers.
Proactive IT Support and Maintenance:
MSPs offer proactive IT support and maintenance, which is crucial for SMBs. They monitor networks, identify potential issues, and take preventive measures to avoid downtime and disruptions. MSPs also provide regular software updates, security patches, and system maintenance, ensuring that SMBs’ IT remains secure and up-to-date. This proactive approach helps SMBs minimize the risk of costly IT failures and ensures smooth business operations.
Enhanced Data Security:
Data breaches and cyberattacks pose a significant threat to SMBs. MSPs play a vital role in safeguarding SMBs’ sensitive data and protecting them from potential security breaches. They implement robust cybersecurity measures, such as firewalls, antivirus software, and encryption, to ensure data confidentiality and integrity. MSPs can also conduct regular security audits and vulnerability assessments to identify and address any potential weaknesses in the IT infrastructure.
Scalability and Flexibility:
As SMBs grow, their IT needs evolve. MSPs offer scalable solutions that can adapt to changing business requirements. Whether it’s adding new users, expanding storage capacity, or integrating new software, MSPs can quickly and efficiently accommodate these changes. This scalability and flexibility allow SMBs to focus on their growth without worrying about the limitations of their IT infrastructure.
If your company could use the cost-effective solutions, access to expertise, proactive support, enhanced data security, and scalability that come from using a MSP, then contact us for assistance.
2FA dashboard displaying account protection compliance metrics and phishing defenses.
Businesses are face an increasing number of cyber threats. To protect sensitive data and prevent hackers from gaining access, implementing stronger security measures is crucial. One such measure is 2-factor authentication (2FA). Let’s look at the importance and security benefits of 2FA for businesses.
Enhanced Account Security:
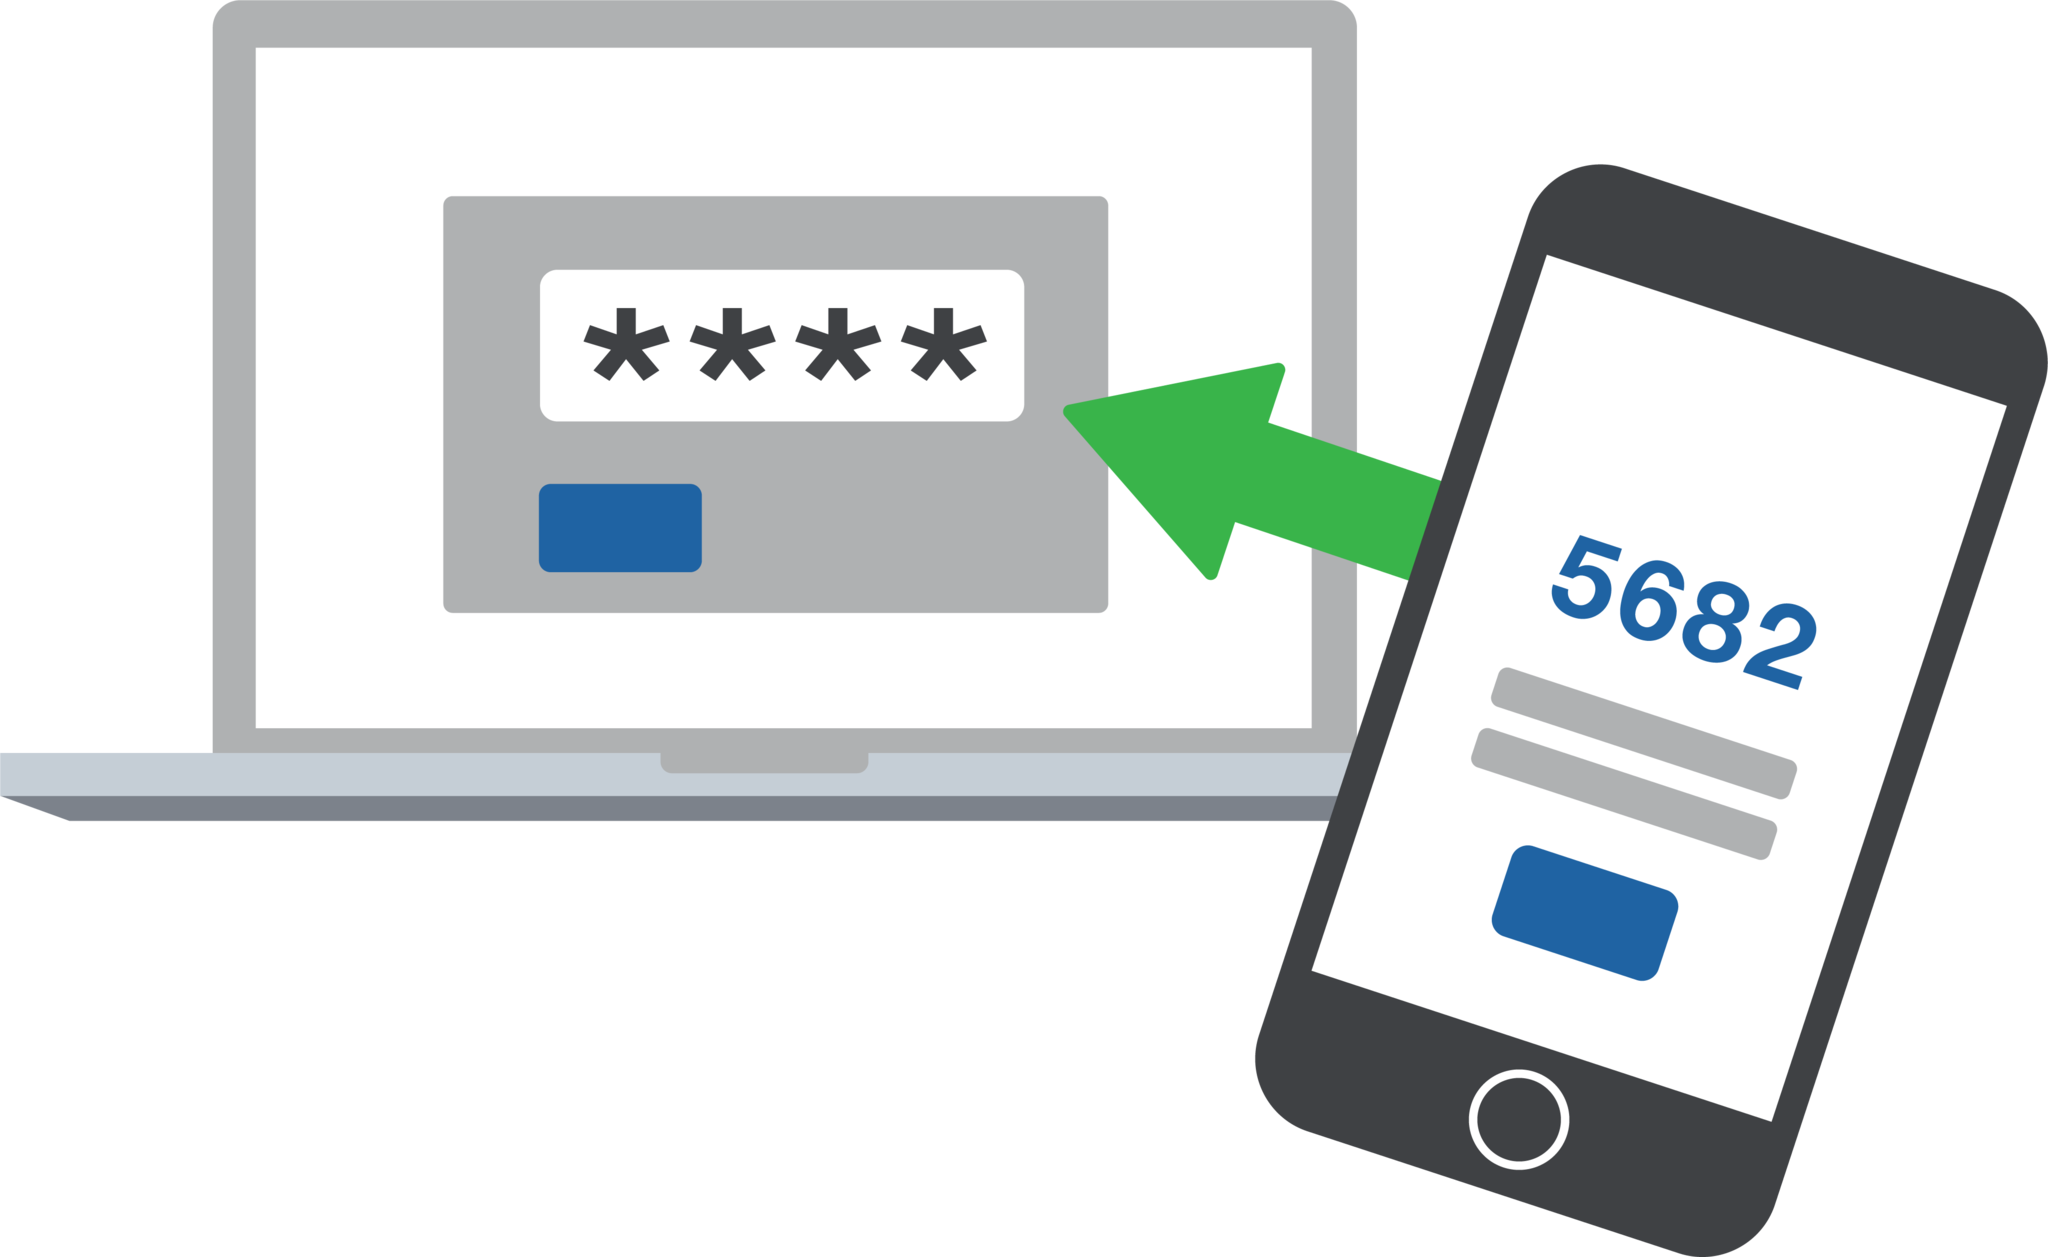
2FA adds an extra layer of security to the traditional username and password login process. By requiring users to provide a second form of authentication, such as a unique code sent to their mobile device, it significantly reduces the risk of hackers from gaining access. Even if a hacker manages to obtain a user’s password, they would still need the second factor to gain access.
Mitigation of Password-related Risks:
Passwords are often the weakest link in security systems. Many users tend to reuse passwords across multiple accounts or choose weak and easily guessable ones or re-use the same password while incrementally changing a digit or two. With 2FA, even if a password is compromised, the additional authentication factor acts as a safeguard, making it significantly harder for attackers to gain access.
Protection Against Phishing Attacks:
Phishing attacks, where attackers trick users into revealing their login credentials, are a common threat to businesses. 2FA provides an additional layer of defense against such attacks. Even if a user unknowingly falls victim to a phishing attempt and enters their credentials on a fake website, the second authentication factor would prevent the attacker from accessing the account.
Compliance with Industry Regulations:
Many industries, such as finance, healthcare, government contractors, and e-commerce, are subject to strict data protection regulations. Implementing 2FA helps businesses meet compliance requirements and avoid potential penalties. It demonstrates a commitment to safeguarding sensitive customer information and builds trust with clients.
Cost-Effective Security Measure:
Implementing 2FA does not require significant financial investment. Many 2FA solutions are readily available and can be easily integrated into existing systems. Considering the potential financial and brand reputation damage caused by a security breach, the cost of implementing 2FA is minimal compared to the benefits it provides.
In an era where cyber threats are constantly evolving, businesses must prioritize security measures to protect their valuable data. 2-factor authentication offers a simple yet effective way to do so.
If your company is interested in implementing 2FA across the entire organization, then contact us for assistance.
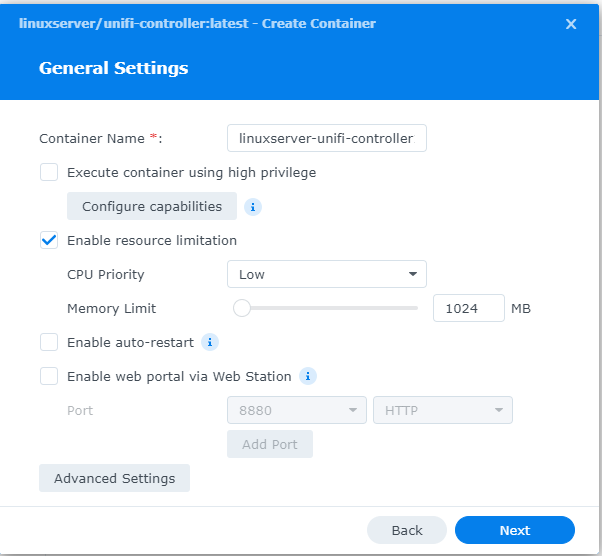
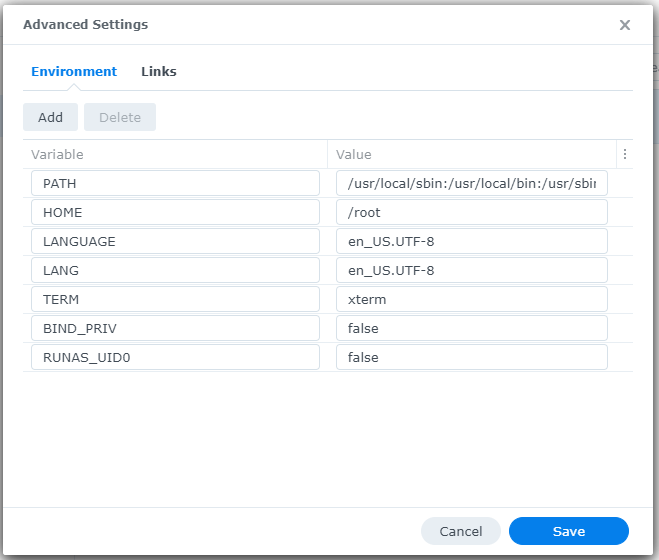
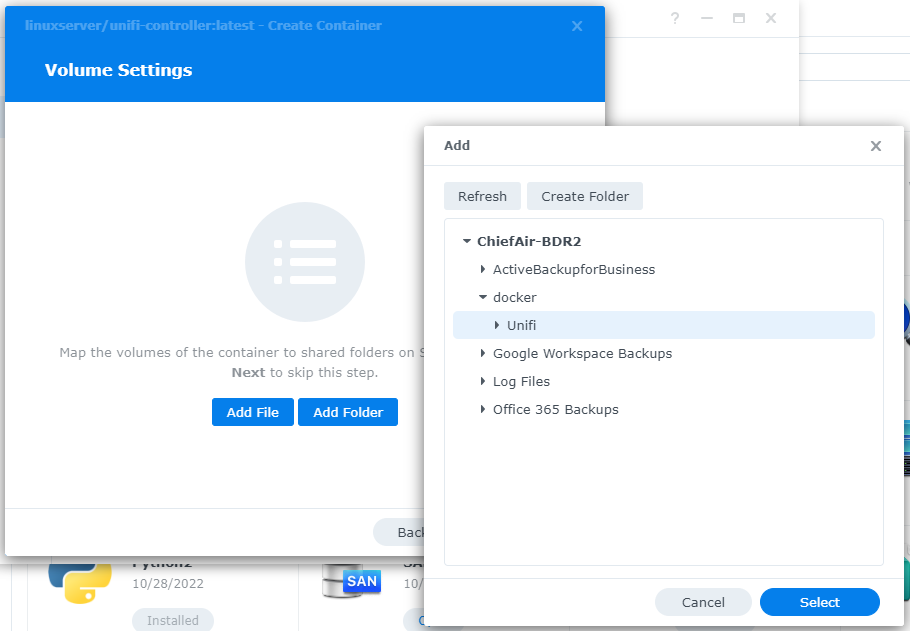
This is the third in a series that documents the Tier 3 / Co-Managed IT work we did to setup a wireless test bed for a Linux based scientific device. The testing environment included two different wireless network hardware types (Ubiquiti and Cisco). There was also a Synology device used for various purposes including hosting the Ubiquiti controller inside a Kubernetes container, providing certificate services, providing LDAP authentication, and providing RADIUS authentication. Each article will detail a separate piece of the project. This article shows the basic setup of Ubiquiti Wireless Controller as a Docker instance on the Synology.
Synology NAS DSM wizard for storage pool volume and initial configuration.
This is the second in a series that documents the Tier 3 / Co-Managed IT work we did to setup a wireless test bed for a Linux based scientific device. The testing environment included two different wireless network hardware types (Ubiquiti and Cisco). There was also a Synology device used for various purposes including hosting the Ubiquiti controller inside a Kubernetes container, providing certificate services, providing LDAP authentication, and providing RADIUS authentication. Each article will detail a separate piece of the project. This article shows the basic setup of Cisco Wireless Controller.
Setup of Synology NAS
Physically install hard drives into bays
Plug into network
Plug into power
Find IP address by pinging ‘Diskstation’ on network
Start web browser and connect to IP address
Run Setup Wizard
Install Synology OS on drives
Wait for reboot
Start setup
Give it a name
Create admin account / password
Install only important updates automatically
Sign-In to or Create Synology Account
Create quickconnect ID
Enable DSM backups
Create storage pool
If it states that no drives are available – check under HDD/SSD to see if there are required firmware updates. Install all available.
Use SHR-2 RAID
Choose all drives to be in the RAID (not m.2 cache drive)
Use Max Allocated size
Use Btrfs file system
Click Apply
Click OK to erase all drives
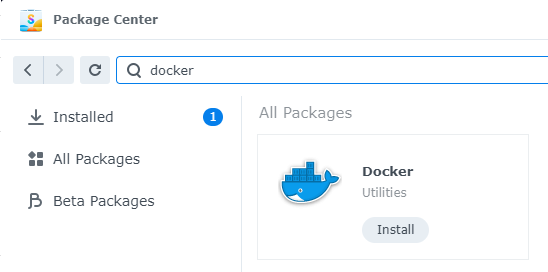
Open Package Center App
Accept terms of service
Update any Installed
Install LDAP Server and RADIUS Server
Close Package Manager
If your company has highly customized setup requirements that you need consulting for, then contact us for assistance.
Cisco wireless controller setup wizard with SSID and management VLAN configuration.
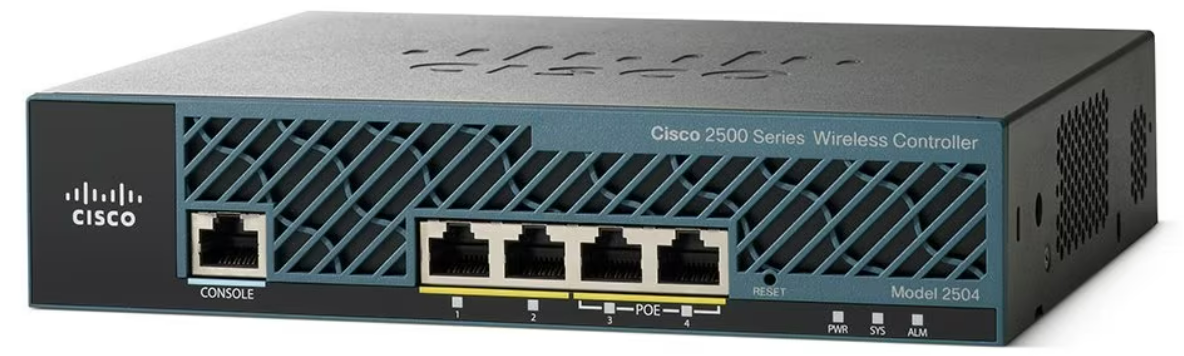
This is the first in a series that document the Tier 3 / Co-Managed IT work we did to setup a wireless test bed for a Linux based scientific device. The testing environment included two different wireless network hardware types (Ubiquiti and Cisco). There was also a Synology device used for various purposes including hosting the Ubiquiti controller inside a Kubernetes container, providing certificate services, providing LDAP authentication, and providing RADIUS authentication. Each article will detail a separate piece of the project. This article shows the basic setup of Cisco Wireless Controller.
Setup of Cisco Wireless Controller
Plug -in ethernet of Computer to port 2 on controller
Boot controller and wait for SYS light to go solid
Open web browser to http://192.168.1.1
Create admin username
Create password
Fill in the needed information:
System nameManagement IP Subnet MaskDefault Gateway
Click Next
Fill in temporary information for wireless
Network BSSIDCreate PassphraseEnter local DHCP server address
Click Next
Click Apply and wait for reboot
Click on Commands tab
Click on Set Time on the left-hand menu
Change needed values
Click Set Date and Time
Click Save Configuration at the top
If your company has highly customized setup requirements that you need consulting for, then contact us for assistance.
Today we tell the story of a medical office’s journey to the cloud. This particular client was facing their server operating system reaching end of support (a HIPAA violation) in the near future. They had begun by looking at their electronic medical records software company’s online offering, which didn’t have all the functionality of their on-premises software and was very expensive (this is typical).
They next decided to look into moving their current on-premises software into the cloud and we were asked to help with the testing. We determined that it would be best to move the file portion of the server to SharePoint / OneDrive to increase their mobility and flexibility. We also determined that it would be best to move them away from on premises Active Directory into Azure Active Directory / Intune to allow authentication and security policies. Finally we began testing the on-premises software hosted on a server in Azure with a VPN connection to their office.
The SharePoint / OneDrive and Azure Active Directory portions went through with little issues. The server, however, was not as we had hoped. The Azure VPN connection was expensive due to it always being on and no way of turning it off outside of business hours. The performance of the SQL database that the on-premises software used was basically unusable. The other option would be to create virtual desktops on Azure for this purpose but the cost and functionality was not what the customer was hoping for.
This has lead them back to searching for an online EMR software that will meet all their requirements. This will be tough because most companies are good at some things, but not all things and compromises usually have to be made. Our hope is that this story is a lesson to other companies. The cloud may sound like the newest and best way to work, but the costs and functionality are often worse than expected.
If your company is going to use full disk encryption or has compliance requirements that you need consulting for, then contact us for assistance.
Every modern business has one thing in common – the internet.
Businesses are using computers, smart phones, tablets, etc. to connect to the internet for research, shopping, advertising, or any number of things. With a connection to the internet comes the need for routers, switches, wireless, and other network hardware to distribute internet connectivity across the company. There are malicious people on the internet that are setting traps and trying to break into companies which necessitate the use of tools like antivirus, internet filtering, spam filtering, and other protective measures. There are also people who work from their homes and need to have a way of tunneling safely into the network to use the resources there.
All of this has to be managed by someone in the company or you can contract with a managed IT service provider.
If your company needs help managing all the things connected to your internet, then contact us for assistance.
Had a local medial office want to move their current server into the cloud and because they are already an Office 365 customer, I chose to use Azure for their Virtual Machine. I helped them setup Azure to Araknis IPSec VPN to connect their headquarters to the hosted server. This tutorial will go into detail about the creation of this tunnel starting with the Microsoft Azure side first using Resource Manager. It will be using the following parameters:
VNet Name: TestNetwork
Address Space: 10.10.0.0/16
Subnets:
Primary: 10.10.10.0/24
GatewaySubnet: 10.10.0.0/24
Resource Group: TestResourceGroup
Location: West US
DNS Server: Azure Default
Gateway Name: TestVPNGateway
Public IP: TestVPNGatewayIP
VPN Type: Route-based
Connection Type: Site-to-site (IPsec)
Gateway Type: VPN
Local Network Gateway Name: TestSite
Local Subnet: 10.20.20.0/24
Connection Name: VPNtoTestSite
Configure an Azure VPN gateway
This part takes the longest, so it should be done first:
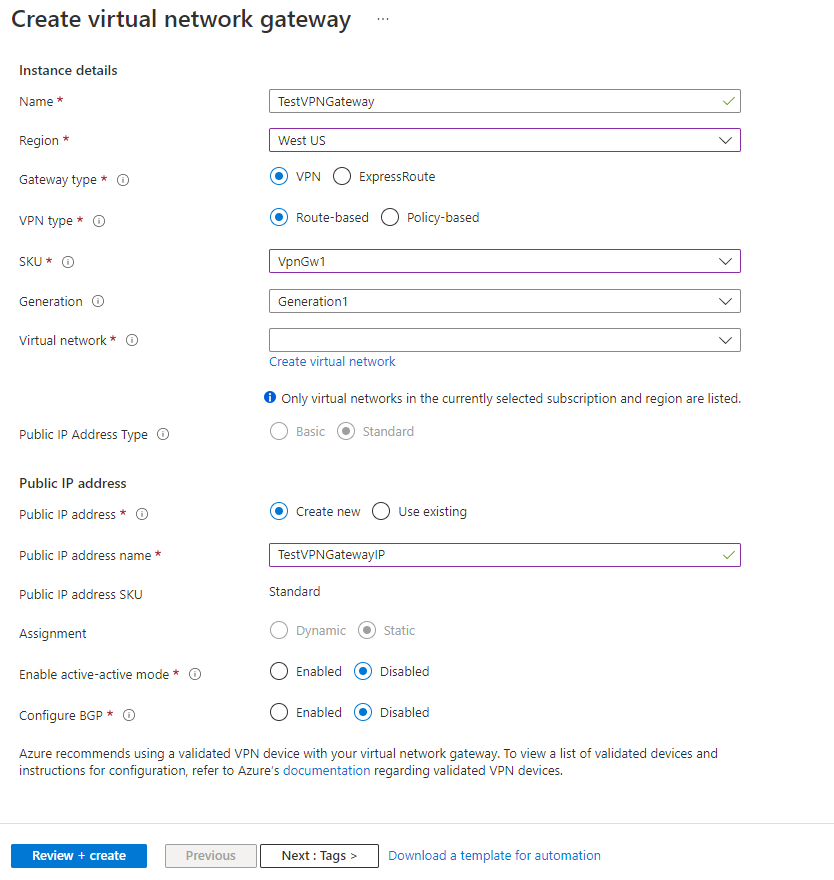
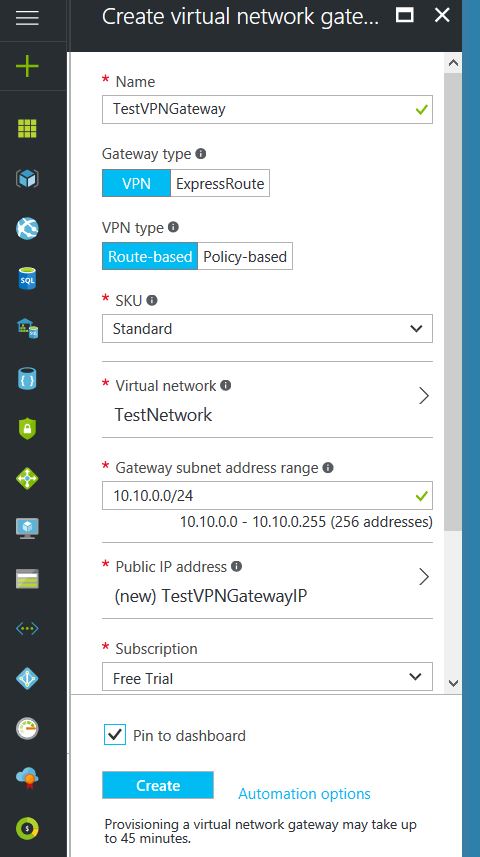
Click on the “+” icon at the top left hand side of the Resource Manager, then search for “Virtual Network Gateway” and click on the “Create” button.
Give the Virtual Network Gateway a name
Select matching Region to where Azure resources are located
Leave Gateway & VPN type the defaults
Choose a SKU <- These have changed since the article was created, so my “standard” now is WpnGw1 with Active / Active turned off (this is a good balance of performance and cost)
Choose or create a local network (not covered here, but must contain Gateway Subnet) that matches internal resources
Choose or create a Public IP Address
Leave the remaining values as their defaults and then click the “Create” button. (Please note the reminder that this takes 45 minutes to create!)
Configure an Azure Local Network Gateway
This is a reference to your on-premise network so that subnets can pass traffic:
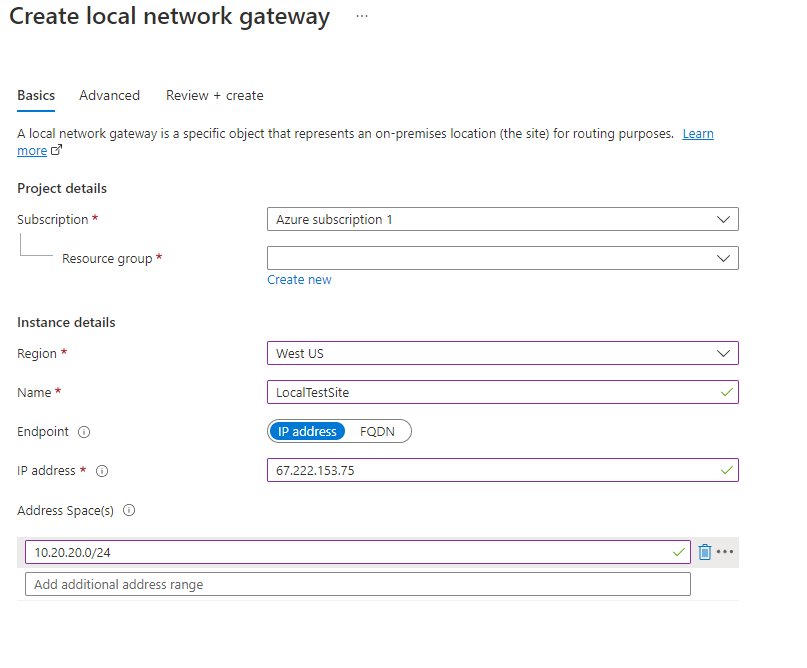
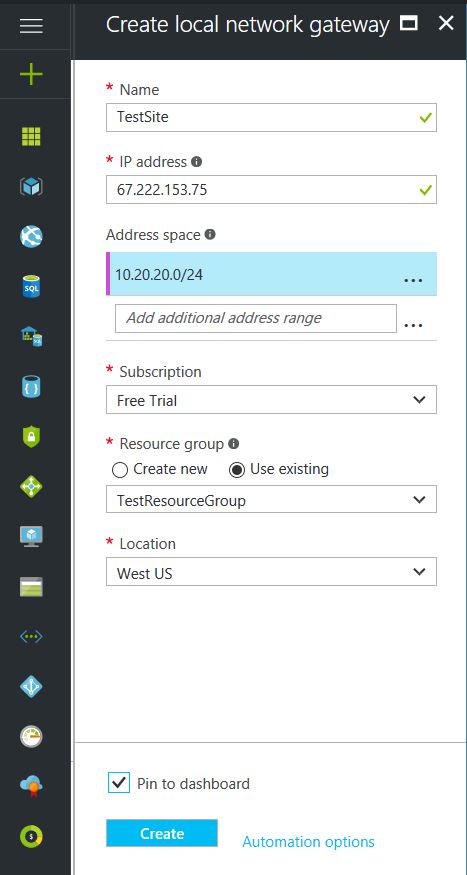
Click on the “+” icon at the top left hand side of the Resource Manager, then search for “Local Network Gateway” and click on the “Create” button.
Give the Local Network Gateway a name
Select matching Region to where Azure resources are located
Specify the external IP address of the local on-premise site
Specify the on-premise address space (subnet)
Leave the remaining values as their defaults and then click the “Create” button.
Configure an Azure VPN Connection
This will create the tunnel from Azure to the on-premise site:
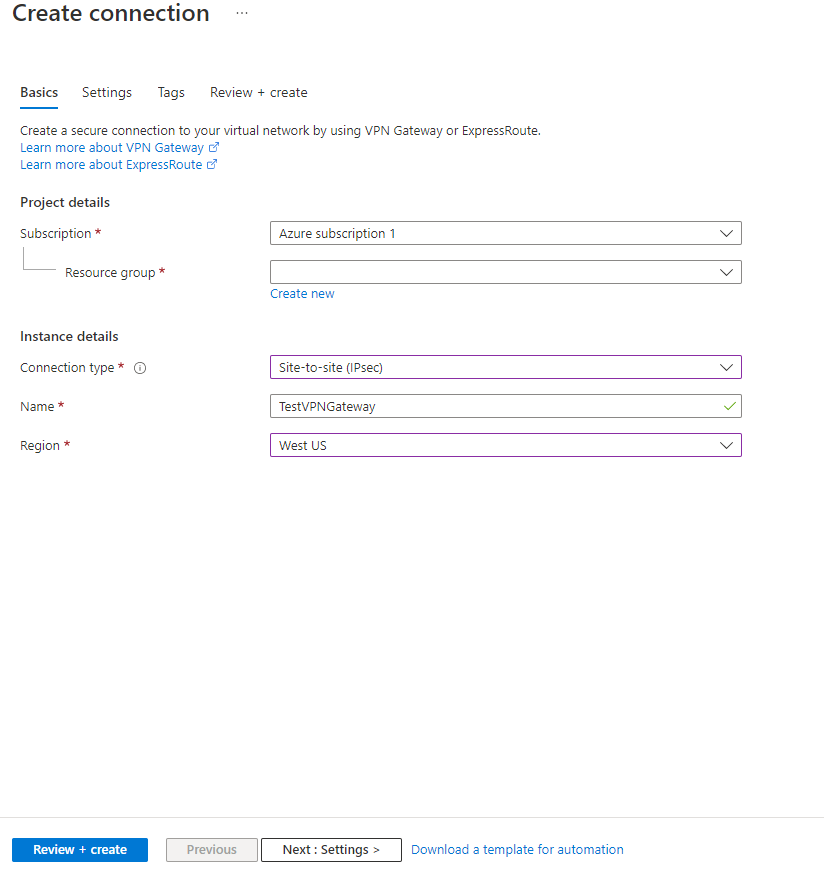
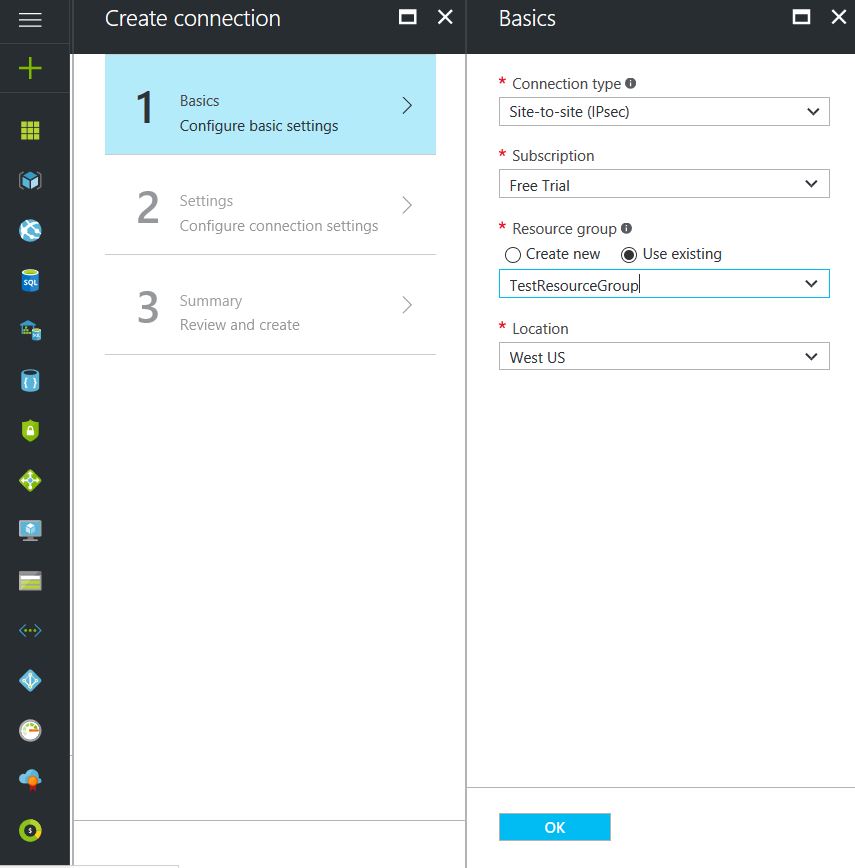
Click on the “+” icon at the top left hand side of the Resource Manager, then search for “Connection” and click on the “Create” button.
Choose “Site-to-site (IPSec)” as the connection type
Give the Connection a name
Select matching Region to where Azure resources are located
Leave the remaining values as their defaults and then click the “OK” button. On the summary screen click on the “OK” button to create the connection.
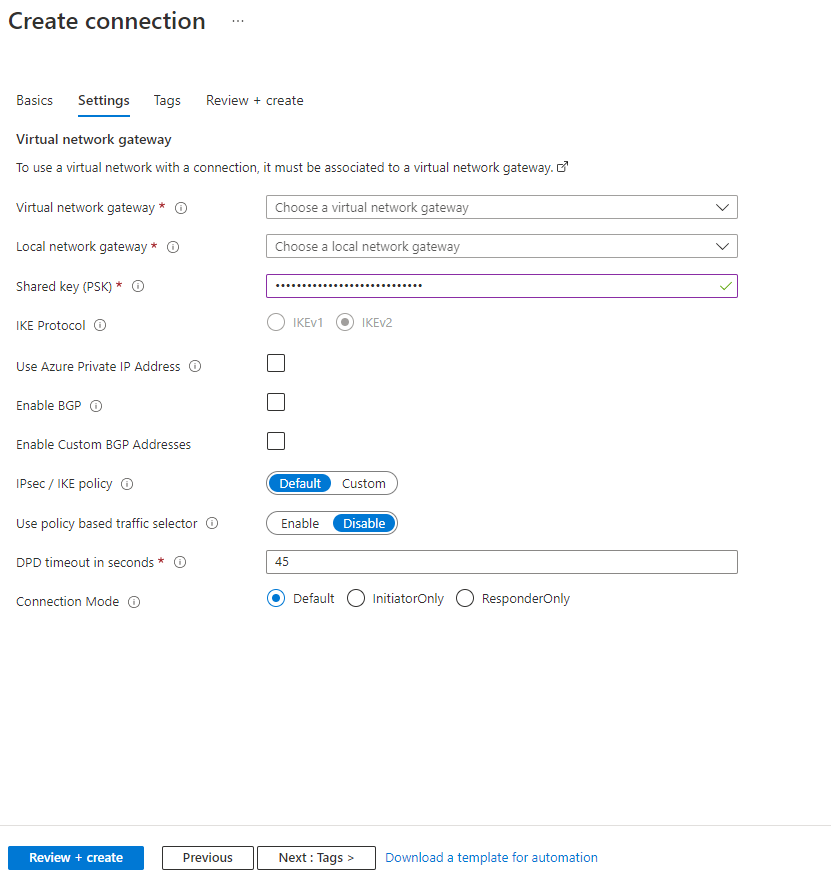
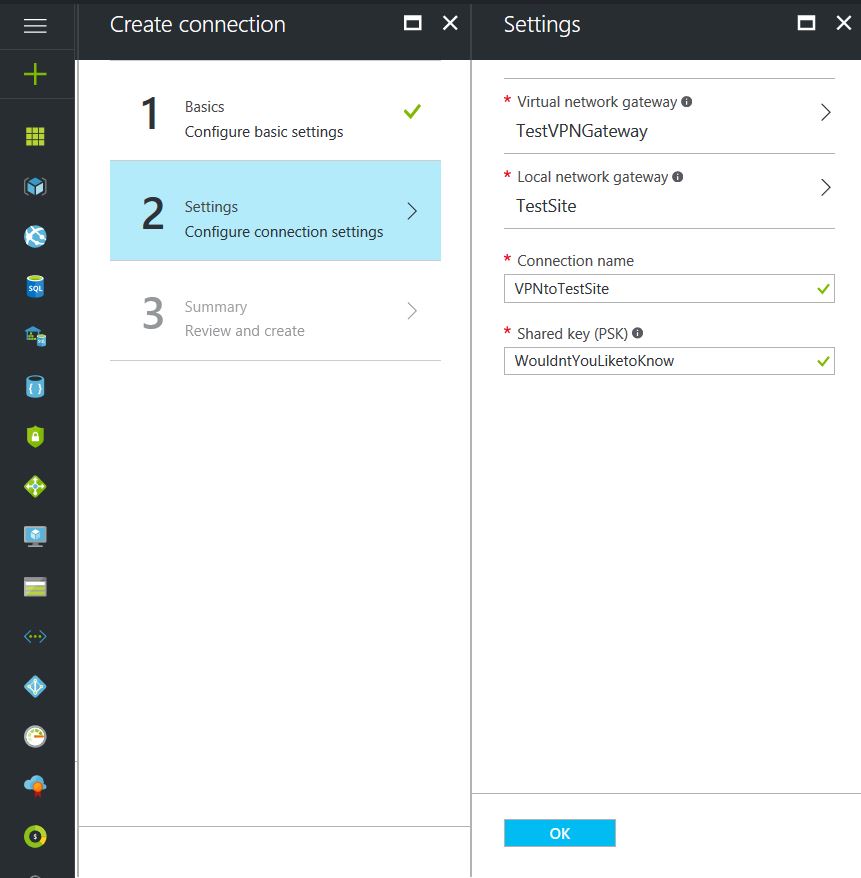
Choose the newly created Virtual Network Gateway
Choose the newly created Local Network Gateway
Specify a shared key
Leave the remaining values as their defaults and click the “Create” button.
This completes the setup of the Azure side of the VPN tunnel. Now to work on the Ubiquiti USG side.
Configuring an Araknis IPSec VPN Network
Connect to Araknis router (need at least a 310 for this to work)
Click on Advanced > VPN
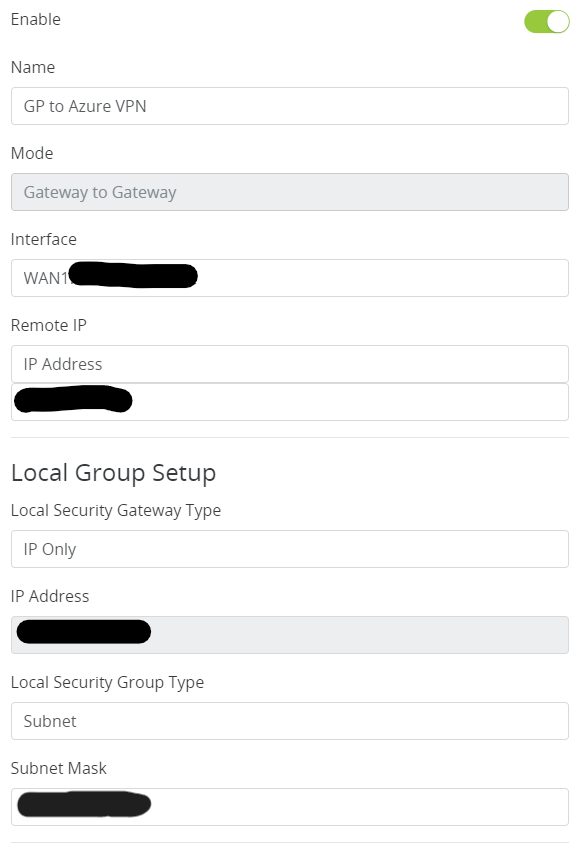
Scroll down to IPSec and click add new tunnel
Fill in the Remote IP address of the Azure VPN Gateway
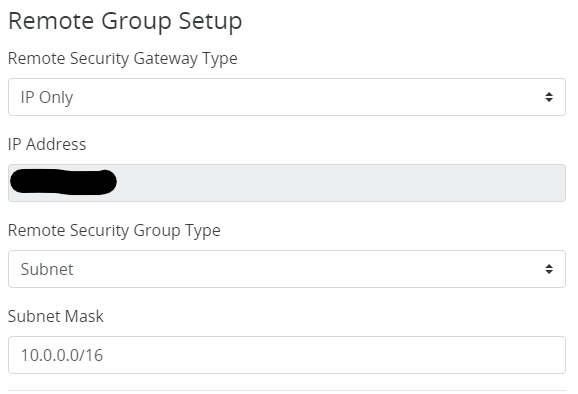
Fill in the Remote Subnet Mask
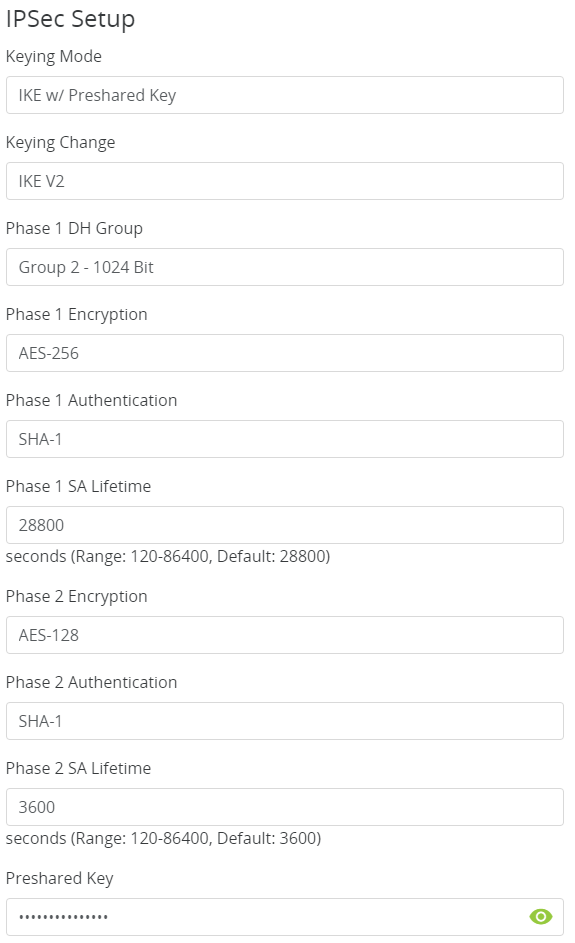
Make the following changes to IPSec Setup
That is all there is to it. If your company is currently using either Microsoft Azure or Araknis routers and would like a VPN created, then contact us for assistance.
Farmhouse Networking’s zero trust security model prevents lateral movement
This is the ninth in a series about the concept of Zero Trust, which means in the IT sense that you trust nothing and always verify everything surrounding and connected to your network. Today’s discussion will be on Network Security.
Network Security
Network Security is having the proper hardware and configuration of that hardware in place to protect the business network. This configuration includes segmenting network traffic to keep specific types of traffic, like guest devices, separate from traffic of business devices. It also includes keeping outsiders out of the network and detecting when they have breached security measures. Here are some questions to ask:
Do you have a business class router / firewall?
Do you have business class switches and access points that support segmentation?
Is your network configured to segment business traffic from guest traffic?
Are devices like VoIP phones and network cameras on their own network?
Is geo-location blocking turned on for non-essential countries?
Is network traffic being analyzed for suspicious activity?
Do you filter internet traffic?
Can your network detect and respond to a breach?
If your company is wanting to lock down network security, then contact us for assistance.
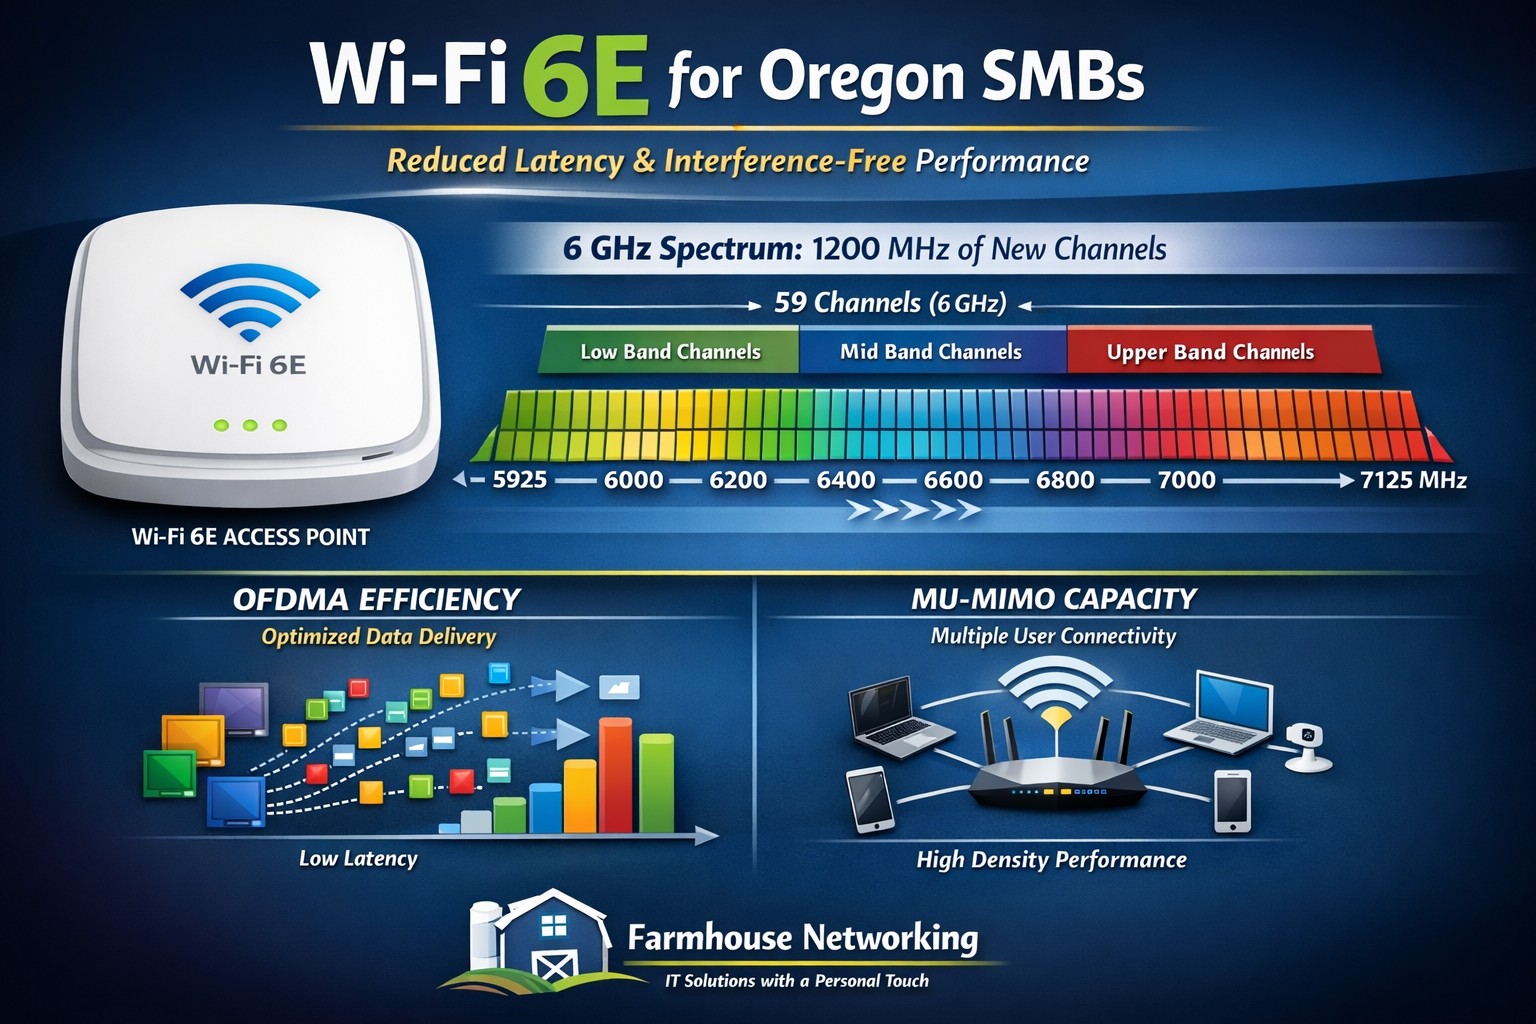
Farmhouse Networking installs Wi-Fi 6E eliminating 2.4/5 GHz congestion for Grants Pass businesses using clean 6 GHz spectrum.
Wi-Fi technology is ingrained into our everyday lives WE COLLECTIVELY STREAM more movies and TV shows, play more online games, and make more video calls than ever before, and all this activity puts a serious strain on our Wi-Fi networks. Wi-Fi 6e has various features to improve the efficiency and data of your wireless network and reduce latency. the latest Wi-Fi 6e standards offers a range of benefits, including faster and more reliable access. So, what is Wi-Fi 6e and what are some of the benefits?
Wi-Fi 6e explained
Existing technologies operate on two frequencies 2.4 GHz and 5GHz which have become more congested over time; Wi-Fi 6e adds access to a third frequency, 6GHz. now wireless devices can also use the 6GHz band. And the 6GHz band opens up the opportunity for higher transfer speeds. On top of that, currently there are about four 160 MHz-wide channels with normal Wi-Fi this 6GHz band brings with it seven 160 MHz-wide channels, More available channels mean more available spectrum for Wi-Fi service “and less overlap between networks in crowded areas like apartment complexes or offices,”. with less overlap and congestion you are able to connect more devices with the same efficiency expectation. Additionally there have been security improvements with Wi-Fi 6E that puts the burden on the router, rather than you, to secure connections between your devices. WPA3 is mandatory for all Wi-Fi 6 certified devices, which provides the latest security and authentication protocols.
Summary of Benefits
Faster, more reliable connection
Transmits data faster with less interference.
You don’t have to compete with traffic from other devices or networks.
Security improvements making it more secure and harder to hack
Accommodates more connected devices
If your company is looking to upgrade the wireless coverage in your office, whole building, or entire business complex, then contact usto evaluate your WiFi needs.
And God will generously provide all you need. Then you will always have everything you need and plenty left over to share with others. As the Scriptures say, “They share freely and give generously to the poor. Their good deeds will be remembered forever.” For God is the one who provides seed for the farmer and then bread to eat. In the same way, he will provide and increase your resources and then produce a great harvest of generosity in you. - 2 Corinthians 9:8-10
We use cookies to ensure that we give you the best experience on our website. If you continue to use this site we will assume that you are happy with it.