Co-managed IT dashboard with MSP monitoring supplementing internal team.
Managing IT can be a daunting task, especially for businesses that lack dedicated IT personnel or the expertise to handle today’s complex technology. In recent years, more and more organizations have recognized the benefits of outsourcing their IT management to Managed Service Providers (MSPs).
What is an MSP?
A Managed Service Provider, or MSP, is a company that offers a range of IT services to businesses. These services can include network monitoring, infrastructure management, data backup, cybersecurity, and more. By partnering with an MSP, businesses can offload their IT responsibilities to professionals with deep expertise and industry-best practices.
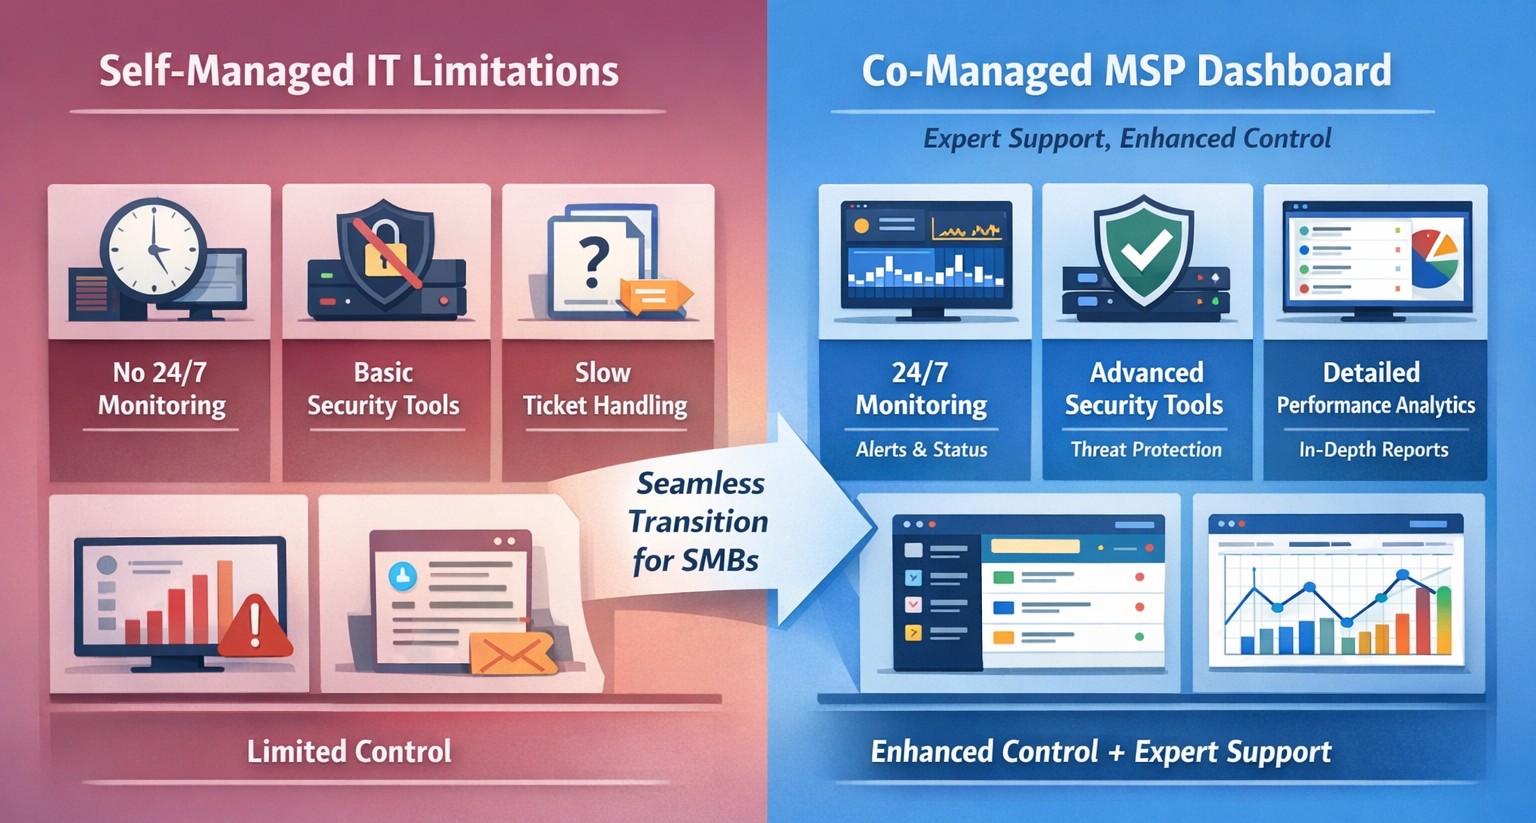
The Challenges of Self-Managed IT
Self-managing your IT can be a significant challenge. Here are some of the common pain points that organizations face:
Lack of Expertise: IT is a complex and ever-evolving field. Keeping up with the latest technologies, security threats, and best practices can be overwhelming, especially for businesses without dedicated IT staff.
Resource Constraints: Managing IT requires time, manpower, and financial resources. Small and medium-sized businesses often struggle to allocate these resources effectively, leading to inefficiencies, downtime, and security vulnerabilities.
Limited Scalability: Growing businesses often find it difficult to scale their IT infrastructure to meet increased demand. Self-managing your IT environment may require significant investments in hardware, software, and additional staff, which can strain budgets and hinder growth.
Cybersecurity Risks: Data breaches and cyber-attacks are on the rise. Without proper security measures in place, businesses face significant financial and reputational risks. Implementing and maintaining robust cybersecurity protocols can be challenging for organizations without the necessary expertise.
The Benefits of MSP-Managed IT
Switching to an MSP-managed IT environment offers several benefits:
Expertise and Support: MSPs have a team of experienced professionals who specialize in different aspects of IT management. They stay up-to-date with the latest industry trends and best practices, providing businesses with access to a breadth of knowledge and expertise.
Proactive Monitoring and Maintenance: MSPs utilize advanced tools and technologies to monitor your IT infrastructure 24/7. They identify potential issues before they become critical, minimizing downtime and ensuring smooth operations.
Scalability and Flexibility: MSPs provide scalable solutions tailored to your business needs. Whether you’re experiencing rapid growth or need to downsize, an MSP can quickly adapt your IT infrastructure to meet changing requirements without additional investments or resources.
Enhanced Security: MSPs employ robust security measures to protect your systems, networks, and data from cyber threats. They implement industry-standard security practices, conduct regular security audits, and ensure compliance with data protection regulations.
Cost Savings: By outsourcing IT management to an MSP, businesses can reduce the overhead costs associated with maintaining an in-house IT department. MSPs work on a subscription-based model, allowing organizations to pay for the services they need, when they need them.
Strategic Planning: MSPs can act as your virtual chief information officer providing project planning services that keep IT spend spread across the years to make the IT budget easier to manage.
Consider making the switch to an MSP today and unlock the benefits of professional IT management, contact us to get started.
vCIO strategic services vs break-fix reactive IT model performance comparison.
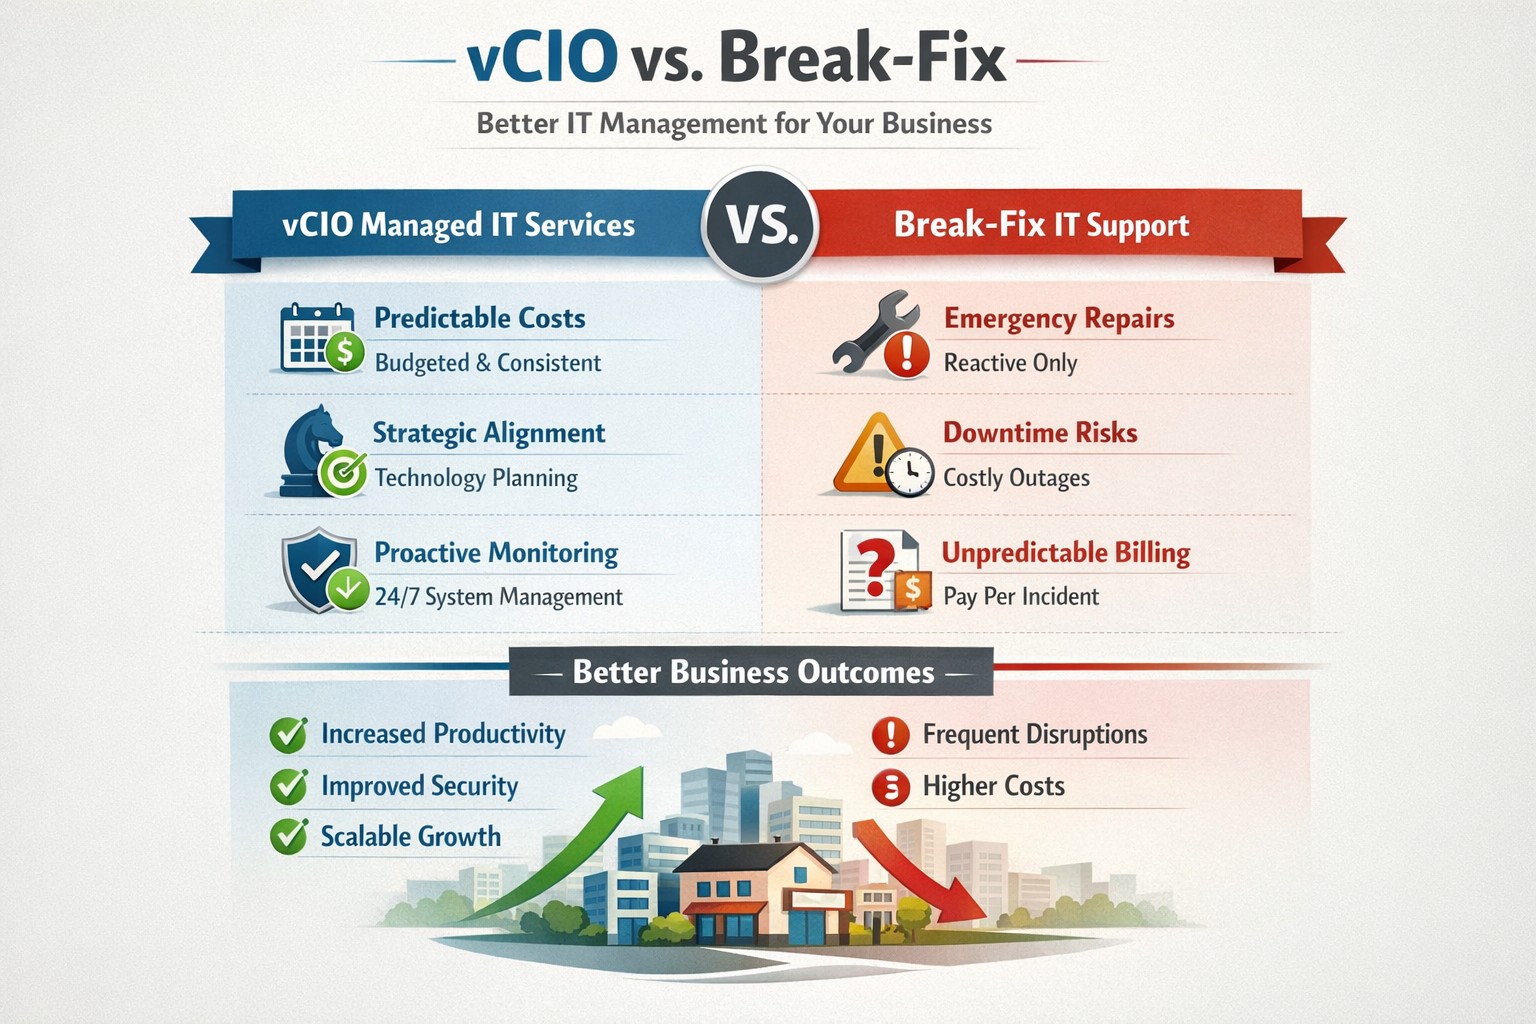
In the ever-evolving world of IT support, two strategic approaches have emerged to address the needs of businesses – vCIO (Virtual CIO) services and break-fix services. Each of these approaches has its own merits and drawbacks, making it crucial for businesses to carefully consider which option best aligns with their goals and IT requirements. So, let’s dive into the comparison between vCIO services and break-fix services and find out which one takes the crown!
vCIO Services: Unleashing the Power of Proactive IT Management
The vCIO model offers businesses a cost-effective and strategic solution to IT management, delivering benefits far beyond simple problem-solving. Here’s a breakdown of what vCIO services bring to the table:
Strategic Technology Planning: A vCIO provides a long-term roadmap for your IT infrastructure, aligning it with your business objectives. They assess your current technology landscape, analyze potential risks, and develop a comprehensive IT strategy to ensure your technology infrastructure drives success.
Proactive IT Monitoring and Management: By constantly monitoring your systems, a vCIO can detect and address issues before they turn into full-blown disasters. They implement proactive measures, such as 24/7 system monitoring, patch management, and security audits to keep your IT environment optimized and secure.
IT Budgeting and Procurement: A vCIO helps you streamline your IT budget by aligning your investment with your business goals. They provide insights into cost-effective technology solutions, negotiate contracts with vendors, and manage IT procurement to help you make informed decisions while optimizing your spending.
Technology Vendor Management: Collaborating with multiple technology vendors can be time-consuming and complex. A vCIO acts as a single point of contact for all your technology vendors, managing relationships and ensuring smooth coordination between various stakeholders.
Break-Fix Services: The Traditional Firefighter Approach
Break-fix services have long been the go-to approach for businesses seeking IT support on an as-needed basis. Here’s a closer look at what break-fix services bring to the table:
Issue-Specific Support: Break-fix services are designed to address specific IT issues as and when they arise. This approach involves fixing problems after they occur, reacting to incidents rather than proactively managing your systems.
Limited Scope of Support: Break-fix services typically focus solely on resolving immediate technical issues. While they can provide quick fixes, they do not offer strategic planning or ongoing support to help prevent future issues or optimize your IT infrastructure.
Variable Costs: Break-fix service costs can be unpredictable, as you are billed per incident or hourly basis. This makes budgeting and financial planning more challenging, especially if you encounter frequent or recurring IT issues.
Less Focus on Prevention: With break-fix services, the emphasis is on remedying existing problems, leaving behind the potential for other underlying issues to remain undetected, ultimately leading to more costly and time-consuming problems down the line.
The Verdict: vCIO Takes the Throne!
While break-fix services may have their place in certain scenarios, vCIO services offer a more comprehensive approach to IT management, aligning your technology with your business goals and providing ongoing support. The proactive nature, strategic planning, and cost optimization provided by vCIO services make it the winning solution for businesses looking to stay ahead of the ever-changing technology landscape. So, without a doubt, the crown firmly sits on the head of vCIO services!
If your company is tired of just calling your IT service company when things are broken, then contact us for vCIO services.
PwC study: MSP strategic users gain 43-point performance premium over cost-focused peers.
A report from PricewaterhouseCoopers based on a survey of over 2,000 business leaders and took it as confirmation of our recent blog post about Why SMBs Need Managed Service Providers (MSPs). Here are some takeaways from the article:
Takeaways:
“Companies that use MSPs for strategic advantage are 1.6 times and 2.4 times more likely to be faster to market as well as more innovative than those focused solely on cost savings, according to the report.”
“Organizations utilizing managed services at a mature level use them to respond more adroitly to changing conditions and potential threats.”
“Most business and IT leaders recognize the pace of innovation is occurring faster than their internal IT teams can absorb. There is always going to be some type of skills shortage. Those skill shortages are ones that MSPs are in the best position to fill.”
If your company is looking to outperform in the marketplace, then contact us to start a partnership.
MSP console managing SMB BYOD smartphones and laptops with centralized MDM and security policies.
Small and medium-sized businesses (SMBs) face numerous challenges when it comes to managing their IT. Limited resources (both human and money), lack of expertise, and the need to focus on core business operations often make it difficult for SMBs to understand and manage technology needs. This is where Managed Service Providers (MSPs) come in. In this blog article, we will explore the reasons why SMBs should consider partnering with MSPs to enhance their IT capabilities and drive business growth.
Cost-Effective IT Solutions:
One of the primary reasons why SMBs need MSPs is the cost-effectiveness they offer. By outsourcing their IT needs to MSPs, SMBs can avoid the high costs associated with hiring and training an in-house IT team. MSPs provide a range of services, including network monitoring, data backup and recovery, cybersecurity, and software updates, all at a predictable monthly cost. This allows SMBs to allocate their resources more efficiently and focus on their core business.
Access to Expertise and Advanced Technology:
MSPs are experts in providing IT services and have a team of highly skilled professionals with expertise in variety of technology. By partnering with MSPs, SMBs gain access to the depth of knowledge and experience from IT experts who can handle complex tasks and provide strategic guidance. Additionally, MSPs stay up-to-date with the latest technology trends and can recommend and implement solutions that can help SMBs stay competitive in the market and safe from hackers.
Proactive IT Support and Maintenance:
MSPs offer proactive IT support and maintenance, which is crucial for SMBs. They monitor networks, identify potential issues, and take preventive measures to avoid downtime and disruptions. MSPs also provide regular software updates, security patches, and system maintenance, ensuring that SMBs’ IT remains secure and up-to-date. This proactive approach helps SMBs minimize the risk of costly IT failures and ensures smooth business operations.
Enhanced Data Security:
Data breaches and cyberattacks pose a significant threat to SMBs. MSPs play a vital role in safeguarding SMBs’ sensitive data and protecting them from potential security breaches. They implement robust cybersecurity measures, such as firewalls, antivirus software, and encryption, to ensure data confidentiality and integrity. MSPs can also conduct regular security audits and vulnerability assessments to identify and address any potential weaknesses in the IT infrastructure.
Scalability and Flexibility:
As SMBs grow, their IT needs evolve. MSPs offer scalable solutions that can adapt to changing business requirements. Whether it’s adding new users, expanding storage capacity, or integrating new software, MSPs can quickly and efficiently accommodate these changes. This scalability and flexibility allow SMBs to focus on their growth without worrying about the limitations of their IT infrastructure.
If your company could use the cost-effective solutions, access to expertise, proactive support, enhanced data security, and scalability that come from using a MSP, then contact us for assistance.
Farmhouse Networking cloud automation eliminates manual IT tasks for Oregon SMBs using Power Automate and PowerShell workflows.
Worked with a client lately to help them Automate a workflow, but you may be wondering what does that even mean. Let me explain. We all have tasks in our workday that are repetitive and consume little bite size pieces of our time. Depending on the steps needed to accomplish these tasks, they can be “delegated” to a computer process via scripting aka we automate them. In the case of the client we helped, they received emails from an eFax service which included attachments. These attachments had to be manually saved into a shared folder for the rest of the staff to access as needed. This process probably took about 30 to 60 seconds each, but multiply this by the 30+ faxes they received each day you have 15 to 30 minutes of wasted time each day (65-130 hours per year). This does not take into account the time taken to stop doing one thing, accomplish this task, and restart the original thing they were doing.
Automate to Freedom
What if we could automate this little task and keep them employee free to do other more important things? We did. They customer uses Office 365 which includes a service called Power Automate. We scripted this tool to look at incoming messages, find ones from the eFax vendor, strip out the attachment, and save it to a SharePoint folder. This can then be shared with other employees and even synced via OneDrive to their Desktops for viewing, etc. That is just the tip of the iceberg as there is so much more that can be done with this technology.
If your company wasting little bite size pieces of time in repetitive taks, then contact us for assistance.
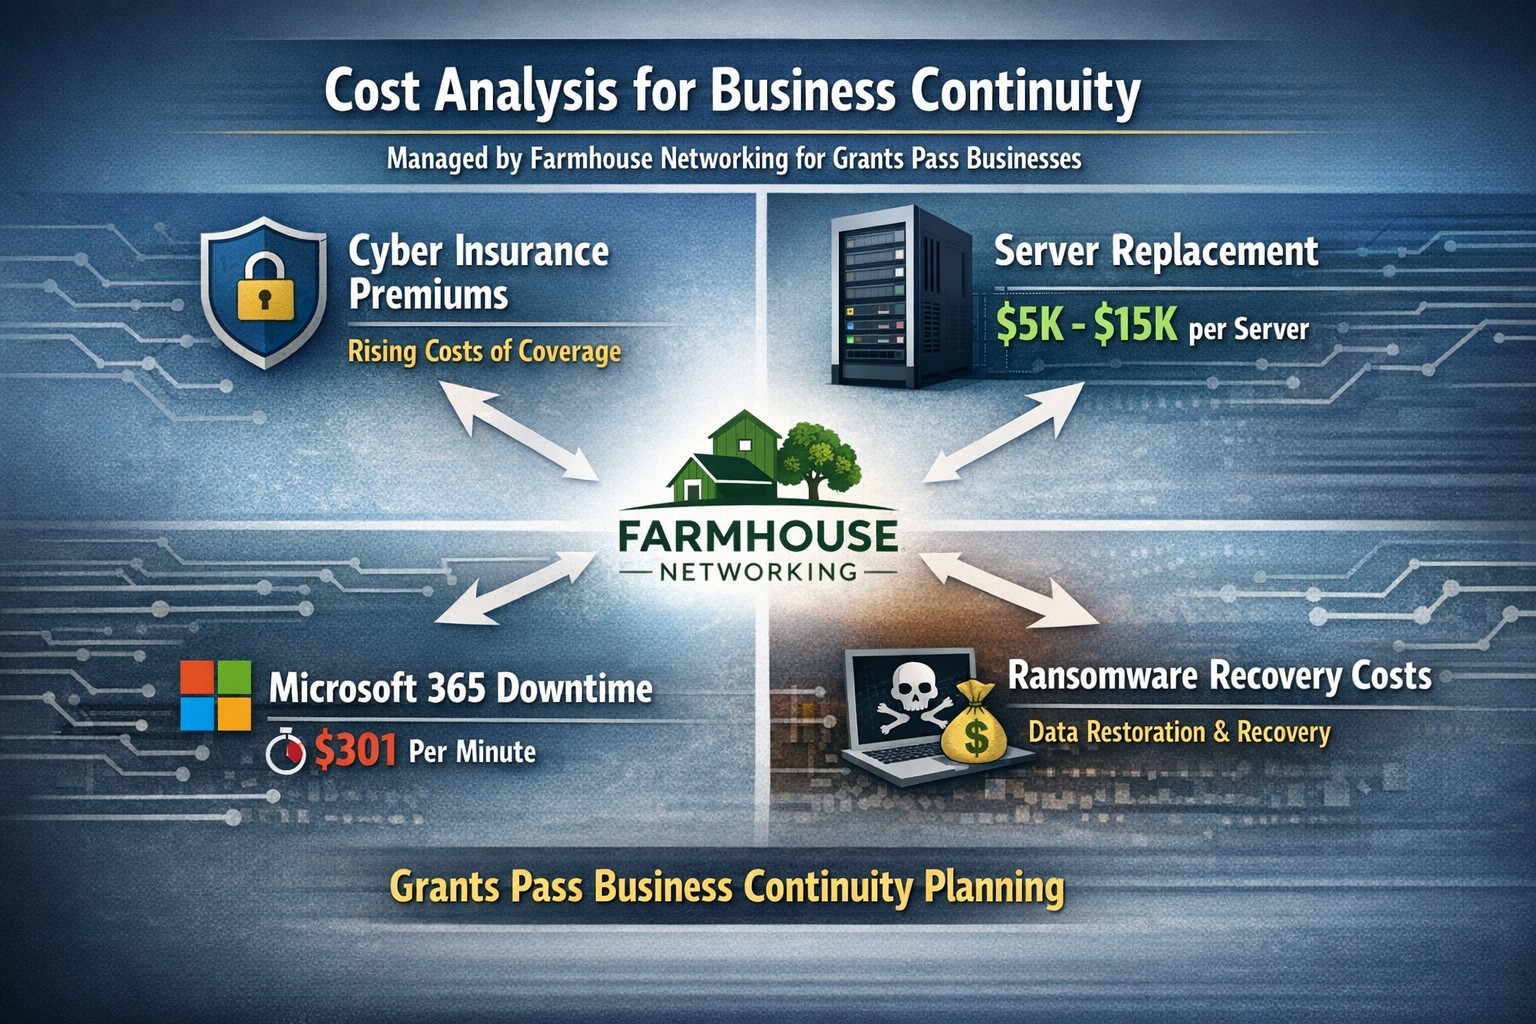
Farmhouse Networking calculates ransomware, server failure, and cyber insurance costs protecting Oregon SMB digital employees from downtime.
We were discussing the price customers paid for their monthly maintenance of computers and the comparison was brought up about insurance costs. As a business owner with employees, it is necessary these days to offer health insurance as part of their compensation package. If the company has vehicles that are used for business, then the government mandates that they be covered by minimum amounts of insurance. These costs are then built into the price the business owner then charges their clients for products or services.
Insurance Statistics:
According to Business.com, the average cost of health insurance for a single employee was $645 per month and $1,850 per month for a family.
According to NerdWallet.com, the average cost of car insurance was $179 per vehicle per month.
Questions:
So what about the “digital” employees of the company, aka the computers and network equipment that make business possible. How much are business owners paying to “insure” these assets? What are businesses willing to pay to make sure that their computers and network don’t have a sick day? Does the cost of insuring them include preventative care? Who does the business call in case of an accident or breakdown in the middle of the day? Does the cost of insuring include on-site service or transport to a service center?
If your company wants to keep their digital employees healthy and insure them from accidents, then contact us for assistance.
As our business continues to grow our focus is on providing white labeled Tier 3 IT support services, RMM as a service, and co-managed IT services. This blog will be highlighting tips for using Powershell to get an Export List of AD Users Last Login was more than 90 Days Ago.
Research
You need to find out what the Organizational Unit (OU) path that you are trying to get the count from. The following command will list all OUs in the domain.
Get-ADOrganizationalUnit -Filter 'Name -like "*"' | Format-Table Name, DistinguishedName -A
If you want the entire organization then you will need the top level information which looks like DC=[DomainName],DC=local
Variables
$SearchOU = This is the full DistinguishedName from the above output.
The script will take several seconds to run based on the number of users in the OU being searched. The output is saved to the local c:\support directory and you can modify this script to include the FTP upload based on our previous article – https://www.farmhousenetworking.com/rmm/automation/rmm-automation-export-log-files-to-ftp/ The script can also be easily modified to change the number of days since last login.
If your company is a MSP or wants to become one and automation just seems out of reach, then contact usto run your RMM for you.
As our business continues to grow our focus is on providing white labeled Tier 3 IT support services, RMM as a service, and co-managed IT services. This blog will be highlighting tips for using Powershell to get an Active Directory User Count.
Research
You need to find out what the Organizational Unit (OU) path that you are trying to get the count from. The following command will list all OUs in the domain.
Get-ADOrganizationalUnit -Filter 'Name -like "*"' | Format-Table Name, DistinguishedName -A
If you want the entire organization then you will need the top level information which looks like DC=[DomainName],DC=local
Variables
$SearchOU = This is the full DistinguishedName from the above output.
The script will take several seconds to run based on the number of users in the OU being searched. The output is an integer number. You can do the same sort of thing for an Active Directory Group Count or Active Directory Computer Count:
Farmhouse Networking resolves credential manager clearing after reboot by deleting Microsoft Vault folder and restarting services for Oregon RMM automation.
As our business continues to focus on providing white labeled Tier 3 IT support services, RMM as a service, and co-managed IT services this blog will be highlighting tips for using Powershell to fix Credential Manager empty after reboot. There has been several users at a bunch of clients recently that have lost access to a network share due to saved passwords and we found Credential Manager empty after reboot. It was easy enough to re-add their password to Credential Manager, but it was not sticking around. This sounds like a job for automation, so we created a script to clear the errant Credential Manger files and create a new entry for the user to connect to file shares.
Variables
$user = username to add to Credential Manager of network share connection
$pass = password to add to same
Script Snippet
### Remove file folder associated with Credential Manager
Remove-Item -Path %localappdata%\Microsoft\Vault -Recurse

### Install Credential Manager Powershell Module
Import-Module -Name CredentialManager -Force

### Convert password to Secure String and create credential
$password = ConvertTo-SecureString -string $pass -AsPlainText -Force
$Credential = new-object -typename System.Management.Automation.PSCredential -argumentlist $user, $password

# Save the credential object directly without unwrapping it:
New-StoredCredential -Credentials $Credential -Target 'Share Credentials' -Persist Enterprise -Comment "Share Credentials for $($Credential.UserName)" > $null
This script will need to be run in the context of the user who needs the credential created. Please use caution with this script as it will empty Credential Manager completely for the user context run with. Also it is advised to run a full CHKDSK /R on the root (C:\ usually) directory to make sure that nothing else is corrupt on the drive.
If your company is a MSP or wants to become one and automation just seems out of reach, then contact usto run your RMM for you.
As our business continues to focus on providing white labeled Tier 3 IT support services, RMM as a service, and co-managed IT services this blog will be highlighting tips for using Powershell to create Office 365 User and add them to groups. We have several clients with high employee turn-over which makes it necessary to often create Office 365 user. We will detail how to find all the needed data to create the proper script for each client (yes it will take a different script for each client due to different group names for each client).
Research
You need to get two pieces of information – the license type used by the organization to create users and the names of the groups to add users to
To find out the license types used use this commands:
Connect-MsolService
Get-MsolAccountSku
To find out all the groups in the organization use this commands:
Connect-ExchangeOnline
Get-UnifiedGroup | Format-Table Alias
Variables
$displayName = Full user name – usually First name & Last Name $userPrincipleName = Email address for user $adminuser = Email address for admin of Office 365 Tenant $adminpass = Password for admin of Office 365 Tenant $licenseType = Office 365 license type found in research above
There is also the need for variables for each group you will be adding users to (found in research above). For this example I will be using:
$CompanyShared = Company Shared Contacts $CompanyTimeOff = Company Time Off Calendar $BillingPayroll = Billing & Payroll Group Email
Script Snippet
###Use this command to be allowed to use DotNet assemblies
Add-Type -AssemblyName System.web

$displayName = "UserFirst UserLast"
$userPrincipleName = “User@Company.com”
$adminuser = "admin@Company.com"
$adminpass = '@dm1nP4ssw0rd'

$CompanyShared = "yes"
$CompanyTimeOff = "yes"
$BillingPayroll = "no"

###converts admin credentials to useable format for connections to Office 365
$adminpassword = ConvertTo-SecureString -string $adminpass -AsPlainText -Force
$admincred = new-object -typename System.Management.Automation.PSCredential -argumentlist $adminuser, $adminpassword

Connect-AzureAD -Credential $admincred
Connect-MsolService -Credential $admincred

$mailNickname = $userPrincipleName.Split("@")[0]

###To find User License Types use Get-MsolAccountSku
$licenseType = "companytenantID:SPB"

###Generates a random password length
$minPassLength = 8 ## characters
$maxPassLength = 15 ## characters
$passlength = Get-Random -Minimum $minPassLength -Maximum $maxPassLength

###Generates a random number of non-alpha characters in the password
$minNonAlphaChars = 1 ## characters
$maxNonAlphaChars = 5 ## characters
$nonAlphaChars = Get-Random -Minimum $minNonAlphaChars -Maximum $maxNonAlphaChars

###Creates the password, makes it useable by Azure, sets it up to not require password change, and creates account
$password = [System.Web.Security.Membership]::GeneratePassword($passlength, $nonAlphaChars)
$PasswordProfile = New-Object -TypeName Microsoft.Open.AzureAD.Model.PasswordProfile
$PasswordProfile.Password = "$password"
$PasswordProfile.ForceChangePasswordNextLogin = $false
Write-Host "Password is set to $password for $displayName"
$user = New-AzureADUSer -DisplayName $displayName -PasswordProfile $PasswordProfile -UserPrincipalName $userPrincipleName -mailNickname $mailNickname -AccountEnabled $true

###Waits 5 minutes for the user creation process in Office 365
Start-Sleep -Seconds 300

###Sets additional parameters for account that are needed like location, license type, and sets password to never expire
Get-MsolUser -UserPrincipalName $userPrincipleName | Set-MsolUser -UsageLocation US
Get-MsolUser -UserPrincipalName $userPrincipleName | Set-MsolUserLicense -AddLicenses $licenseType
Get-MsolUser –UserPrincipalName $userPrincipleName | Set-MsolUser –PasswordNeverExpires $True

###Adds new user to groups
if ($CompanyShared -eq "yes")
{ Add-MailboxPermission -Identity companyshared@premieror.com -User $userPrincipleName -AccessRights FullAccess -InheritanceType All}

if ($CompanyTimeOff -eq "yes")
{ Add-MailboxPermission -Identity companytimeoff@premieror.com -User $userPrincipleName -AccessRights FullAccess -InheritanceType All}

if ($BillingPayroll -eq "yes")
{ Add-MailboxPermission -Identity billing_payroll@premieror.com -User $userPrincipleName -AccessRights FullAccess -InheritanceType All}
This script requires that the admin account you use to setup the user have multifactor authentication turned off (I know not secure), so use a really long complex password. The script creates a random password for the new user and write it to output. The script will take several minutes to run due to the waiting for the account to finish setup before adding additional parameters and adding them to groups.
If your company is a MSP or wants to become one and automation just seems out of reach, then contact usto run your RMM for you.
And God will generously provide all you need. Then you will always have everything you need and plenty left over to share with others. As the Scriptures say,
“They share freely and give generously to the poor. Their good deeds will be remembered forever.”
For God is the one who provides seed for the farmer and then bread to eat. In the same way, he will provide and increase your resources and then produce a great harvest of generosity in you. - 2 Corinthians 9:8-10
We use cookies to ensure that we give you the best experience on our website. If you continue to use this site we will assume that you are happy with it.